background image


www.universal-space.com 

Operation Manual 

IMPORTANT 

Summary of Contents for D-DAY

Page 1: ...www universal space com Operation Manual IMPORTANT...

Page 2: ...MPORTANT SAFETY INSTRUCTIONS 2 1 SPECIFICATIONS 4 2 CONTENTS OF THE ACCESSORY KIT 6 3 PART NAME 7 4 SET UP INSTALLATION 8 5 HOW TO PLAY 17 8 TROUBLE SHOOTINGS 18 9 MAINTENANCE INSPECTION 23 8 OVERALL...

Page 3: ...r future reference Use this product only as described in this manual Other uses not recommended may cause fire electric shock or personal injury Unplug the game from the outlet when not in use when mo...

Page 4: ...t sunlight or places subject to extremely hot or cold temperatures to ensure that it is used within the specified operating range Places where inflammable gas may be present or in the vicinity of high...

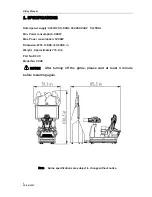
Page 5: ...Min Power consumption 200W Max Power consumption 1200W Dimension W51 1 D95 3 H100 6 in Weight Approximately 771 6 lb Part No D139 Model No V 006 NOTICE After turning off the game please wait at least...

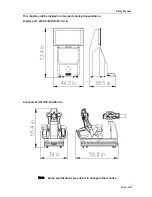
Page 6: ...nual 12 02 2017 5 This machine will be divided into two parts during transportation Display part W44 3 D38 5 H73 4 in Seat part W39 D59 8 H55 4 in Note Game specifications are subject to change withou...

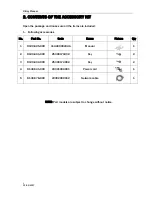
Page 7: ...included 1 Following accessories No Part No Code Name Picture Qty 1 D139 805 000 41440000234A Manual 1 2 D139 801 000 25300171002 Key 2 3 D139 802 000 25300172002 Key 2 4 D139 541 000 23301000001 Pow...

Page 8: ...D Day Manual 12 02 2017 7 3 PART NAME Key Components Coin assy HTC headset Marquee Assy Display Gun assy Base Station...

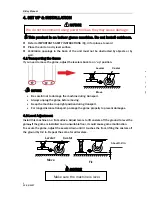
Page 9: ...ug the game before moving Keep the machine in upright position during transport For longer distance transport package the game properly to prevent damages 4 2 Level Adjustment Install this machine on...

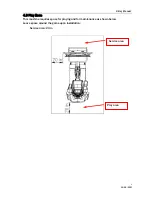
Page 10: ...Day Manual 12 02 2017 9 4 3 Play Zone This machine requires space for playing and for maintenance as shown below Leave space around the game upon installation Service area 20 in Service area Play are...

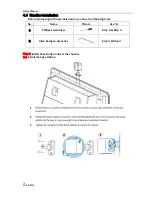
Page 11: ...ion Before processing with assembly assure you have the following tools Step 1 Install base station and set the channel 1 1 Install the base station No Name Picture Use for 1 Phillips screwdriver Step...

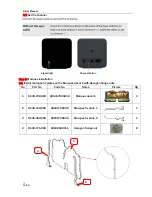
Page 12: ...D Day Manual 12 02 2017 11...

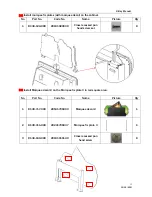
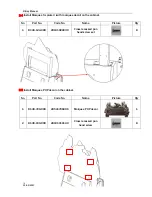
Page 13: ...the Marquee decal 1 with Hexagon flange nuts No Part No Code No Name Picture Qty 1 D139 702 000 20541706A002 Marquee decal 1 1 2 D139 310 000 20241706045 Marquee fix plate 1 1 3 D139 309 000 20241706...

Page 14: ...1 D139 124 000 20101020039 Cross recessed pan head screw set 8 2 3 Install Marquee decal 2 on the Marquee fix plate 3 in red square area No Part No Code No Name Picture Qty 1 D139 717 000 20541706003...

Page 15: ...net No Part No Code No Name Picture Qty 1 D139 124 000 20101020039 Cross recessed pan head screw set 8 2 5 Install Marquee POP decal on the cabinet No Part No Code No Name Picture Qty 1 D139 720 000 2...

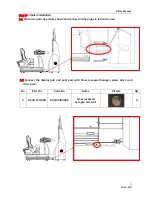
Page 16: ...parts as picture shown and connect all the plugs in red circle area 3 2 Connect the display part and seat part with Cross recessed hexagon screw kits in red circle area No Part No Code No Name Pictur...

Page 17: ...6 3 3 Install the Wiring cover with Cross recessed pan head screws in red rectangle area No Part No Code No Name Picture Qty 1 D139 308 000 20241706001 Wiring cover 1 2 D139 169 000 20101010140 Cross...

Page 18: ...D Day Manual 12 02 2017 17 5 HOW TO PLAY 5 1 Insert coin s to start the game 5 2 Put on the headset and fasten the seat belt 5 2 Press the trigger to shoot...

Page 19: ...t Utilize another source such as a PC to verity if the display is operational RAM is loose Remove and reinsert RAM Display blue screen PC power cord is loose Check PC power cord whether is loose VGA s...

Page 20: ...D Day Manual 12 02 2017 19...

Page 21: ...D Day Manual 12 02 2017 20...

Page 22: ...D Day Manual 12 02 2017 21...

Page 23: ...D Day Manual 12 02 2017 22 For base station...

Page 24: ...t and clean when necessary Note Parts and components require preventative maintenance to maintain proper operation 7 2 Handling Precautions When installing or inspecting the machine be very careful of...

Page 25: ...y 1 2 D139 005 000 29941706008 Display assy 1 3 D139 001 000 29941706A001 Frame assy 1 4 D139 308 000 20241706001 Wiring cover 1 5 D139 002 000 29941706005 Motion assy 1 6 D139 008 000 29941706011 Gun...

Page 26: ...210 000 20241706005 Wiring metal plate 1 5 D139 221 000 20241706007 Connected plate 2 1 6 D139 223 000 20241706008 Connected plate 3 1 7 D139 222 000 20641706018 Damping rod rubber 1 8 D139 220 000 2...

Page 27: ...073 Cabinet top bracket 1 4 D139 298 000 20241706063 Gasbag bracket 4 5 D139 297 000 20241706074 Cabinet bracket 1 D139 201 000 26000010000 Caster bracket 4 D139 202 00026000008000 Cabinet leveller 4...

Page 28: ...000 20241706082 Gun tube top flange 1 4 D139 233 00020641706013 Gun tube light fix tube 1 D139 234 00020641706020 Plastic tube 1 5 D139 272 00020641706004 L side gun shell 1 D139 270 00020641706005 R...

Page 29: ...ed plate 1 4 D139 259 000 20241706080 Slide block 1 D139 260 000 20241706040 Sliding channel 2 1 D139 261 000 20241706039 Sliding channel 1 1 5 D139 263 000 20241706033 Gun bracket 1 6 D139 264 000 20...

Page 30: ...000 20241706077 Axis of rotation middle 1 8 D139 253 00020241123014 BR bracket 1 9 D139 251 000 20241706035 Vertical rotary gear 1 1 10 D139 250 000 20241706079 Vertical rotary gear 2 1 11 D139 249 00...

Page 31: ...D139 275 00020241706066 Speaker cover 2 4 D139 278 00020241706068 Seat fixing metal 2 5 D139 281 00020241706067 Motor fix plate 1 6 D139 279 000 20241706041 Seat base 1 7 D139 277 000 20641706015 Seat...

Page 32: ...5004 Brass post 3 5 D139 293 000 20641706010 R light bracket 1 D139 537 00020841105004 Brass post 3 6 D139 291 000 20641706007 Back plastic 1 8 8 Display assy No Part No Code No Name Qty 1 D139 314 00...

Page 33: ...241706052Gun platform block 2 1 3 D139 290 00020241706055 Button bracket 1 4 D139 289 00020241706050 Gun platform cover 2 1 5 D139 288 00020241706049 Gun platform cover 1 1 6 D139 282 00020241706048 G...

Page 34: ...7 D139 725 000 20541706014 L side decal 1 D139 726 000 20541706015 R side decal 1 8 D139 722 000 20541706009 L green cover 1 D139 723 000 20541706010 R green cover 1 9 D139 719 000 20541706005 Back li...

Page 35: ...0000037 Voltage label L 1 6 D139 729 000 25600000036 Voltage label S 1 7 D139 703 00020541706A003 Stop button decal 2 8 D139 709 00020541706A009 Button instruction label 2 9 D139 710 000 20541706A010...

Page 36: ...2017 35 No Part No Code No Name Qty 1 D139 713 00020541706A014 220V nameplate 1 2 D139 714 00020541706A015 220V nameplate 1 3 D139 715 00020541706A016 110V nameplate 1 4 D139 716 000 20541706A017 Air...

Page 37: ...ve base station 1 2 D139 551 000 21201043001 43 display 1 D139 563 000 23307000015 DVI DVI video cable 1 3 D139 552 000 22801000001 Base speaker 1 4 D139 576 000 22002015009RX5050G light strip green3...

Page 38: ...2 D139 559 000 29791400001 POT connected plate 2 4 D139 542 000 22402010002 Red button 1 D139 543 00022402030002 Green button 1 D139 544 000 22402050001 Black button 1 No Part No Code No Name Qty 1 D1...

Page 39: ...1 D142 596 000 21107030088 Video card 1 D142 597 000 21107220009 Main board 1 D142 598 000 21107190021 CPU 1 D142 599 000 21107170013 Power supply 1 D142 541 000 23301000001 Power cord 1 D142 586 000...

Page 40: ...40611010008 Air compressor 1 3 D139 555 00022601000086Electric leakage SW 1 4 D139 568 000 21606000010 Socket 1 No Part No Code No Name Qty 1 D139 573 000220020130063528 LED light strip red2 2 2 D139...

Page 41: ...30 24 30 A0P 40P 1 2 3 4 5 6 7 8 9 10 11 12 13 14 15 16 P 90 50 95 96 V R 50K POT 1 2 3 4 5 6 J19 XH 1 2 3 4 5 6 CN1 VRPCB 20 M 90 M E 20 M 90 M E 20 M 90 M E V R 50K POT 1 2 3 4 5 6 J18 XH 1 2 3 4 5...

Page 42: ...WE ARE HERE TO ASSIST For parts and service Have Questions Contact us UNIS SERVICE CENTER Tel 972 241 4263 Fax 214 919 4918 Email service unisusasupportcenter com...

Reviews: