background image

XAS005

INSTRUCTION MANUAL

If you have any questions along the way, just give us a call

1-800-460-0956 or message to us. We’re ready to help!

R

USA-B0

Summary of Contents for XAS005

Page 1: ...XAS005 INSTRUCTION MANUAL If you have any questions along the way just give us a call 1 800 460 0956 or message to us We re ready to help R USA B0 ...

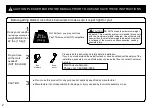
Page 2: ...er than the maximum weights indicated may result in collapse of the mount and its accessories causing possible injury Do not use this product for any purpose not explicitly specified by manufacturer Manufacturer is not responsible for damage or injury caused by incorrect assembly or use Please read this instruction carefully before installation If you do not understand these instructions or have d...

Page 3: ...Product dimensions FRONT VIEW 200mm 600mm 400mm 126mm 4 96in 241mm 9 48in 110mm 4 33in 45mm 1 77in 578mm 22 74in 395mm 15 55in 21mm 0 83in MIN 75mm Dimensions MAX 725mm MAX 525mm MAX 925mm MIN 275mm MIN 45mm ...

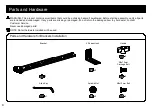
Page 4: ... parts are missing or damaged do not return the damaged item to your dealer contact Customer Service Never use damaged parts NOTE Not all hardware included will be used 4 Parts and Hardware for Brackets Installation x2 L Shape Hook Handle Bracket 01 Parts and Hardware M6x12mm Carriage Bolt M6x12mm Bolt x2 02 x2 03 x2 04 x2 05 x2 06 Allen Key x1 07 Antiskid Nut ...

Page 5: ... M8x25mm M6x25mm M8x45mm M6 8x10mm 2 5mm Washers x4 x4 x4 x4 x4 x4 x4 Hardware for Soundbar Installation Key Hole Bolt M4x16mm M5x16mm x2 x2 x2 Hardware for soundbar M6 a b c d f g e m h i x2 l x2 k M6 Butterfly Nut M6x16mm x2 j ...

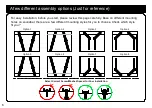
Page 6: ...different assembly options Just for reference Option 4 Option 5 Option 6 Option 7 Option 8 For easy installation before you start please review this page carefully Base on different mounting hotes on soundbar there are a few different mounting styles for you to choose Check which style fit you ...

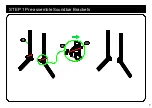
Page 7: ...STEP 1 Pre assemble Soundbar Brackets 03 01 04 7 ...

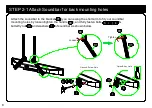
Page 8: ...u can swing the short arm to fit your soundbar mounting holes by loosen tighten the handle and fully fasten bolts butterfly nut and washers of soundbar as shown below STEP 2 1 Attach Soundbar for back mounting holes Tighten 03 Loosen 03 l h i j m l k 01 01 01 h i k j m l 8 03 ...

Page 9: ...es 9 06 05 07 l h i j 02 Fix the L Shape Hook on the bracket and place the sound bar on the L Shape Hook and completely fix the soundbar with bolts and washers Tips The position of L Shape Hook depends on the bottom hole of soundbar 02 01 02 h i j l ...

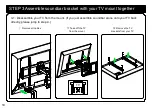
Page 10: ... the mount Ⅲ Remove the TV brackets from your TV TV 1 2 10 STEP 3 Assemble soundbar bracket with your TV mount together 3 1 Disassemble your TV from the mount If you just assemble soundbar alone onto your TV back directly please jump to step 4 ...

Page 11: ... e when using M8 screw c d Option 1 Option 2 Option 3 Tips You only need to assemble soundbar bracket with two lower VESA holes on your TV a b e g e a b c g c d f g d f 11 3 2 Attach the Assembled Soundbar Brackets Unit to Your TV ...

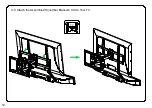
Page 12: ...TV 1 2 12 3 3 Attach the Assembled Soundbar Brackets Unit to Your TV ...

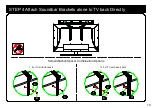
Page 13: ...13 STEP 4 Attach Soundbar Brackets alone to TV back Directly Screw Washer Spacer Combination Options Ⅰ For TV with flat back Ⅱ For TV with insert hole d b f c a e f e No ...

Reviews: