background image

VectorSave™ 10 

Manual for VectorSave™10 Mavic 


www.vectorsave.com - Designed and Made in Finland 

1.edition

Summary of Contents for 10 Mavic

Page 1: ...VectorSave 10 Manual for VectorSave 10 Mavic www vectorsave com Designed and Made in Finland 1 edition ...

Page 2: ...onsideration for mounting 8 Installing the harness 9 Complete installation on Mavic 11 4 12 Packing the parachute 12 General ideas about packing parachute 12 Links to youtube parachute packing and testing videos 12 Do not store the parachute packed in the tube 12 If tube cap is becoming loose over time 12 Picture guide for packing the parachute 13 5 20 VectorSave 10 launcher 20 Before first use 20...

Page 3: ...igger RadioSave 21 General about the RadioSave remote trigger 21 Charging the RadioSave remote 21 Using the RadioSave remote 21 7 22 FAQ 22 Frequenty Asked Questions 22 Limited Product Warranty 23 Liability Policy 24 ...

Page 4: ...red to level condition in gravity field If free fall is detected for over defined time parachute will be deployed Angle detection is also set so that the defined angle deviation needs to occur for over period of time before it is considered unusual and the deployment will occur It is also possible to disable one or both of automatic conditions VectorSave system equipped with internal Rx option can...

Page 5: ...kage you will receive 1 VectorSave 10 Rx launcher unit has a built in radio option 2 Parachute with shock cord and tube cap 3 Front and rear tubeholders 4 Mavic harness kit with two ropes and shackle 5 USB cable In the VectorSave 10 Mavic RadioSave package you will receive 1 VectorSave 10 Rx launcher unit has a built in radio option 2 RadioSave remote trigger 3 Parachute with shock cord and tube c...

Page 6: ...6 g Rx tube 49 g connector micro USB Parachute weight 25 g Shock cord harness tension strength 420 kg RadioSave range open air 2 km frequency EU 863 to 870 MHz frequency US 902 to 928 MHz frequency CN 779 to 787 MHz Operating temperature range lower limit 15 deg C higher limit 55 deg C ...

Page 7: ...h special glue pads that will safely hold then in place You need to degrease the area where mounts will be attached on your Mavic drone We use bräkleen by CRC but any degreasers like isopropanol will work fine There may be strong degrease agents that we have not tested that may harm the surface of your Mavic pls test with small area first if any doubt Remove protective cover from bracket stand and...

Page 8: ...ike to shoot to back or to front Then choose your preferred mounting style We think shooting direction to rear is better since in most scenarios Mavic is likely to have forward speed In that case rear launch will get help for chute opening by velocity of vehicle Allow the glue to set overnight for a permanent strong connection ...

Page 9: ...d it seems safe to avoid any contact with propellers when flying Also the center of gravity of Mavic is behind the hanging point so Mavic will land first on its back protecting camera unit as much as possible in case of emergency landing by deployed parachute Pull to longer harness rope thru the landing pods so that it does not block bottom camera ...

Page 10: ...The shorter rope runs as shown and turns back around the front arms Finally run the longer rope thru the loops of the shorter rope as shown in picture ...

Page 11: ...ord with stainless steel connector ring Extra length of shock cord which is attached to the parachute lines is coiled inside the tube behind the cap as instructed in packing the parachute section Mavic battery can be changed by lifting front part of the tube from clip No need to take away the whole setup Harness can be left on for transportation too Mavic will fold nicely with the harness in place...

Page 12: ...every time Links to youtube parachute packing and testing videos Packing the parachute https youtu be fK81aFi2APM Tilt angle test to deploy packed parachute https youtu be dgIi2JfjT64 Do not store the parachute packed in the tube If you store your VectorSave 10 system for longer time do not leave parachute packed in the tube In our testing parachutes that have been packed inside the tube for days ...

Page 13: ...find that this is possibly the best way to pack parachute in right shape so that it shoots out nicely every time If your package is too thick it and required a lot of power to push in you did not make it right Bad packing may jam parachute in the tube and cause deployment failure Please be careful here practice and do tilt test to get it right Make sure lines are untangled Clear them if necessary ...

Page 14: ...Opposite corner pairs are then laid out on the table and folded inside one after another ...

Page 15: ...Lines will be positioned to loop inside along centerline while shock cord is left outside ...

Page 16: ...Roll in the outer sides and then make a Z fold ...

Page 17: ...Again roll the sides in to make a package that will now take same shape as the space for it inside the tube ...

Page 18: ...Finally loop the shock cord and place it on the side of the roll before you slide it into the loaded tube Cord loop ensures that chute is not stopped by cord at shootout ...

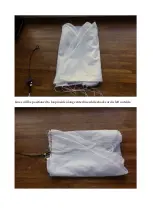
Page 19: ...Here you see how everything should look with the chute half way in and cap closed ...

Page 20: ...ne you can load the spring To do this you need a ph or pz screwdriver Holding the tube end in the palm of your hand point the end of screwdriver to center hole of the piston and press it down until you hear click and piston is locked to the down position You may now repeat the tilt test while blocking the open tube end by hand to create some resistance for piston Without resistance the piston may ...

Page 21: ...ect it with USB cable to indicate it is charging Using the RadioSave remote RadioSave remote has range of 2 km in open air Button is made so that it requires hard pressure to activate This is protecting you from mistakenly pressing the button Button functions are here 1 Turn on unit by pressing the button once 2 When light is on and you press the button your parachute will be deployed if your Vect...

Page 22: ...test firmware the battery last for 5 hours of operation for basic system and 2 hours of operation for system with built in radio Q Is the position of the cap where the small opening is important to the units operation Same question with the tube rotation should it always be with label as shown in your photos or A Cap positioning is meaningful only in sense that the cap should not open by mistake s...

Page 23: ...of crash damage abuse overloading incorrect component matching incorrect wiring reverse polarity or negligence by the user Return Merchandise Authorization RMA number will be issued for your request via e mail and must be placed on the return shipment label or clearly marked on the box for proper processing Please refer to manuals and product video instructables YouTube for proper use requirements...

Page 24: ...n contract warranty tort negligence strict liability or any other theory of liability even if VectorSave has been advised of the possibility of such damages Further in no event shall the liability of VectorSave exceed the individual price of the product on which liability is asserted As VectorSave has no control over use setup final assembly modification or misuse no liability shall be assumed nor...

Reviews: