background image

WT11EL                                                                                                                                    VELLEMAN 

1

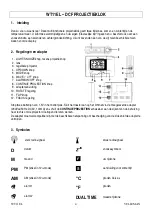
WT11EL – DCF PROJECTION CLOCK 


1. Introduction 

 
Thank you for buying the 

WT11EL

 ! This multifunctional projection clock displays two time zones, summer/winter 

time and the temperature. You can enter two alarm times and your own "local time" and there is a snooze function, a 
calendar and a backlight. You can also choose one of five display languages. 


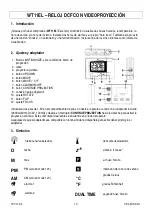
2.  Controls and Adapter 

 
  1.  LIGHT/SNOOZE button, also projection button 
 2. lens 
 3. adjustable projector 
 4. UP/DOWN key 
 5. MODE key 
  6.  WAVE / °C/°F button 
  7.  ALARM ON/OFF button 
 8. CONTINUE PROJECTION button 
 9. adapter socket 
10. ROTATE control 
11. FLIP button 
12. FOCUS control 
 
Insert two AA-batteries of 1.5V. Connect the device with the 
mains via the included adapter (230Vac/50Hz, DC3V, 
100mA) and slide the 

CONTINUE PROJECTION

 switch on 

the side of the housing to the right for continuous projection. 
Make sure the adapter is compatible with the available mains voltage to avoid damaging the clock and/or the adapter. 


3. Symbols 


M


PM 


AM °C


°F


DUAL TIME


strong radio signal

date 

your time zone 

PM (only in 12hr-mode) 

AM (only in 12hr-mode) 

weak radio signal 

alarm 1 

alarm 2 

snooze symbol 

month 

summer time indication 

degrees Celsius 

degrees Fahrenheit 

second time zone 

Summary of Contents for WT11EL

Page 1: ...ALARM ON OFF button 8 CONTINUE PROJECTION button 9 adapter socket 10 ROTATE control 11 FLIP button 12 FOCUS control Insert two AA batteries of 1 5V Connect the device with the mains via the included...

Page 2: ...al display mode c Setting the Clock Calendar Manually Hold the MODE button for three seconds until the digits for the hours start to flash in the normal display mode Enter the hours with the or button...

Page 3: ...ash Set the hours with or and confirm with MODE Hold for 3 seconds if you want to return to the normal display mode 8 Additional Time Zone You can keep track of the time in a different time zone by se...

Page 4: ...ALARM ON OFF knop 8 CONTINUE PROJECTION knop 9 adapteraansluiting 10 ROTATE regeling 11 FLIP knop 12 FOCUS regeling Stop twee batterijen van 1 5V in het batterijvak Sluit het toestel aan op het lichtn...

Page 5: ...lay mode c Manueel klok en kalender instellen Houd de MODE knop gedurende drie seconden ingedrukt tot de digits voor de uren beginnen te knipperen in de normale display mode Geef de uren in met de of...

Page 6: ...Houd MODE gedurende 3 seconden ingedrukt tot de digits voor de uren beginnen te knipperen Stel de uren in met of en bevestig met MODE Houd gedurende 3 seconden ingedrukt om terug te keren naar de norm...

Page 7: ...ALARM ON OFF 8 bouton CONTINUE PROJECTION 9 prise pour l adaptateur 10 r glage ROTATE 11 bouton FLIP 12 r glage FOCUS Ins rez deux piles de 1 5V dans le compartiment des piles Branchez l appareil au...

Page 8: ...affichage normal c Instaurer l horloge et le calendrier manuellement Maintenez le bouton MODE enfonc pendant 3 secondes jusqu ce que les digits des heures commencent clignoter dans le mode d affichage...

Page 9: ...jusqu ce que les digits des heures commencent clignoter Entrez les heures avec ou et confirmez avec MODE Enfoncez pendant 3 secondes pour retourner au mode d affichage normal 8 Fuseau horaire addition...

Page 10: ...ot n CONTINUE PROJECTION 9 conexi n para adaptador 10 ajuste ROTATE 11 bot n FLIP 12 ajuste FOCUS Introduzca dos pilas de 1 5V en el compartimiento de pilas Conecte el aparato a la red con el adaptado...

Page 11: ...calendario manualmente Mantenga apretado el bot n MODE durante 3 segundos hasta que los d gitos de las horas empiecen a parpadear en el modo de visualizaci n normal Introduzca las horas con el bot n o...

Page 12: ...Introduzca las horas con o y confirme con MODE Apriete durante 3 segundos para volver al modo de visualizaci n normal 8 Huso horario adicional El modo dual time permite poner el reloj en la hora seg...

Page 13: ...e 7 ALARM ON OFF Taste 8 CONTINUE PROJECTION Taste 9 Adapteranschluss 10 ROTATE Regler 11 FLIP Taste 12 FOCUS Regler Legen Sie zwei Batterien von 1 5V im Batteriefach ein Schlie en Sie das Ger t ber d...

Page 14: ...len f r die Stunden anfangen zu blinken Bet tigen Sie die oder Taste bis die gew nschte Stunde angezeigt wird und best tigen Sie mit der MODE Taste Die Minuten blinken Bet tigen Sie die oder Taste bis...

Page 15: ...der Taste bis die gew nschte Stunde angezeigt wird und best tigen Sie mit MODE Halten Sie w hrend 3 Sekunden gedr ckt um wieder in den normalen Display Modus zur ckzukehren 8 Zus tzliche Zeitzone Sie...

Reviews: