

LIEBERT® MPX™ BRM
Quick Installation Guide
SL-20823_REV4
590-1623-501B
1
WARNING:
Before assembling and
installing a Liebert® MPX™, read
and understand all warnings and
cautions in the Liebert® MPX™ Rack
Power Distribution Unit User Manual
which can be downloaded at www.
VertivCo.com.
The Liebert® MPX contains high voltage
that can cause serious personal injury or
death. The unit must be installed in a
restricted-access location.
To attach an MPX™ BRM to the
MPX™ PRC:
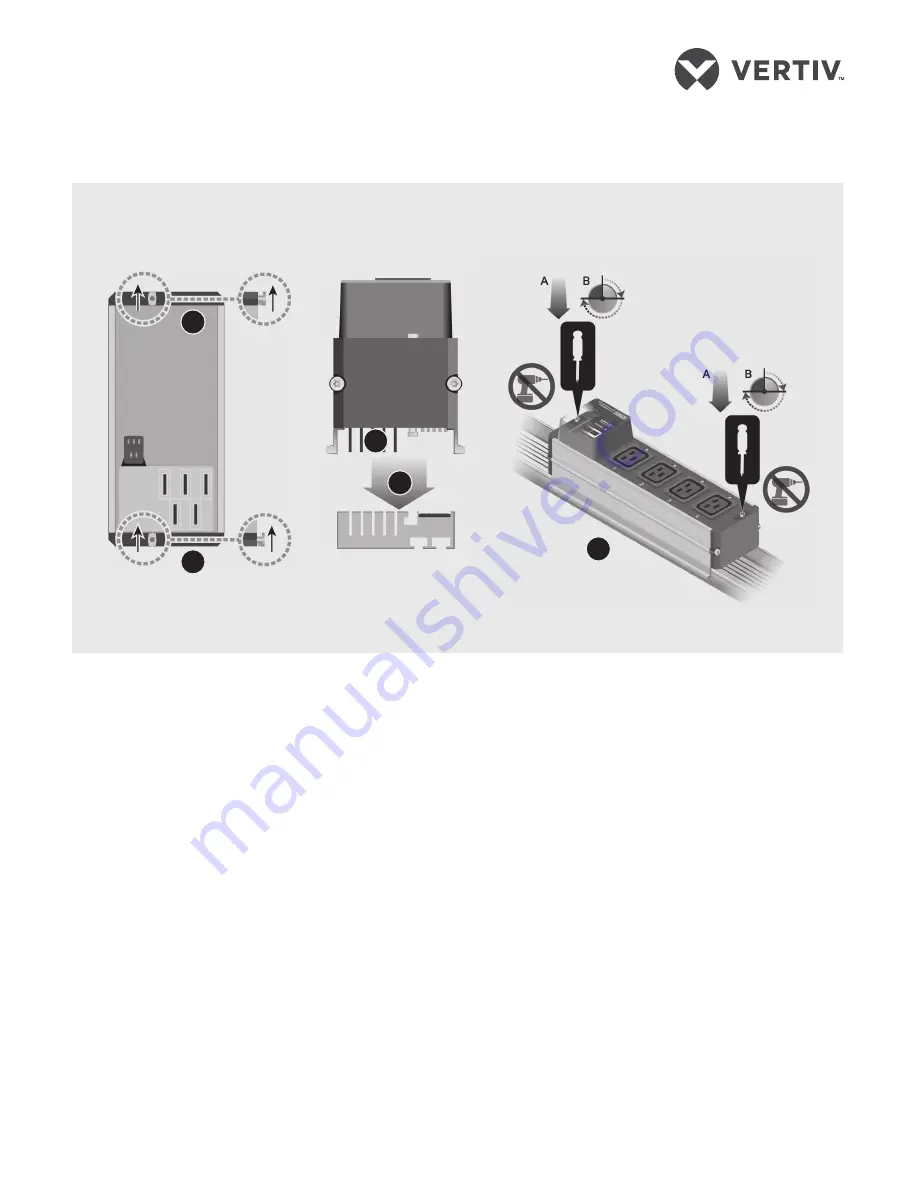
1. Preparing for installation
Ensure the module’s circuit
breaker is in the off/open
position and ensure the screw
latches at each end of the MPX
branch receptacle module
(BRM) are positioned to fit into
the MPX power rail chassis (PRC)
slot.
2. Aligning the MPX BRM power
blades
Position the module so the
power blades fit into the power
bus on the MPX PRC.
3. Connecting the module to
the MPX PRC
Press the module firmly onto
the MPX PRC until the bottom
of the MPX BRM is flush to the
surface of the MPX PRC.
4. Securing each MPX BRM
to the MPX PRC
Use a Pozidriv® (PZ1)
screwdriver to press each screw
latch downward. Turn the screw
latch 90 degrees (one-quarter turn)
to seat the locking tab. Turn the
screw latch an additional 180
degrees (one-half turn) until it locks.
WARNING:
Do not use power tools
or pneumatic equipment to secure
the screw latch.
Do not turn the screw latch
more than 270 degrees (a
three-quarter turn).
NOTE
: If using a torque-limiting
screwdriver, carefully press the
screw downward first before turning.
To prevent damage to the latches,
do not exceed a maximum torque of
18 in/lbs (2 Nm).
5. Verifying installation
Conduct a visual inspection to
verify the MPX BRM has been
properly installed. A slight side-
to-side rocking of the module
should not cause separation
from the MPX PRC surface.
MPX
™
BRM Configuration
1
3
4
1
MPX BRM
Bottom view
MPX BRM and PRC
End view
2


