background image


Quality does it. 

ION/ PARTS CLEANER 

No. IPC40-E 


Application 
This product is used to remove fine powder and dust attracted by static electricity and to remove static 
electricity from parts that are negatively affected by static electricity. 
A powerful air blower in an ionized space blows off the debris. The blown off debris is forcefully 
collected by a dust collector. 


Table of Contents 


Instruction Manual 

For Your Safety ································ P.2 

Product Overview ····························  P.6 

Dimensions ······································ P.9 

Component Functions ····················· P.10 

Installation ······································· P.13 

Operation ········································· P.19 

Maintenance ····································  P.27 

Storage &Troubleshooting   ··········· P.33 

Removing, Disposing of,   

and Replacing Parts ······················ P.34 

Notice of CE Marking   ···················· P.35 


Summary of Contents for IPC40-E

Page 1: ... static electricity A powerful air blower in an ionized space blows off the debris The blown off debris is forcefully collected by a dust collector Table of Contents Instruction Manual For Your Safety P 2 Product Overview P 6 Dimensions P 9 Component Functions P 10 Installation P 13 Operation P 19 Maintenance P 27 Storage Troubleshooting P 33 Removing Disposing of and Replacing Parts P 34 Notice o...

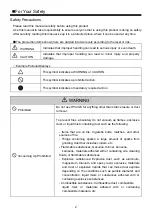
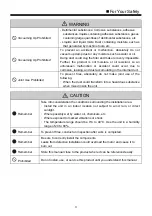
Page 2: ...PC40 E for anything other than static erasure or dust removal Vacuuming Up Prohibited To prevent fires absolutely do not vacuum up flames explosive dust or liquid mist containing dust such as the following Items that are on fire Cigarette butts matches and other sources of fire Things containing sparks A large amount of sparks from grinding dust that includes cinders etc Flammable substances Gasol...

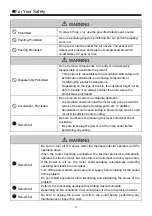
Page 3: ...e Prohibited To prevent fires absolutely do not make joint use of the following When the dust could transform into a hazardous substance when mixed inside the unit CAUTION Remember Take into consideration the conditions surrounding the installation area Install the unit in an indoor location not subject to wind rain or direct sunlight Where possibly wet by water oil chemicals etc Where exposed to ...

Page 4: ... strength of rotating parts etc In addition deceleration could cause a drop in blow volume which could result in insufficient motor cooling Remember Be sure to observe the following to prevent electrical shock accidents Be sure to unplug the power cord from the outlet before performing any wiring WARNING Remember Be sure to turn off the power when the thermal protector operates and the operation s...

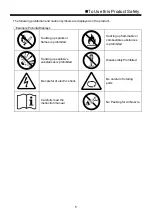
Page 5: ... Pictorial Displays Sucking up sparks or flames is prohibited Sucking up flammable or combustible substances is prohibited Sucking up explosive substances is prohibited Disassembly Prohibited Be careful of electric shock Be careful of rotating parts Carefully read the instruction manual No Peeking for Air Nozzle ...

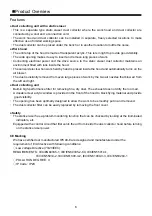
Page 6: ...moved from even large pieces of work by the two air nozzles that blow air from the left and right Dust collecting unit Built in high performance filter for removing fine dry dust The exhaust does not dirty the room air A closable clear acrylic window is provided in the front of the hood to block flying material and provide good visibility The opening has been optimally designed to allow the work t...

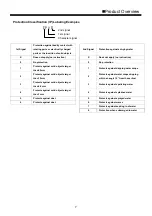
Page 7: ...er than 50 mm 1 Protects against dripping water drops 2 Protects against solid objects larger than 12 mm 2 Protects against water drops dripping within an angle 15 from the vertical 3 Protects against solid objects larger than 2 5 mm 3 Protects against spattering water 4 Protects against solid objects larger than 1 mm 4 Protects against splashed water 5 Protects against dust 5 Protects against spr...

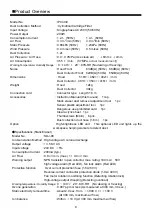
Page 8: ...ustment tool 1pc Dangerous use prohibited card 1pc Clear acrylic sheet 1pc Thumbscrews M4 6 6pcs Dust collection duct hose 1 6 m 1pc Option High brightness LED unit This optional LED unit lights up the workspace helping workers to detect dust Specifications Static Eraser Model No SDJ 08 Ion Generation Method High voltage AC corona discharge Output voltage 3 5 KV AC Input voltage 24V DC 5 Consumpti...

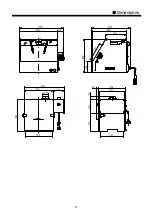
Page 9: ...9 Dimensions ...
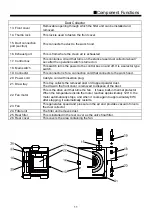
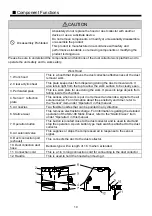
Page 10: ...ects from falling inside the chamber 4 Sensor reflection plate This senses when work is put in or removed and sends a signal to the air solenoid valve For information about the sensitivity and timer refer to the Sensor item under Operation in this manual 5 Air nozzles Two flexible nozzles that can be pointed in any direction 6 Static eraser This removes electrostatic charge For information regardi...

Page 11: ...or is for a connection cord that connects to the work hood 20 Power cord Cabtyre cord with insertion plug 21 Draw tray This tray collects the removed dust or dropped powder dust The draw in the front cover is removed to dispose of the dust 22 Fan motor This is the drive unit that turns the fan It has a built in thermal protector When the temperature inside the motor reaches approximately 120 C the...

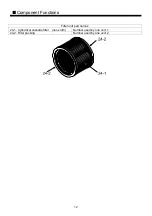
Page 12: ...12 Component Functions Filter unit part names 24 1 Cylindrical cassette filter non cloth Number used by one unit 1 24 2 Filter packing Number used by one unit 2 ...

Page 13: ... it will be subject to sudden temperature changes Avoid using the unit where it will be subject to strong vibration or impacts An exhaust outlet is provided on the back of this unit so placing the back of the unit close to the wall will prevent normal exhausting and decrease the dust collecting capability Install the unit with its back at least 10 cm from the wall Ambient temperature and humidity ...

Page 14: ...product while it is being installed or moved Make sure the product does not fall over while it is being installed or moved Do not move the product while an object is set on its hood The object could fall off of the hood Accessory Installation Clear acrylic sheet installation The work hood top acrylic sheet is removed from the hood and packed to prevent it from being broken during product shipment ...

Page 15: ...e sure to unplug the power cord from the outlet before performing any wiring Remember To ensure safety the work hood and dust collector shall be set up as prescribed by this manual Do not remove components or modify or unreasonably disassemble or assemble the product This product is manufactured in accordance with safety and performance standards so removing components or modifying the product is ...

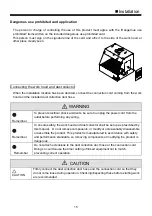
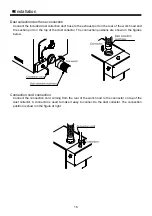
Page 16: ...tion port on the top of the dust collector The connection positions are shown in the figures below Connection cord connection Connect the connection cord coming from the rear of the work hood to the connector on top of the dust collector A connector is used to make it easy to connect to the dust collector The connection position is shown in the figure at right ...

Page 17: ...used to supply the compressed air and it will not operate properly if the supply pressure is too low Use an air drier to remove the moisture from the air The dew point temperature is 15 C or lower Use mist separator 0 3 μm to remove the impurities from the air Supply air within the temperature range of 0 to 40 C Hose used Use an air hose with sufficient pressure resistance performance outside diam...

Page 18: ...e installed Extension cord When an extension cord is used to supply power from a distant location if the core wire of the extension cord is narrow it could cause a voltage drop and make it difficult for the unit to start and prevent the capacity from being fully realized so make sure the extension cord has sufficient capacity to carry the electrical load In addition carrying a current that exceeds...

Page 19: ...ion duct hose or connection cord come loose Operation Operation is performed using the Start green and Stop black push buttons on the front of the work hood The selector switch on the front of the dust collector is the main switch Turn this from OFF to ON before beginning operation Use a wiring circuit breaker for the motor to prevent overloading In this case use one that is suitable for the motor...

Page 20: ...product in this condition is hazardous so make sure the perforated plate is properly maintained Replacing the deformed or damaged perforated plate is recommended Remember This unit is designed for light work such as handwork so do not place heavy objects on top of the perforated plate or forcefully strike it Doing so could deform or break the perforated plate The perforated plate is designed to su...

Page 21: ...d mist or materials adhered with or containing combustible materials etc Do not vacuum up flammable dust or dust containing flammable substances Caution must be taken in particular with non combustible substances that change into combustible substances when worked on etc It is very difficult to determine if such substances are changing into combustible dust so we ask the customer to be responsible...

Page 22: ...amp dust could clog the filter and make recovery impossible Further the product is not moisture or oil resistant so an unforeseen malfunction or accident could occur due to corrosion leaking and dust accumulating in the internal duct Joint Use Prohibited Use in the same unit of substances that change into a hazardous substance when mixed is prohibited Even if the individually handled dusts are saf...

Page 23: ... block openings such as the intake vent and the discharge vent Doing so could cause a malfunction PROHIBITED Do not insert metal or foreign matter into the unit openings Doing so could result in electrical shock accidents or equipment breakdown Unplug the power cable Before long periods of disuse unplug the power cable Leaving the power on during periods of disuse can result in electric shock brea...

Page 24: ...peration See Page 32 Ionizing operation can be continued during the blinking After the cleaning please keep pressing ON OFF switch for more than 3 seconds then resetting the accumulative operation hours recorded and no blinking Accumulative running hours won t be faded nor resetting even if power supply suspended Warning Indicator 1 Abnormal high voltage warning indicator This illuminates when the...

Page 25: ...cting the static eraser CAUTION Disassembly Prohibited Do not modify or disassemble the product Remember The sensitivity and timer are set at the time of shipment Do not change the settings unnecessarily When making fine adjustments use the included sensor adjustment tool When making adjustments turning the control with excessive force could damage it Timer setting method The output time can be ad...

Page 26: ...et Scratches dirtiness or damage that makes it difficult to set the work area inside the hood Replace Seal packing Air leaks or dust leaks in the main unit or duct piping Replace Drawer tray Dust accumulation condition Dust disposal processing Filter unit Filter body clogging damage deterioration dampness etc and deteriorated damaged or missing packing Remove the dust or replace the filter unit Po...

Page 27: ... Sensor Solenoid valve Compressed air nozzle Static eraser Dust Removal and Disposal If the vacuum force appears to have dropped during use the internal filter unit is clogged so use the following procedure to remove the dust When doing this flammable dust could catch fire or explode under certain conditions so quickly dispose of the accumulated waste WARNING Remember Quickly dispose of the dust w...

Page 28: ...he thumb lock and take off the front cover 3 Remove the filter Remove the internal filter unit 4 Remove the dust Remove the filter unit dust 5 Dispose of the dust Dispose of the dust in the draw tray 6 Install the filter Install the filter unit back in its original location 7 Close the front cover Insert the front cover and completely close the thumb lock If the front cover is not properly install...

Page 29: ...the rear cover Tighten the 4 wing nuts to attach the guide vanes to the rear cover 9 Close the rear cover Tighten the 4 screws to attach the rear cover Filter Replacement If the filter has become damaged or if after long use the vacuum force does not recover even after the dust is removed use the following procedure to replace the filter Filters can be purchased through the product was purchased W...

Page 30: ...n the screws Loose the 4 screws on the rear cover and remove the rear cover 3 Loosen the wing nuts Loosen the 4 wing nuts inside the rear cover 4 Remove the rear filter Remove the rear filter that is inserted into the guide vanes 5 Remove the dust 6 Clean up the dust 7 Reinstall the rear filter Reinsert the rear filter into the guide vanes 8 Attach the guide vanes to the rear cover Tighten the 4 w...

Page 31: ...place the clear acrylic sheet You can purchase it from the store where the product was purchased by specifying either the front or rear clear acrylic sheet of IPC40 E 1 Loosen the screws Loosen the 6 thumbscrews 2 Remove the acrylic sheet Remove the acrylic sheet 3 Attach the acrylic sheet Attach the new acrylic sheet 4 Tighten the screws Tighten the 6 thumbscrews The screw positions are shown in ...

Page 32: ...ry 100 hours of use To prevent electrical shock accidents be sure to unplug the power cord from the outlet and wait at least 1 min before cleaning the electrode wires Insert a cotton swab into the clearance on the finger guard to clean the electrode wire If the electrode is heavily contaminated clean it with a cotton swab with a little alcohol and remove the stuck dirt Do not rub the electrode wir...

Page 33: ...it Replace with a new component Motor does not turn Defective power connection Perform the wiring correctly Thermal protector has operated Use power voltage that is in a range of 10 Make sure all covers are closed completely to prevent air leaks Switch is broken Repair by manufacturer Motor is burned out Repair by manufacturer There is abnormal noise or vibration The impeller is not balanced prope...

Page 34: ...ck the following being aware of the weight of the product Be sufficiently careful that no part of the body especially fingers and toes will be caught underneath the product while it is being removed or moved Make sure the product does not fall over while it is being removed or moved Do not move the product while an object is set on its hood The object could fall off of the hood Disposal Disposal W...

Page 35: ...ABILITY AND FITNESS FOR A PARTICULAR PURPOSE WHICH ARE SPECIFICALLY DISCLAIMED The express warranty will not apply to defects or damage due to accidents neglect misuse alterations operator error or failure to properly maintain clean or repair products LIMIT OF LIABILITY This electronic static eraser use high voltage corona discharge and should not be used in or near flammable or explosive environm...

Page 36: ...ta In order to maintain the best conditions of this tool please be sure to take a few minutes to read through the enclosed instruction manuals and operate as recommended DATE CHIEF INSPECTOR MANUFACTURED BY VESSEL CO INC OSAKA JAPAN Manufactured by VESSEL CO INC Higashinari ku Osaka 537 0001 Japan Tel 81 6 6976 7778 Fax 81 6 6972 9441 E mail export vessel co jp URL http www vessel jp Printed in Ja...

Reviews: