background image

EN


English

 - Instruction manual 


IT


Italiano

 - Manuale di istruzioni   

FR


Français

 - Manuel d’instructions   

DE


Deutsch

 - Bedienungsanleitung   

RU


Русский

 - Руководство по эксплуатации 

UPTJBUL

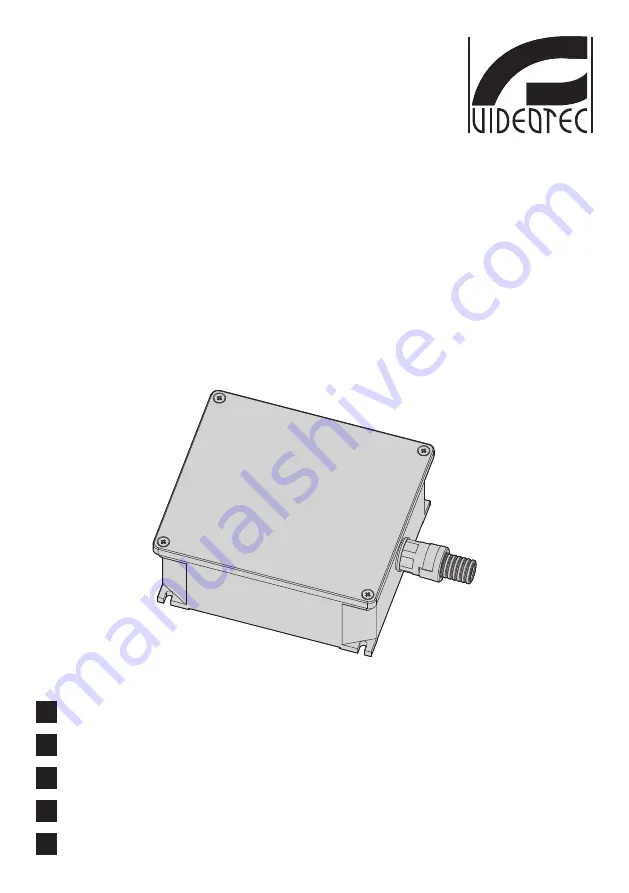
Weatherproof junction box

Summary of Contents for UPTJBUL

Page 1: ...EN English Instruction manual IT Italiano Manuale di istruzioni FR Fran ais Manuel d instructions DE Deutsch Bedienungsanleitung RU UPTJBUL Weatherproof junction box...

Page 2: ......

Page 3: ...specialist technical staff only The manufacturer declines all responsibility for any damage caused by an improper use of the appliances mentioned in this manual Furthermore the manufacturer reserves...

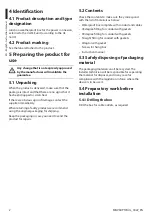
Page 4: ...y product we recommend using the original packaging for shipping Keep the packaging in case you need to send the product for repairs 5 2 Contents Check the contents to make sure they correspond with t...

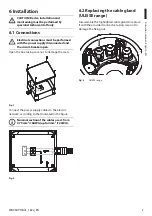
Page 5: ...ted and the circuit breaker open Open the box taking care not to damage the seals Fig 1 Connect the power supply cables to the electric network according to that indicated in the figure Nominal sectio...

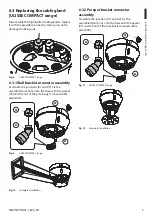
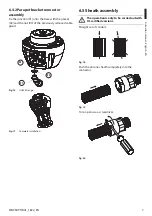
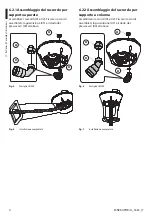
Page 6: ...he gasket 03 and the nut of the previously removed cable gland 04 03 04 02 01 Fig 4 ULISSE range Fig 5 Complete installation 6 2 2 Parapet bracket connector assembly Assemble the junctions 01 and 02 F...

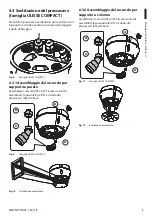
Page 7: ...assembly Assemble the junctions 01 and 02 Fix the assembled junctions onto the base with the gasket 03 and the nut of the previously removed cable gland 04 04 03 02 01 Fig 9 ULISSE COMPACT range Fig...

Page 8: ...ed cable gland to replace it with the provided connector taking care not to damage the fixing nut Fig 13 ULISSE2 range 6 4 1 Wall bracket connector assembly Fix the junction 01 onto the base with the...

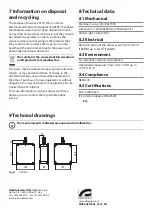
Page 9: ...asket 02 and the nut 03 of the previously removed cable gland 01 02 03 Fig 16 ULISSE2 range Fig 17 Complete installation 6 5 Sheath assembly The operation is only to be carried out with UL certified v...

Page 10: ...t at the time of purchase of a new equivalent or without obligation to a new purchase for equipment with size smaller than 25cm 9 8in For more information on proper disposal of these devices you can c...

Page 11: ...zione del dispositivo deve essere eseguita solo da personale tecnico specializzato Il produttore declina ogni responsabilit per eventuali danni derivanti da un uso improprio delle apparecchiature menz...

Page 12: ...utilizzo dell imballaggio originale per il trasporto Conservare l imballo qualora fosse necessario inviare il prodotto in riparazione 5 2 Contenuto Controllare che il contenuto sia corrispondente alla...

Page 13: ...on dispositivo di sezionamento aperto Aprire la scatola avendo cura di non danneggiare le guarnizioni Fig 1 Collegare i cavi di alimentazione alla rete elettrica secondo quanto indicato in figura Sezi...

Page 14: ...mblati la guarnizione 03 e il dado del pressacavo 04 alla base 03 04 02 01 Fig 4 Famiglia ULISSE Fig 5 Installazione completata 6 2 2 Assemblaggio del raccordo per supporto a colonna Assemblare i racc...

Page 15: ...mblaggio del raccordo per supporto a parete Assemblare i raccordi 01 e 02 Fissare i raccordi assemblati la guarnizione 03 e il dado del pressacavo 04 alla base 04 03 02 01 Fig 9 Famiglia ULISSE COMPAC...

Page 16: ...evidenziato per sostituirlo con l apposito raccordo avendo cura di non danneggiare il dado di fissaggio Fig 13 Famiglia ULISSE2 6 4 1 Assemblaggio del raccordo per supporto a parete Fissare il raccor...

Page 17: ...izione 02 e il dado del pressacavo 03 alla base 01 02 03 Fig 16 Famiglia ULISSE2 Fig 17 Installazione completata 6 5 Montaggio della guaina L operazione va effettuata solamente per le versioni certifi...

Page 18: ...uistata l apparecchiatura all atto di acquisto di una nuova equivalente o senza obbligo di un acquisto nuovo per le apparecchiature di dimensioni minori di 25cm Per ulteriori informazioni sulla corret...

Page 19: ...entretien du dispositif doivent tre effectu s exclusivement par un personnel technique qualifi Le fabricant d cline toute responsabilit pour les dommages ventuels dus une utilisation non appropri e d...

Page 20: ...l emballage original pour le transport Conserver l emballage en cas de n cessit d exp dition du produit pour r paration 5 2 Contenu Contr ler que le contenu correspond la liste mat riel indiqu e ci d...

Page 21: ...rsque le dispositif de sectionnement ouvert Ouvrir le bo tier en ayant soin de ne pas endommager les garnitures Fig 1 Brancher les c bles d alimentation au r seau lectrique selon ce qui est indiqu sur...

Page 22: ...assembl s le joint 03 et l crou du presse toupe 04 a la base 03 04 02 01 Fig 4 Famille ULISSE Fig 5 Installation compl te 6 2 2 Montage du raccord pour support fixation au sol Assembler les raccords...

Page 23: ...ACT 6 3 1 Montage du raccord pour support mural Assembler les raccords 01 et 02 Fixer les joints assembl s le joint 03 et l crou du presse toupe 04 a la base 04 03 02 01 Fig 9 Famille ULISSE COMPACT F...

Page 24: ...esse toupe indiqu pour le remplacer par le raccord sp cifique en veillant ne pas endommager l crou de fixation Fig 13 Famille ULISSE2 6 4 1 Montage du raccord pour support mural Fixer la base le racco...

Page 25: ...ur tuyau 01 le joint 02 et l crou du presse toupe 03 01 02 03 Fig 16 Famille ULISSE2 Fig 17 Installation compl te 6 5 Montage de la gaine L op ration doit tre effectu e uniquement pour les versions ce...

Page 26: ...istributeur o vous avez achet l quipement au moment de l achat d un nouvel dispositif quivalent ou sans obligation d achat pour un quipement de taille inf rieure de 25cm Pour plus d informations sur l...

Page 27: ...Fachleuten vorbehalten Der Hersteller lehnt jede Haftung f r eventuelle Sch den ab die aufgrund unsachgem er Anwendung der in diesem Handbuch erw hnten Ger te entstanden ist Ferner beh lt er sich das...

Page 28: ...n Produktes empfiehlt sich die Verwendung der Originalverpackung f r den Transport Bewahren Sie die Verpackung auf f r den Fall dass das Produkt zur Reparatur eingesendet werden muss 5 2 Inhalt Pr fen...

Page 29: ...offen ist Beim ffnen der Dose ist darauf zu achten dass die Dichtungen nicht besch digt werden Abb 1 Die Versorgungskabel an das Stromnetz anschlie en siehe Zeichnung Nennquerschnitt der verwendeten...

Page 30: ...ng 03 und die Mutter der Kabelschelle 04 am Unterbau befestigen 03 04 02 01 Abb 4 ULISSE Familie Abb 5 Komplette Installation 6 2 2 Zusammenbau des Anschlusses f r S ulehalterung Die Verbindungen 01 u...

Page 31: ...nschlusses f r Wandhalterung Die Verbindungen 01 und 02 zusammenbauen Die zusammengebauten Verbindungen die Dichtung 03 und die Mutter der Kabelschelle 04 am Unterbau befestigen 04 03 02 01 Abb 9 ULIS...

Page 32: ...um sie durch das entsprechende Anschlussst ck zu ersetzen dabei darauf achten die Spannmutter nicht zu besch digen Abb 13 ULISSE2 Familie 6 4 1 Zusammenbau des Anschlusses f r Wandhalterung Der Rohra...

Page 33: ...die Mutter der Kabelschelle 03 am Unterbau befestigen 01 02 03 Abb 16 ULISSE2 Familie Abb 17 Komplette Installation 6 5 Montage Ummantelung Der Eingriff ist nur bei den UL zertifizierten Ausf hrungen...

Page 34: ...tragsh ndler bringen bei dem das Ger t gekauft wurde Das kann beim Einkauf von neuen gleichartigen Produkten passieren oder auch ohne Verpflichtung eines Neukaufes falls die Gr e des Ger tes kleiner a...

Page 35: ...RU 1 MNVKUPTJBUL_1822_RU UPTJBUL 1 1 1 INFO 2 3 4 2 2...

Page 36: ...RU 2 MNVKUPTJBUL_1822_RU 4 4 1 ULISSE UL 4 2 5 5 1 5 2 45 90 5 3 5 4 5 4 1...

Page 37: ...RU 3 MNVKUPTJBUL_1822_RU 6 6 1 1 0 75mm 18AWG 4mm 12AWG a N L 2 6 2 ULISSE 3 C ULISSE...

Page 38: ...RU 4 MNVKUPTJBUL_1822_RU 6 2 1 01 02 03 04 03 04 02 01 4 C ULISSE 5 6 2 2 01 02 03 04 04 03 02 01 6 C ULISSE 7...

Page 39: ...RU 5 MNVKUPTJBUL_1822_RU 6 3 ULISSE COMPACT 8 C ULISSE COMPACT 6 3 1 01 02 03 04 04 03 02 01 9 C ULISSE COMPACT 10 6 3 2 01 02 03 04 04 03 02 01 11 C ULISSE COMPACT 12...

Page 40: ...RU 6 MNVKUPTJBUL_1822_RU 6 4 ULISSE2 13 C ULISSE2 6 4 1 01 02 03 01 02 03 14 C ULISSE2 15...

Page 41: ...RU 7 MNVKUPTJBUL_1822_RU 6 4 2 01 02 03 01 02 03 16 C ULISSE2 17 6 5 UL 18 19 20...

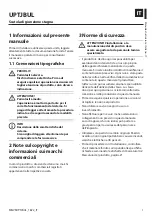
Page 42: ...6kg 8 2 0 75mm 18AWG 4mm 12AWG 8 3 40 C 55 C 8 4 NEMA 4X 8 5 EAC IP EN60529 IP66 9 39 168 80 149 34 192 168 21 UPTJBUL Headquarters Italy Videotec S p A Via Friuli 6 I 36015 Schio VI Italy Tel 39 044...

Page 43: ......

Page 44: ...ance Tel 33 1 60491816 Fax 33 1 69284736 Email info fr videotec com Asia Pacific Videotec HK Ltd Flat 8 19 F On Dak Industrial Building No 2 6 Wah Sing Street Kwai Chung New Territories Hong Kong Tel...

Reviews: