background image

VP2768

Display

User Guide

Model No. VS16814

IMPORTANT: Please read this User Guide to obtain important information on 

installing and using your product in a safe manner, as well as registering your 

product for future service. Warranty information contained in this User Guide will 

describe your limited coverage from ViewSonic Corporation, which is also found on 

our web site at http://www.viewsonic.com in English, or in specific languages using 

the Regional selection box in the upper right corner of our website. “Antes de operar 

su equipo lea cu idadosamente las instrucciones en este manual”

Summary of Contents for VP2768

Page 1: ...r product for future service Warranty information contained in this User Guide will describe your limited coverage from ViewSonic Corporation which is also found on our web site at http www viewsonic...

Page 2: ...ding the world s expectations for technological evolution innovation and simplicity At ViewSonic we believe that our products have the potential to make a positive impact in the world and we are confi...

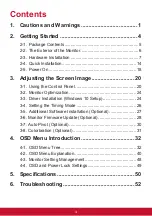
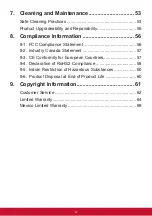
Page 3: ...anel 20 3 2 Monitor Optimization 24 3 3 Driver Installation Windows 10 Setup 24 3 4 Setting the Timing Mode 26 3 5 Additional Software Installation Optional 27 3 6 Monitor Firmware Update Optional 28...

Page 4: ...FCC Compliance Statement 56 8 2 Industry Canada Statement 57 8 3 CE Conformity for European Countries 57 8 4 Declaration of RoHS2 Compliance 58 8 5 Indian Restriction of Hazardous Substances 60 8 6 P...

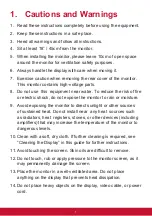
Page 5: ...expose the monitor to rain or moisture 9 Avoid exposing the monitor to direct sunlight or other sources of sustained heat Do not install near any heat sources such as radiators heat registers stoves o...

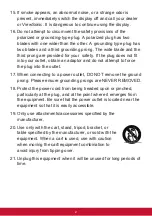
Page 6: ...to force the plug into the outlet 17 When connecting to a power outlet DO NOT remove the ground prong Please ensure grounding prongs are NEVER REMOVED 18 Protect the power cord from being treaded upon...

Page 7: ...ate normally or has been dropped 23 Excessive sound pressure from ear headphones can cause hearing damage hearing loss 24 Adjustment of the volume control as well as the equalizer may increase the ear...

Page 8: ...easier for you to verify your product and repair refund and or return your product to you If you have any problems with your product or questions that have not been addressed in the User Guide please...

Page 9: ...n Additional software Optional NOTE 1 The video cables included in your package may vary depending on your country Please contact your local reseller for more information 2 The INF file ensures compat...

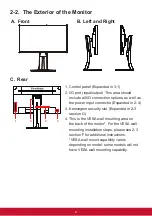
Page 10: ...ons as well as the power input connector Expanded in 2 4 3 Kensington security slot Expanded in 2 3 section G 4 This is the VESA wall mounting area on the back of the moitor For the VESA wall mounting...

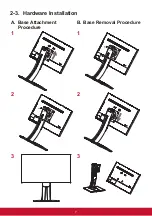
Page 11: ...7 2 3 Hardware Installation A Base Attachment Procedure B Base Removal Procedure 1 1 2 2 3 3...

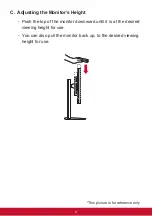
Page 12: ...e Monitor s Height Push the top of the monitor downward until it is at the desired viewing height for use You can also pull the monitor back up to the desired viewing height for use This picture is fo...

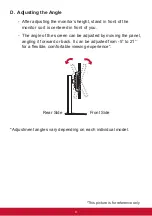
Page 13: ...ntered in front of you The angle of the screen can be adjusted by moving the panel angling it forward or back It can be adjusted from 5 to 21 for a flexible comfortable viewing experience Rear Side Fr...

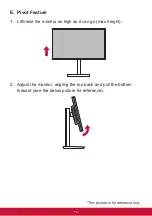
Page 14: ...ot Feature 1 Lift raise the monitor as high as it can go max height 2 Adjust the monitor angling the top back and pull the bottom forward see the below picture for reference This picture is for refere...

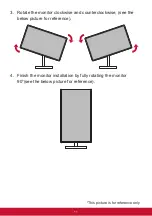
Page 15: ...e monitor clockwise and counterclockwise see the below picture for reference 4 Finish the monitor installation by fully rotating the monitor 90 see the below picture for reference This picture is for...

Page 16: ...ting kit which meets the quaternions below Max Loading Hole pattern W x H mm Interface Pad W x H x D Pad Hole Screw Q ty Specification 14kg 100mm x 100mm 115 mm x 115 mm x 2 6 mm 5mm 4 piece M4 x 10mm...

Page 17: ...located on the back side of the monitor For more information on installation and usage please visit the Kensington website at http www kensington com Below is an example of setting up the Kensington l...

Page 18: ...e both the LCD monitor and computer are turned OFF 2 Remove rear panel covers if necessary 3 Connect the video cable from the LCD monitor to the computer Power Connector HDMI DisplayPort USB 3 0 Downs...

Page 19: ...computer For a computer or other source device with HDMI output connect the HDMI cable to the HDMI connector on the rear of the monitor and the HDMI port of the computer or source device For a MAC wi...

Page 20: ...out is used for daisy chain connection Explained in section D C USB Cable Connect the B type connector of USB cable to the USB 3 0 upstream port on the rear of the monitor And connect the A type conne...

Page 21: ...r DP cable to connect DP output of the 1st monitor and DP input of the 2nd monitor DP IN DP OUT 1920X1080 2560X1440 2560X1440 1920X1080 1920X1080 2560X1440 1920X1080 1920X1080 1920X1080 DP OUT DP OUT...

Page 22: ...eive a message asking them to install the INF file To access the file please insert ViewSonic CD into Computer s CD drive and locate within the following directory CD vsfiles If your computer does not...

Page 23: ...z miniDP DisplayPort On Off HDMI 1 Auto Detect Setup Menu Color Adjust View Mode Manual Image Adjust Input Select Audio Adjust HDMI 2 DisplayPort 1 2 mode set to On VP2468 75 1980 x 1080 60Hz ECO Mode...

Page 24: ...20 3 Adjusting the Screen Image 3 1 Using the Control Panel Use the buttons on the front or rear control panel to display and adjust OSD...

Page 25: ...bezel symbol explanation is stated below Standby Power On Off NOTE Power light Blue ON Orange Power Saving Display the Menu by pressing any square button Press the No 5th square button to turn on off...

Page 26: ...ions and adjusts the monitor controls Symbol used to go back or revert back to the previously selected menu Information shortcut select button which gives users access to the information of the monito...

Page 27: ...etting in the setup menu 2 After pressing one of the squares you will see options appear for quick access Preset Color Option Contrast Brightness Option Input Select Option Main Menu Access Exit 3 Aft...

Page 28: ...r monitor to your PC boot up your PC make sure to first turn on the monitor first and when the PC has finished booting up your PC should auto detect the monitor If your monitor came with a ViewSonic d...

Page 29: ...nized by your PC in the Color Management section of your advanced settings If your PC has not auto detected the monitor but is still functioning you can restart your computer and follow the steps abov...

Page 30: ...se see your graphics card manager for adjusting the resolution and refresh rate Set up your widescreen LCD Set your monitor resolution to its native resolution to get the best experience possible with...

Page 31: ...lication if desired 3 Double click on the exe file or pkg file and follow the onscreen instructions to complete the simple installation for each additional software application 4 If your PC did not co...

Page 32: ...Step1 Check and download the Firmware Update Tool with latest firmware version for your monitor from http color viewsonic com support software Step2 Make sure your monitor USB upstream port has been c...

Page 33: ...rade your monitor firmware VP Series USB Firmware Update Tool v1 0 Model Name Current Firmware New Firmware CheckSum 0 Model Name Current Firmware New Firmware CheckSum Update EXIT X Note The update p...

Page 34: ...lation file is in the software folder of ViewSonic CD Or you can check and download the latest version Auto Pivot application from http color viewsonic com support software Note Before applying the Au...

Page 35: ...or which Colorbration application need to work with ViewSonic s Colorbration kit includes the CS XRi1 color sensor which has been co developed with X Rite to provide the best solution for displaying l...

Page 36: ...and pertaining functions please refer to the 4 2 OSD explanation below The OSD tree visually represents the complete OSD menu that can be accessed by your monitor If you aren t sure where an option fu...

Page 37: ...Exit Preset Color Startup Menu Preset Color sRGB EBU SMPTE C REC709 DICOM SIM Native CAL 1 CAL 2 CAL3 CUSTOM Contrast Brightness Contrast Brightness Input Select mini DP DisplayPort HDMI 1 HDMI 2 Menu...

Page 38: ...iniDP DisplayPort HDMI 1 Setup Menu Color Adjust View Mode Manual Image Adjust Input Select Audio Adjust HDMI 2 2560 1440 60Hz Menu Input Select mini DP DisplayPort HDMI 1 HDMI 2 Audio Adjust Volume O...

Page 39: ...tra Clear Advanced Sharpness Advanced Gamma Photo Ultra Clear Advanced Sharpness Advanced Gamma TruTone Landscape Ultra Clear Advanced Sharpness Advanced Gamma TruTone Portrait Ultra Clear Advanced Sh...

Page 40: ...imited Range Standard Color sRGB EBU SMPTE C REC 709 DICOM SIM Color Calibration CAL 1 CAL Time Flag CAL 2 CAL Time Flag CAL 3 CAL Time Flag Calibration Notice Remind Schedule Hour Counter Hour Recall...

Page 41: ...reen Blue Cyan Magenta Yellow Saturation Red Green Blue Cyan Magenta Yellow Recall Manual Image Adjust Sharpness Aspect Ratio 1 1 4 3 Full Screen Overscan On Off Low Input Lag Off Advanced Ultra Fast...

Page 42: ...German Spanish Italian Finnish Russian Turkish Japanese Korean Traditional Chinese Simplified Chinese Resolution Notice On Off Information Information message OSD Timeout OSD Background On Off OSD Piv...

Page 43: ...Setup Menu Auto Power Off On Off Sleep 30 Minutes 45 Minutes 60 Minutes 120 Minutes Off ECO Mode Standard Optimize Conserve Displayport 1 2 On Off DDC CI On Off Save As User 1 User 2 User 3 Recall All...

Page 44: ...abetical order for a clearer explanation of what each function does A Audio adjust Adjusts the volume mutes the sound or toggles between inputs if you have more than one source Advanced DCR Advanced D...

Page 45: ...on and may increase energy consumption beyond the limits required for ENERGY STAR qualification as applicable ENERGY STAR is a set of power saving guidelines issued by the U S Environmental Protection...

Page 46: ...ze their viewing experience Contrast Adjusts the difference between the image background black level and the foreground white level Color adjustment functions To deliver precise and accurate color per...

Page 47: ...is limited YUV Full Range The input signal color format is YUV and the black white level is full YUV Limited Range The input signal color format is YUV and the black white level is limited Color Calib...

Page 48: ...of the monitor s grayscale levels There are five selections 1 8 2 0 2 2 2 4 and 2 6 H HUE Adjusts the hue of each color red green blue cyan magenta and yellow I Information Displays the timing mode v...

Page 49: ...t the aspect ratio of the input signal received by your monitor to adjust the image so it appears on the monitor OFFSET Adjusts black levels for red green and blue The gain and offset functions allow...

Page 50: ...mma of ITU R Rec 709 standard DICOM SIM Gamma curve are set to a DICOM simulation CUSTOM Original color presented by the LCD panel R Response time Adjusts the response time creating smooth images with...

Page 51: ...ity Correction function compensates any luminance and color uniformity imbalance on the screen such as dark spots uneven brightness or illegible images on the screen With the ViewSonic uniformity corr...

Page 52: ...ground The OSD Background function allows users to turn off the OSD background while selecting and adjusting OSD settings Power Indicator The power indicator is the light that displays whether the mon...

Page 53: ...nds If any other buttons are pressed the message OSD Locked will display for 3 seconds OSD Unlock Press and hold 2 and 3 again for 10 seconds Power Button Lock Press and hold 2 and 4 for 10 seconds If...

Page 54: ...Hz Compatibility PC Macintosh1 Up to 2560 x 1440 Non interlaced Power Macintosh up to 2560 x 1440 Supported by limited graphic cards Resolution2 Recommended Supported 2560 x 1440 60 Hz 1920 x 1080 60...

Page 55: ...4 96 mm D 24 13 W x 21 28 H x 8 46 D Wall Mount Distance 100 x 100 mm Weight NET Display w o Stand 9 68 lb 4 39 kg NET Display w Stand 15 17 lb 6 88 kg Gross 21 16 lb 9 60 kg Power saving modes On4 Of...

Page 56: ...ideo output port on the back of the computer If the other end of the video cable is not attached permanently to the display properly secure it to the display Adjust brightness and contrast Wrong or ab...

Page 57: ...ee cloth This removes dust and other particles 2 If the screen is still not clean apply a small amount of non ammonia non alcohol based glass cleaner onto a clean soft lint free cloth and wipe the scr...

Page 58: ...isplay screen or case Some chemical cleaners have been reported to damage the screen and or case of the display ViewSonic will not be liable for damage resulting from use of any ammonia or alcoholbase...

Page 59: ...laceable Main Processor s or SOC No No Yes Memory N A N A N A HDD N A N A N A Wireless Networking Capability N A N A N A Graphics Card N A N A N A Rechargeable Battery N A N A N A Fan Assembly N A N A...

Page 60: ...is equipment generates uses and can radiate radio frequency energy and if not installed and used in accordance with the instructions may cause harmful interference to radio communications However ther...

Page 61: ...oltage Directive 2014 35 EU Following information is only for EU member states The mark shown to the right is in compliance with the Waste Electrical and Electronic Equipment Directive 2012 19 EU WEEE...

Page 62: ...ces in electrical and electronic equipment RoHS2 Directive and is deemed to comply with the maximum concentration values issued by the European Technical Adaptation Committee TAC as shown below Substa...

Page 63: ...m 5 mg per lamp 3 Long length 1 500 mm maximum 13 mg per lamp 2 Lead in glass of cathode ray tubes 3 Lead in glass of fluorescent tubes not exceeding 0 2 by weight 4 Lead as an alloying element in alu...

Page 64: ...ons exceeding 0 1 weight and 0 01 weight for cadmium except for the exemptions set in Schedule 2 of the Rule 8 6 Product Disposal at End of Product Life ViewSonic respects the environment and is commi...

Page 65: ...tal Protection Agency EPA As an ENERGY STAR partner ViewSonic Corporation has determined that this product meets the ENERGY STAR guidelines for energy efficiency Disclaimer ViewSonic Corporation shall...

Page 66: ...in Indonesia www viewsonic com id Israel www viewsonic com il Japan www viewsonic com jp Korea www viewsonic com kr Malaysia www viewsonic com my Middle East www viewsonic com me Myanmar www viewsoni...

Page 67: ...urope Europe www viewsonic com eu France www viewsonic com fr Deutschland www viewsonic com de www viewsonic com kz www viewsonic com ru Espa a www viewsonic com es T rkiye www viewsonic com tr www vi...

Page 68: ...eriod will not be extended ViewSonic provides no warranty for any third party software whether included with the product or installed by the customer installation of any unauthorized hardware parts or...

Page 69: ...occurring during repair or replacement 5 Any damage of the product due to shipment 6 Removal or installation of the product 7 Causes external to the product such as electric power fluctuations or fail...

Page 70: ...mer Support page You will need to provide your product s serial number 2 To obtain warranty service you will be required to provide a the original dated sales slip b your name c your address d a descr...

Page 71: ...r other commercial loss even if advised of the possibility of such damages 2 Any other damages whether incidental consequential or otherwise 3 Any claim against the customer by any other party 4 Repai...

Page 72: ...wSonic dealer The warranty period for this product in mainland China Hong Kong Macao and Taiwan Excluded is subject to the terms and conditions of the Maintenance Guarantee Card For users in Europe an...

Page 73: ...l at its sole option repair or replace the product with a like product Replacement product or parts may include remanufactured or refurbished parts or components accessories How long the warranty is e...

Page 74: ...ilure to follow instructions supplied with the product b Causes external to the product such as electrical power fluctuations or failure c Use of supplies or parts not meeting ViewSonic s specificatio...

Page 75: ...cords Product Name _______________ Model Number ____________ Document Number ____________Serial Number _____________ Purchase Date _________Extended Warranty Purchase __ Y N If so what date does warra...

Page 76: ...onic shall not be liable for 1 Damage to other property caused by any defects in the product damages based upon inconvenience loss of use of the product loss of time loss of profits loss of business o...

Page 77: ...Cefeo soluglobales com Cuernavaca Compusupport de Cuernavaca SA de CV Francisco Leyva 178 Col Miguel Hidalgo C P 62040 Cuernavaca Morelos Tel 01 777 3180579 01 777 3124014 E Mail aquevedo compusuppor...

Page 78: ......

Reviews: