background image

for Windows

Visioneer

®  

OneTouch

®


9650 USB Scanner
User's Guide
           

Summary of Contents for OneTouch 9650

Page 1: ...for Windows Visioneer OneTouch 9650 USB Scanner User s Guide...

Page 2: ...Visioneer OneTouch 9650 USB Scanner User s Guide F O R W I N D O W S...

Page 3: ...HE INITIAL 90 DAY PERIOD THE 12 MONTH WARRANTY IS NO LONGER AVAILABLE AND YOUR PRODUCT WARRANTY WILL TERMINATE AFTER THE 90 DAY INITIAL PERIOD EXPIRES THIS IS VISIONEER S ONLY WARRANTY AND YOUR EXCLUS...

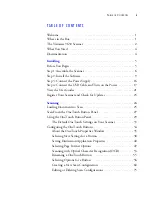
Page 4: ...heck for Updates 23 Scanning 24 Loading Documents to Scan 25 Scan From the OneTouch Button Panel 27 Using the OneTouch Button Panel 29 The Default OneTouch Settings on Your Scanner 33 Configuring the...

Page 5: ...nterface Options 96 Scanning from the TWAIN Basic Interface 97 Scanning Part of an Image 99 Scanning from the TWAIN Advanced Interface 100 Adjusting the Image on the Advanced Interface 103 Adjusting t...

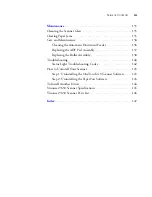
Page 6: ...ADF Pad Assembly 137 Replacing the Roller Assembly 138 Troubleshooting 140 Status Light Troubleshooting Codes 142 How to Uninstall Your Scanner 143 Step 1 Uninstalling the OneTouch 4 0 Scanner Softwa...

Page 7: ...iv TABLE OF CONTENTS...

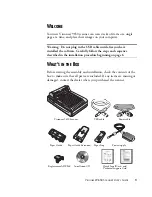
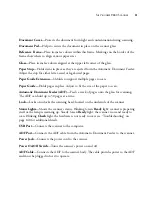
Page 8: ...at all parts are included If any items are missing or damaged contact the dealer where you purchased the scanner Warning Do not plug in the USB cable until after you have installed the software Carefu...

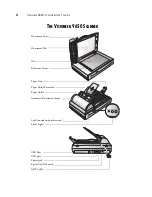
Page 9: ...SIONEER 9650 SCANNER Status Lights Glass Document Pad Reference Frame Document Cover ADF Cable Power jack USB Port ADF port Power On Off Switch Paper Stop Paper Guide Extension Paper Guide Automatic D...

Page 10: ...per to scan Automatic Document Feeder ADF Feeds a stack of pages onto the glass for scanning The ADF can hold up to 50 pages at a time Lock Locks or unlocks the scanning head located on the underside...

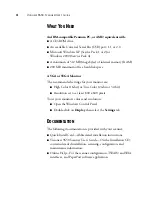
Page 11: ...r are High Color 16 bit or True Color 24 bit or 32 bit Resolution set to at least 800 x 600 pixels To set your monitor s colors and resolution Open the Windows Control Panel Double click on Display th...

Page 12: ...should allow the installation to proceed if that option is available Alternatively you can turn off the AntiVirus or AntiSpyware software before installing your scanner But if you do make sure to tur...

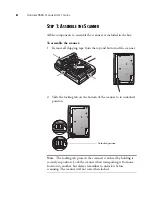
Page 13: ...pe from the top and bottom of the scanner 2 Slide the locking tab on the bottom of the scanner to its unlocked position Note The locking tab protects the scanner s scan head by holding it securely in...

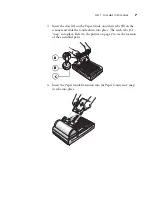
Page 14: ...e onto their tabs B on the scanner and slide the Guide down into place The catch tabs C snap into place Refer to the picture on page 2 to see the location of the assembled parts 4 Insert the Paper Gui...

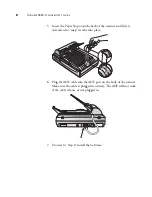
Page 15: ...of the scanner and slide it downward to snap its tabs into place 6 Plug the ADF cable into the ADF port on the body of the scanner Make sure the cable is plugged in securely The ADF will not work if t...

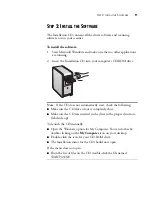
Page 16: ...If the CD does not automatically start check the following Make sure the CD drive s door is completely shut Make sure the CD was inserted in the drive in the proper direction label side up To launch...

Page 17: ...ion window opens automatically 3 On the Installation Main Menu click Install Products The next window lists the software that is available to install on your computer 4 Select Nuance PaperPort Scanner...

Page 18: ...alled 9 On the Customer Information window accept the current values or enter new information then click Next 10 On the Setup Type window keep the default Setup Type and click Next 11 Click Install to...

Page 19: ...On the Visioneer License Agreement window read the license agreement If you accept the terms select I Agree and click Next If you choose not to accept the license agreement the installation will term...

Page 20: ...s that you can use several different methods to scan as explained in this User Guide TWAIN and ISIS The TWAIN and ISIS drivers are installed The OneTouch 4 0 Monitor will not run and you cannot use th...

Page 21: ...f the images for your Color Space setting The Color Space setting sets the gamma value for the scanner so scanned items look good on your monitor Gamma controls the brightness of the midtones of color...

Page 22: ...our computer is running AntiVirus or AntiSpyware software you may see messages asking you to allow installation Select the option to allow installation to proceed Note If you want to see more informat...

Page 23: ...canner Make sure the ADF cable is plugged in securely If the cable is loose the ADF will not function properly 2 Plug the power cord into the power supply and into a wall outlet Now proceed to the nex...

Page 24: ...performance however your scanner will also connect to a USB 1 1 port The USB symbol as seen in the above diagram identifies the location of the USB port on your computer If the plug does not attach e...

Page 25: ...an information bubble may open explaining that A HI SPEED USB device is plugged into a non HI SPEED USB hub Plug the USB cable into a USB 2 0 port if available or just disregard the message If you le...

Page 26: ...computer has found the new hardware or updated the driver database If your computer is running Windows XP you will see the following message 5 When you re certain that the software has completely loa...

Page 27: ...R S GUIDE 6 Click OK 7 Click Close on the Installation Complete window to close and exit the software installer 8 When the window appears for installing the QuickScan software click Next and follow th...

Page 28: ...ur Visioneer 9650 scanner and for the PaperPort software are also on the Installation CD To view the user s guides 1 Return to the Installation window and click User Guides The Visioneer User Guides w...

Page 29: ...dows To view and save the User Guides 1 Click the name of a User Guide you want to view and it will open in Acrobat Reader Use the Acrobat Reader Save command to save that User Guide on your computer...

Page 30: ...or Online Updates from the pop up menu 3 Follow the instructions on the screen and register your scanner by entering your scanner s serial number and your email address The serial number is located on...

Page 31: ...WAIN interface window The PaperPort software that you installed for your scanner uses the TWAIN interface for scanning but many other programs use it too so you can scan from them as well as from Pape...

Page 32: ...back of the scanner for the size of the paper Pull out the slide on the Stop for letter sized pages Push it in for legal sized pages Note Always remove any staples or paper clips from documents before...

Page 33: ...the pages into the Automatic Document Feeder To load a single item 1 Place the item on the scanner glass face down 2 Align the item with the arrow on the reference frame 3 Close the cover Important I...

Page 34: ...indows Notification Area at the bottom right corner of the screen The OneTouch Button Panel opens and shows the first five on screen scanning buttons Click the arrows to cycle through the buttons to f...

Page 35: ...e example below the Destination Application is PaperPort To cancel scanning click the Cancel button Important The OneTouch Properties window must be closed before you can scan from the Button Panel No...

Page 36: ...ouch Button Panel opens at its Button View which shows the on screen scanning buttons 2 To scan from the panel click the icon you want to use to scan 3 To see the detailed settings for a button click...

Page 37: ...ware View shows the current scanners connected to your computer To change the settings for a button 1 Right click on the button to open the OneTouch Properties window This number is the Button number...

Page 38: ...lect your new settings 4 To close the OneTouch Button Panel click the close button on the panel Note The configurations shown on this example of the OneTouch Properties window are for illustration pur...

Page 39: ...an a lot of documents that have faint images such as hand drawn sketches in light pencil you might want to change the button s name to Sketches and the Destination Application to Microsoft Paint or so...

Page 40: ...White 200dpi 8 5 x 11 page Brightness 50 2 PDF PaperPort Black White 300dpi 8 5 x 11 page Brightness 50 3 Print Printer Black White 300dpi 8 5 x 11 page Brightness 50 4 eMail Microsoft Outlook attach...

Page 41: ...e OneTouch Properties window 1 Click the OneTouch icon It is located in the Windows Notification Area at the bottom right corner of the screen 2 Right click a button on the OneTouch Button Panel Remem...

Page 42: ...in the PDF image format To make sure all of your computer s Destination Applications are linked to OneTouch 4 0 click the Refresh button The Destination Application This is the application that opens...

Page 43: ...scanning mode resolution dpi page size brightness and contrast To see a selected scan configuration s settings click its icon Click the icon again to close the detailed information These icons next to...

Page 44: ...for the scanned image for the selected button The formats are based on the type of destination application you select This example shows the formats that apply to Microsoft Outlook The button names in...

Page 45: ...n list select the application where you want documents sent when scanning is finished See Selecting Options for a Button on page 56 to display a full list of the Destination Applications that you can...

Page 46: ...e Destination Application the available formats are for text such as txt and rtf However if you select Microsoft Paint as the Destination Application then the available formats are for graphics such a...

Page 47: ...operties that you can select 1 On the OneTouch Properties window click a Destination Application 2 Click the Properties button A OneTouch 4 0 Link Properties dialog box opens for the type of Destinati...

Page 48: ...the folder to receive your scanned items 1 Select the PaperPort folder where you want the file of the scanned image to be located 2 Click OK 3 Click OK or Apply on the OneTouch Properties window When...

Page 49: ...u want The options will apply to all the applications in the group Always send a file even when no text was found The scanned file is sent to the OCR reader even if the image does not appear to contai...

Page 50: ...on that will appear in the OneTouch Destination List 5 In step 4 of the dialog box select the file formats that the application will accept Refer to the documentation that you received with the applic...

Page 51: ...reen Resolution Use this option to ensure that an image will fit on the computer s screen When a computer screen is set to a lower resolution bitmap images with a higher resolution may be too big to f...

Page 52: ...perties apply to the Destination Application named Transfer to Storage If a CD burner is attached to your computer you can also use this dialog box to start the Burn to CD process See the section Scan...

Page 53: ...ated for each month and week so you can keep track of when you scanned the documents 2 Click the Browse button to specify the location to store the scanned documents or type a location directly into t...

Page 54: ...OL you need to know which folder contains the scanned documents so you can manually attach them to your email messages 1 Click the Browse button under Folder for storing attachments and choose a folde...

Page 55: ...net options applicable to AOL 4 Select the options for color document handling Convert Bitmaps using Screen Resolution Use this option to ensure that an image will fit on the computer s screen When a...

Page 56: ...Select an image file format for photos artwork or other documents that you want to save as images BMP and TIFF are standard image file formats generally used if you want to do additional image process...

Page 57: ...PDF as the page format 2 Right click on the JPG or PDF icon A menu opens 3 Choose the file size image quality option for your scanned images Minimize Size Smallest file size lowest image quality Norma...

Page 58: ...as a business letter report or spreadsheet The text format icon may have additional file formats available depending on the Destination Application you select The specific file format is the file nam...

Page 59: ...tly selected on the OneTouch Properties window Other buttons that have a text option selected as the Page Format are not affected so you can set the text file type independently for each button Simple...

Page 60: ...e Destination Application with their text ready for editing and other text processing To select OCR settings 1 Select the Destination Application 2 Right click on a text format icon Note Visioneer rec...

Page 61: ...y rotate an improperly oriented page image so the text is recognizable by the OCR process Single column output Select this option to produce a single column of text in the Destination Application even...

Page 62: ...F but you can edit the names To change the button names 1 Open the OneTouch Properties window 2 Using the arrows choose the button that you want to rename 3 Select the name s text and type a new name...

Page 63: ...and choose the button for new options 3 Select button options as described below Show All Destinations This option selects all the Destination Application categories The list of Destination Applicatio...

Page 64: ...ail applications See eMail Properties on page 47 for details about attaching scanned documents to your email messages Storage and CD R W is for either storing scanned documents in a folder or sending...

Page 65: ...e 59 and the description below This option is not available if either the Document Management or Storage and CD R W options are selected because by default file copies for those types of Destination A...

Page 66: ...file such as doc or jpg If you also want to group them by date you can choose the week and month options The following example shows the folders when the selections are Group items by type and Group i...

Page 67: ...reate a new configuration 1 Open the OneTouch Properties window and make sure the Multi Function tab is selected 2 Scroll through the applications in the Select Destination list and click the type of...

Page 68: ...Scan Settings tab is not selected click it 4 On the Scan Configuration Properties dialog box type a name If the configuration is locked click the lock to unlock it The icon becomes a key as shown her...

Page 69: ...is 50 dpi The higher the dpi setting the sharper and clearer the scanned image However higher dpi settings take longer to scan and produce larger files for the scanned images Brightness and Contrast S...

Page 70: ...size for items scanned on the Flatbed glass is 8 5 x 11 69 The units of measurement can be inches or millimeters Click the name of the units inches or millimeters to toggle between them Improvements a...

Page 71: ...Skewed pages may not scan properly and the autocropped image may not be correct Reduce Moire Patterns Moire patterns are wavy rippled lines that sometimes appear on the scanned images of photographs...

Page 72: ...option reverses the black and whites of an image Color Filter Color filter is the ability of your scanner to automatically remove a color from a scanned item For example if you are scanning a letter w...

Page 73: ...or your eyes see as reflected from the image and gamma controls the brightness of the midtones of the color 9 Drag the sliders to the left and right to change the color settings As you do the image ch...

Page 74: ...e will automatically be reduced to fit the page Actual size crop image if necessary If the scanned image is too big to be printed or faxed on a single page the image will automatically be cropped arou...

Page 75: ...s tab to select where you want to save your scanned items for storage when scanning with that particular Scan Configuration Button 7 is set as the default Archive button for scanning to storage with T...

Page 76: ...nth and week so you can keep track of when you scanned the documents By default the location of the archived documents is at C Documents and Settings your user name My Documents My OneTouch Archive an...

Page 77: ...rations with Transfer to Storage as the Destination Application and assign each scan configuration to one of the buttons Setting up multiple folders for transfer to storage 1 Using Microsoft Windows c...

Page 78: ...ich folder it is give the new configuration a name that indicates the folder name such as Storage for Business Receipts 6 Click the Storage Options tab 7 Click the Browse button 8 Select the folder yo...

Page 79: ...a Transfer to Storage configuration 11 Repeat the process to create additional new configurations such as one named Storage for Personal Receipts 12 Make sure to designate separate folders as the Sto...

Page 80: ...ples show that buttons 7 and 8 have been set to scan to each of the new configurations Note that the button names have also been changed to Storage 1 and Storage 2 to remind you that both send documen...

Page 81: ...one of the buttons set up for scanning to storage 3 Click the button on the OneTouch Panel 4 When scanning is finished put the next set of documents into the scanner and click the arrows on the OneTo...

Page 82: ...those configurations locked and do not edit or delete them That way you will always have the factory settings available If you do edit or delete them and want to get the factory pre sets back again y...

Page 83: ...indicates the configuration is unlocked 5 Edit the settings and click OK 6 Click OK to close the dialog box CONFIGURING BEFORE SCANNING You can manually configure the scan settings before beginning t...

Page 84: ...ake changes prior to scanning available on Windows XP only See Scanning with the WIA Interface on page 119 5 Click OK or Apply on the OneTouch Properties window Note choosing Configure Before Scan sim...

Page 85: ...k CD into your computer s CD Drive 2 Open the OneTouch Properties window 3 Using the arrows choose a button to use for scanning and burning to a CD 4 Select Burn to CD as the Destination Application T...

Page 86: ...The OneTouch 4 0 Link Properties window opens 9 Make sure a CD is in the CD burner 10 Click the Burn to CD button The CD burner begins and your scanned documents are written to the CD Note Until you...

Page 87: ...fault configurations are already set up to send the scanned images to the proper storage location where the Windows XP CD writing wizard can find the files to burn to the CD Likewise when you create a...

Page 88: ...tion Application Note that you cannot choose a page format for this option because the actual destination application is not selected until after the scanner feeds in the first page of your document 4...

Page 89: ...n you selected for event forwarding A dialog box opens for you to select the application to use for scanning 7 Select the application in the box and click OK Now the application you selected opens and...

Page 90: ...processing This is essentially from your scanner to a web ready format in one automatic step To scan and create an HTML web page 1 Open the OneTouch Properties window 2 Using the arrows choose a butt...

Page 91: ...n opens showing your converted page 8 Choose Save As from the Internet Explorer File menu give the page a name and save it in the location you use for your web page files You may also want to write do...

Page 92: ...or process them in any other way If you choose a text format for the file format the documents are also automatically converted by the OCR process into editable text and numbers before being stored 1...

Page 93: ...utton if it is set up with Transfer to Storage as one of its Destination Applications 3 Choose a text format as the file format Note The Storage Location shown in the example above is the default plac...

Page 94: ...TS TO A SERVER OR MAPPED DRIVE When selecting the storage location for scanned documents you can select a local folder or a folder on a server or mapped drive You select a mapped drive using the Brows...

Page 95: ...canned documents Servers and mapped drives are represented by an icon that indicates its network connection 4 Click OK Now when you scan using Transfer to Storage as the Destination Application the do...

Page 96: ...AMP POWER SAVING 1 Right click on the OneTouch icon and choose Show Hardware from the pop up menu You can also click the scanner icon at the top of the OneTouch Button Panel If the Hardware View of th...

Page 97: ...90 VISIONEER 9650 SCANNER USER S GUIDE The Hardware Properties dialog box opens and shows information about your Visioneer 9650 scanner 2 Click the Properties button...

Page 98: ...re the scanner powers down from 1 minute to a maximum of 10 hours 3 Click the arrows for the Lamp timeout setting and choose a time To turn the lamp on and off manually without turning off power to th...

Page 99: ...an also open the TWAIN interface from many other graphics and imaging applications and scan from them as well Because the TWAIN interface is the same regardless of the software you use to open it you...

Page 100: ...on are for accessing the TWAIN interface from the PaperPort application To access the TWAIN interface from PaperPort 1 On the Windows taskbar click Start point to Programs point to ScanSoft PaperPort...

Page 101: ...you select from the list while PaperPort initializes the scanner Later on the scanner initializes immediately when you select it from the list Note If the Scan button at the bottom of panel is not av...

Page 102: ...w Multiple pages are stacked on the PaperPort Desktop if the type of image file can be stacked Note that items scanned as jpg files cannot be stacked on the desktop 6 The option Blank page is job sepa...

Page 103: ...r Flatbed See Scanning from the TWAIN Basic Interface on page 97 Advanced Interface The Advanced Interface includes all the settings of the Basic Interface plus a wide range of more advanced settings...

Page 104: ...Reflective Using Scans the document on the Flatbed Auto Document Feeder Simplex Scans one sided documents from the Automatic Document Feeder 2 Choose the color grayscale or black and white option from...

Page 105: ...Scan 6 When you re finished scanning items click Done to close the Basic Interface 7 If you re using PaperPort the PaperPort Scan message box opens Click Done When scanning is complete thumbnail imag...

Page 106: ...r left corner indicating it is your first selected area You can select up to six separate areas on an image at a time You can now move or resize the outline to select the specific area you want to sca...

Page 107: ...appear on the right side of the Advanced Interface where you can make changes if necessary When you are satisfied with the scan settings click Scan Click Preview to viewthe imagein the window Check t...

Page 108: ...white photographs and other higher quality black and white images You can also scan a color photo with this setting to turn its colors into gray shades The file size is about one third the size of a c...

Page 109: ...ick the Cancel button on the progress window 10 When you re finished scanning items click Done to close the Advanced Interface 11 If you re using PaperPort the PaperPort Scan message box opens Click D...

Page 110: ...f the Advanced Interface select a configuration for example Color Configurations 2 Click a setting in the list of settings or click its corresponding button on the right side of the Advanced Interface...

Page 111: ...ick the Resolution setting in the list or click the Resolution button Note The information in the scan settings list and the options you select on the various settings panels are interactive As you ch...

Page 112: ...the details However higher dpi settings also take longer to scan and produce larger files sizes Usually the higher resolution settings are used for precision work such as photographs or fine artwork T...

Page 113: ...er directly into the resolution setting box or click the up and down arrows to increase or decrease the setting The resolution settings on your Visioneer 9650 scanner range from 50 dpi to 600 dpi 3 Cl...

Page 114: ...ntrast is only available for Color and Gray Scale configurations To adjust the brightness and contrast 1 Drag the Brightness slider to the left to make the item darker or to the right to make the item...

Page 115: ...urity of a color and hue is the color your eyes see as reflected from the image The following figure shows the color options To adjust the color settings 1 Drag the Gamma Saturation and Color Hue slid...

Page 116: ...to scan only specific sections of an image For example if you re scanning a photograph and want to focus on one section adjusting the input size removes the rest of the photograph from the final scann...

Page 117: ...To resize the selected area put the pointer on a dotted line and drag it Note that as you drag a dotted line the menu selection for the image size changes to Custom to indicate you are customizing th...

Page 118: ...you click the icon the ruler units across the top and down the side of the window cycle among inches centimeters and pixels THE SCAN INFO BOX The following figure shows the information on the Scan In...

Page 119: ...iles for example Black White Configurations Custom 2 Adjust the settings as required and then click the Save As button The Save Profile dialog box opens 3 Type a name for the new profile and click OK...

Page 120: ...CONFIGURATION 1 Click the Device Configuration button The Device configuration window opens and shows the information about your scanner See the section Checking the Hardware and Setting the Lamp Powe...

Page 121: ...PaperPort to work with that scanning option Note Setting up PaperPort is a one time only process for each option from the Scanner drop down list Therefore you may have to set up PaperPort once each fo...

Page 122: ...t for your scanner 1 From the Scanner drop down list select one of the options such as TWAIN Visioneer 9650 2 Click the Setup button A window opens to begin the setup process 3 Click Yes then click Ne...

Page 123: ...cking the connection between your scanner and the computer 5 Click Next After the Setup Wizard checks the connections the next window is displayed It has a series of setup options but only the Basic s...

Page 124: ...ck Next The TWAIN Basic Interface opens 7 Insert a page into the scanner face up and the Scan button on the Basic Interface will become active Note If you are setting up PaperPort for the WIA or ISIS...

Page 125: ...w opens that says Basic scan test passed 9 Click Next on the message window The final Setup window opens to let you know the setup process is finished 10 Click Finish PaperPort is now set up for the s...

Page 126: ...ion WIA for acquiring images from scanners digital cameras and other digital devices You can scan from many Windows XP applications using the WIA interface The instructions in this section explain how...

Page 127: ...scan an item from PaperPort using WIA 1 On the Windows taskbar click Start point to Programs point to ScanSoft PaperPort then click PaperPort The PaperPort desktop opens 2 Click the Scan icon on the P...

Page 128: ...t scanning click Settings The default file type for documents is PDF and the default for photographs is JPG See the PaperPort User s Guide for more information about the PaperPort Settings Note If the...

Page 129: ...s JPG files cannot be stacked on the desktop Also see the PaperPort User s Guide for more information about stacks 6 The option Blank page is job separator is for when you load several separate scanni...

Page 130: ...ic Document Feeder select a paper size from the Page Size list If you re scanning from the Flatbed glass you can change the size of the scanned image after seeing a preview 11 Click Preview to preview...

Page 131: ...f the image If you re scanning from the ADF choose a new page size from the drop down menu 13 Preview the image again When you are satisfied with the image click the Scan button If the Create single p...

Page 132: ...an select new settings before you scan an item to fine tune exactly how you want to scan a particular item To select the scanner settings before you scan 1 On the scan window click Adjust the quality...

Page 133: ...choose the dots per inch dpi of the resolution The maximum resolution is 600 dpi the minimum is 50 dpi The higher the dpi setting the sharper and clearer the scanned image However higher dpi settings...

Page 134: ...the interface to use The interface is also available from ISIS scanning applications If you are using an ISIS application to scan please see its User s Guide for the steps to open the interface To ope...

Page 135: ...on the right side of the window Note If you preview when scanning a stack of documents the first page of the stack feeds through the ADF for the preview After adjusting the scanner settings replace t...

Page 136: ...ocument pages feed through the Automatic Document Feeder and are scanned with the new scan settings To scan with the Flatbed 1 Click the Flatbed tab at the top of the window 2 Click the button most ap...

Page 137: ...ings ADJUSTING THE ISIS SCAN SETTINGS You can adjust the scan settings for the selected type of scan To adjust the Color Document GrayScale or Text Document settings 1 Click the Color Document button...

Page 138: ...ow and choose a resolution dpi Your Visioneer 9650 scanner can scan up to 600 dpi Page Click the menu arrow and choose a page size Your Visioneer 9650 scanner can scan a page up to 8 5 x 14 2 Click OK...

Page 139: ...to produce newspaper and magazine images Use this setting for lower resolution black and white images The halftone settings also produce small file sizes Diffusion Also converts the image to gray ton...

Page 140: ...the rectangle put the crosshairs cursor in it hold down the Ctrl key and drag the mouse You can also type new numbers in the boxes on the left 5 To resize the rectangle click in the Width or Length b...

Page 141: ...ded in this User s Guide If you open the QuickScan software to scan directly from it you may see the following warning message 1 Please disregard this message and click Continue The Pixel Translations...

Page 142: ...ned item wipe the scanner glass with a soft clean cloth to rid the glass of dust or other debris CLEARING PAPER JAMS If your scanner stops scanning due to a paper jam in the Automatic Document Feeder...

Page 143: ...pe the feed roller from side to side Rotate the roller to clean its entire surface 4 Wipe the ADF pad from top to bottom Be careful not to snag the cloth on the springs on either side of the pad 5 Clo...

Page 144: ...pad is wearing thin You received a replacement pad in the original scanner box and you can also order a new one See the Visioneer 9650 Scanner Parts List on page 146 for ordering information To replac...

Page 145: ...y A worn roller can cause documents to feed in skewed at an angle or multiple pages to feed at the same time In both cases paper jams may occur A worn roller should be replaced to avoid damage to the...

Page 146: ...king tabs are free from the ADF cover 4 Gently slide the roller to the right until the left side is free from its mounting hole 5 You can now angle the roller assembly out and away from its housing 6...

Page 147: ...in securely Inspect all cable connections Make sure all the cables are plugged in securely Are the scanner s status lights on Turn on the scanner s power If the lights still don t come on plug the po...

Page 148: ...d then plug it back in If the scanner does not reconnect 1 Unplug the power cable from the scanner 2 Restart your computer 3 After the restart is complete plug the power cable back in Problem The inst...

Page 149: ...error codes Error Code Problem Description Solution 6 The status light is faulty Contact Visioneer Technical Support 7 The lamp in the scanner body has malfunctioned Make sure that the lamp has not be...

Page 150: ...s and asks if you are sure you want to remove OneTouch 4 0 from your computer Click Yes The OneTouch 4 0 software is removed from your computer 5 Unplug the scanner USB cable 6 Close all open windows...

Page 151: ...le click the Add or Remove Programs icon c Select OneTouch 4 0 then click on the Remove button d An Add or Remove message box opens and asks if you are sure you want to remove OneTouch 4 0 from your c...

Page 152: ...scent lamp Interface Hi Speed USB 2 0 compatible with USB 1 1 Scanner dimensions Height 7 5 inches 19 cm Width 12 inches 30 5 cm Length 17 5 inches 44 5 cm Weight 10 95 pounds 4 96 kg Operating temper...

Page 153: ...bers when ordering replacements for your Visioneer 9650 scanner Part Name Part Number Paper guide assembly 57 0097 000 Paper guide extension 57 0098 000 Paper stopper assembly 57 0099 000 ADF Pad asse...

Page 154: ...on settings 38 C CD starting manually 9 Color 62 101 color hue 108 options 108 Color Document button 130 color filter 65 computer restart 140 Configure Before Scan 76 127 Contrast 62 107 126 131 creat...

Page 155: ...nitor 4 O OCR 51 columns 54 optical character recognition 53 storage 86 OCR options 53 on off switch 3 18 OneTouch Button Panel 27 Button View 29 Detail View 30 Hardware View 30 initial settings 33 na...

Page 156: ...age 63 spreadsheet 53 status light 3 18 140 troubleshooting codes 142 Sti event forwarding 57 Storage and CD R W 57 Storage Properties 45 Straighten Image 64 system requirements 4 T technical support...

Page 157: ...INDEX 150...

Page 158: ...Copyright 2006 Visioneer Inc 05 0486 600 visioneer...

Reviews: