background image


39056 

Night Vision Camcorder 


User Manual 


© 2009-2012 Sakar International, Inc. All rights reserved. 

Windows and the Windows logo are registered trademarks of Microsoft Corporation. 

All other trademarks are the property of their respective companies. 

Summary of Contents for 39056 Digital Camera

Page 1: ...mcorder User Manual 2009 2012 Sakar International Inc All rights reserved Windows and the Windows logo are registered trademarks of Microsoft Corporation All other trademarks are the property of their...

Page 2: ...des 12 Camcorder Features Infrared Night Vision Light ViviLink Resolution 13 Video Capture Mode 15 Photo Capture Mode 17 Playback Mode 19 Setup Mode 23 Installing the Software 25 Connecting the Camcor...

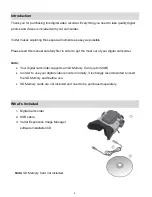
Page 3: ...ly first in order to get the most out of your digital camcorder Note Your digital camcorder supports an SD Memory Card up to 32GB In order to use your digital video recorder normally it is strongly re...

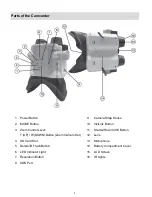
Page 4: ...10 ViviLink Button 3 Zoom Control Lever T UP W DOWN Button Zoom In Zoom Out 11 Shutter Record OK Button 12 Lens 4 SD Card Slot 13 Microphone 5 Delete IR Flash Button 14 Battery Compartment Cover 6 LED...

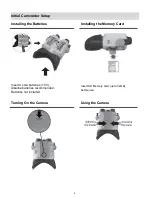
Page 5: ...tup Installing the Batteries Installing the Memory Card Insert 4 x AA batteries 1 5V Alkaline batteries recommended Batteries not included Insert SD Memory card up to 32GB before use Turning On the Ca...

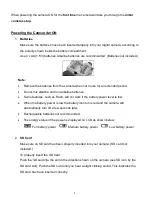
Page 6: ...Some features such as Flash will not work if the battery power level is low When the battery power is low the battery icon turns red and the camera will automatically turn off a few seconds later Rech...

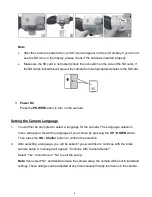
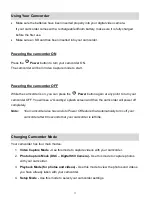
Page 7: ...anguage 1 You will first be prompted to select a language for the camera The Language selection menu will appear Select the language of your choice by pressing the UP DOWN button Then press the OK Shu...

Page 8: ...the accompanying software application 1 First you will be asked to choose the default ViviLink social network for Photos Use the UP DOWN button to highlight the desired default social network and pre...

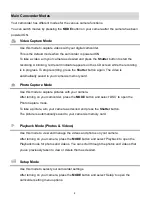
Page 9: ...memory card Photo Capture Mode Use this mode to capture pictures with your camera After turning on your camcorder press the MODE button and select DSC to open the Photo Capture mode To take a picture...

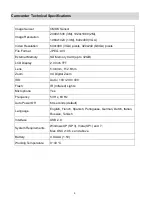
Page 10: ...emory Card up to 32GB LCD Display 2 0 Inch TFT Lens f 4 8mm F 2 6mm Zoom 4X Digital Zoom ISO Auto 100 200 400 Flash IR Infrared Lights Microphone Yes Frequency 50 Hz 60 Hz Auto Power Off 60 seconds de...

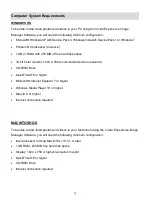
Page 11: ...nitor 1024 X 768 recommended screen resolution CD ROM Drive QuickTime 6 or higher Microsoft Internet Explorer 7 or higher Windows Media Player 10 or higher DirectX 9 or higher Internet connection requ...

Page 12: ...n at any point to turn your camcorder OFF You will see a Goodbye splash screen and then the camcorder will power off completely Note Your camcorder also has an Auto Power Off feature that automaticall...

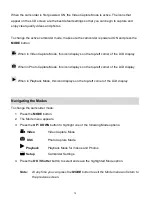
Page 13: ...pture Mode this icon displays on the top left corner of the LCD display When in Playback Mode this icon displays on the top left corner of the LCD display Navigating the Modes To change the camcorder...

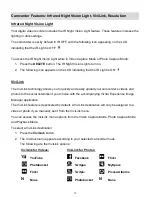
Page 14: ...ViviLink technology allows you to quickly and easily upload your camcorder s videos and photos to the social networks of your choice with the accompanying Vivitar Experience Image Manager application...

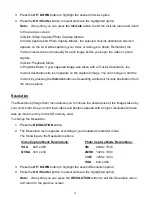
Page 15: ...add the ViviLink by pressing the ViviLink button and selecting a different ViviLink destination from the menu options Resolution The Resolution Image Size menu allows you to choose the desired size o...

Page 16: ...in your camcorder 2 To adjust the camcorder display you can use the zoom control lever Push the zoom control lever UP to zoom in T Zoom In UP Push the zoom control lever DOWN to zoom out W Zoom Out D...

Page 17: ...Infra red Night Vision Lights ON and OFF VIVILINK Opens the ViviLink for Videos menu screen which allows you to select your ViviLink Destination Site The ViviLink options include YouTube Photobucket...

Page 18: ...number of photos that can be taken appears on the top right of the LCD screen After the photo is taken the number is reduced by one The amount of photos that can be captured depends on the selected p...

Page 19: ...VIVILINK Opens the ViviLink for Photos menu screen which allows you to select your ViviLink Destination Site The ViviLink options include Facebook Twitgoo Twitpic Photobucket Flicker MySpace Picasa Al...

Page 20: ...ld like to view Each captured image videos and photos displays on the LCD screen Videos appear with an AVI icon on the top left of the LCD screen 2 Play your selected video Press the Shutter OK button...

Page 21: ...ction Buttons BUTTON FUNCTION Shutter OK PLAYS and PAUSES Video Playback Saves your selected menu option MODE Opens the Mode menu screen which allows you to select your camcorder mode The Mode options...

Page 22: ...leting the current image Delete All Images Deletes all videos and photos saved to your memory card All videos and photos are deleted Note After selecting this option you will need to reconfirm Select...

Page 23: ...stination site 1 View the video or photo you would like to delete If the selected image already has a ViviLink the ViviLink icon appears on the left side of the LCD screen 2 Press the ViviLink button...

Page 24: ...ench Spanish Portuguese German Dutch Italian Russian Turkish 6 Press the UP DOWN button to highlight the desired Language option 7 Press the OK Shutter button to select and save the highlighted option...

Page 25: ...P DOWN button to highlight Setup 3 Press the OK Shutter button to select and enter the Setup menu options 4 Press the UP DOWN button to highlight Default Setting 5 Press the OK Shutter button to selec...

Page 26: ...ation s CD DVD drive and click on Setup exe to launch the installer 3 On Macintosh Click the icon that appears on the desktop to install the Vivitar Experience Image Manager 4 If you do not have inter...

Page 27: ...installed and then click Install 11 Please wait while the application continues the installation process on your computer 12 On PC Click the Close button when the installation is complete Click the La...

Page 28: ...it will be selected automatically 5 Select a location on the computer where to place the new photo and video files 6 Add the new photo and video files to albums if desired 7 You can choose to remove t...

Page 29: ...Home screen Transferring Media from the Camcorder to the Computer Manually Transferring Photos and Videos WINDOWS 1 Use the supplied USB cable to connect your camcorder to your computer 2 MSDC appear...

Page 30: ...tibility with the iPad Apple iPad Camera Connection For models that are compatible with the iPad photos and videos can be imported from your digital camera to your iPad by following either one of the...

Page 31: ...ions not resulting from defects in material or workmanship and damages or malfunctions from other than normal use including but limited to repair by unauthorized parties tampering modification or acci...

Page 32: ...ome sample photos and then try downloading them again With test photos if the camera powers off before you upload them to the computer the photos are not stored in the camera s memory These photos sho...

Reviews: