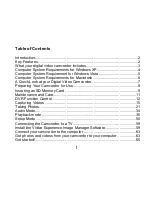
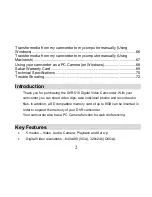
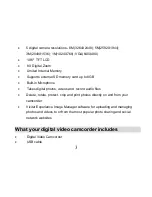
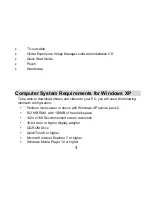
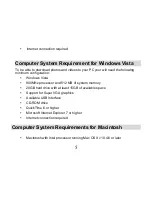
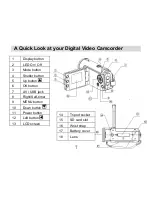
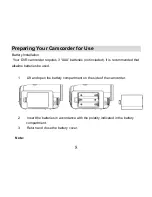
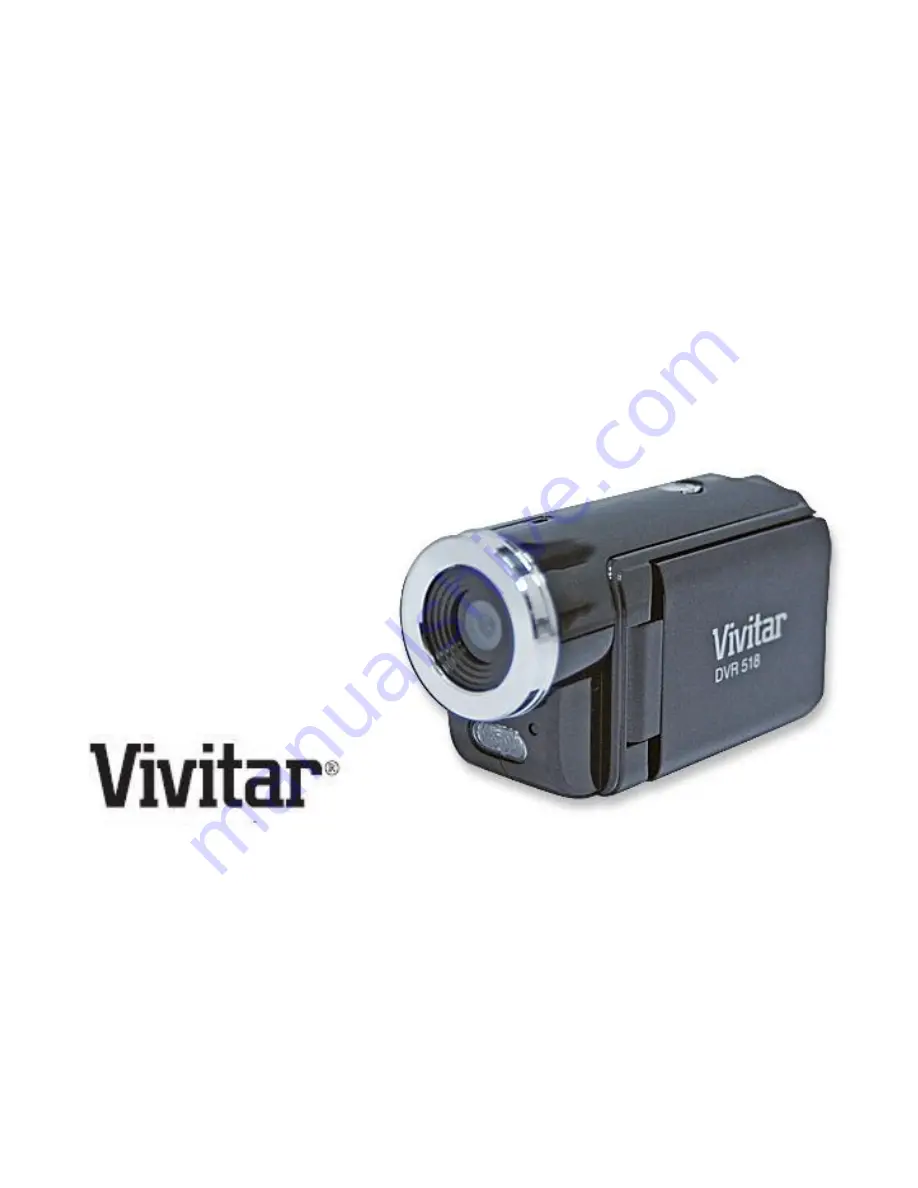
background image

DVR 518 

 Digital Video Camcorder 

User

’s Manual 


© 2009 Sakar International, Inc. All rights reserved. 
Windows and the Windows logo are registered trademarks of Microsoft Corporation. 
All other trademarks are the property of their respective companies. 

Summary of Contents for DVR-518

Page 1: ...Camcorder User s Manual 2009 Sakar International Inc All rights reserved Windows and the Windows logo are registered trademarks of Microsoft Corporation All other trademarks are the property of their...

Page 2: ...ok at your Digital Video Camcorder 7 Preparing Your Camcorder for Use 8 Inserting an SD Memory Card 9 Maintenance and Care 11 DVR Function Control 12 Capturing Videos 15 Taking Photos 21 Audio Mode 34...

Page 3: ...g 72 Introduction Thank you for purchasing the DVR 518 Digital Video Camcorder With your camcorder you can shoot video clips take individual photos and record audio files In addition a SD compatible m...

Page 4: ...GB Built in Microphone Takes digital photos videos and record audio files Delete rotate protect crop and print photos directly on and from your camcorder Vivitar Experience Image Manager software for...

Page 5: ...ad photos and videos to your PC you will need the following minimum configuration Pentium 4 processor or above with Windows XP service pack 2 512 MB RAM with 100MB of free disk space 1024 x 768 Recomm...

Page 6: ...Windows Vista 800MHz processor and 512 MB of system memory 20GB hard drive with at least 15GB of available space Support for Super VGA graphics Available USB Interface CD ROM drive QuickTime 6 or high...

Page 7: ...6 256 MB RAM 100 MB free disk space Display 1024 x 768 or higher resolution monitor QuickTime 6 or higher Internet connection required...

Page 8: ...2 LED On Off button 3 Mode button 4 Shutter button 5 Up button 6 OK button 7 AV USB jack 8 Right Self timer button 9 MENU button 10 Down button 11 Power button 12 Left button 13 LCD screen 14 Tripod...

Page 9: ...3 AAA batteries not included It is recommended that alkaline batteries be used 1 Lift and open the battery compartment on the side of the camcorder 2 Insert the batteries in accordance with the polar...

Page 10: ...ading your photos and videos regularly to your computer Remove the batteries from the DVR camcorder when not in use for an extended period Inserting an SD Memory Card An SD compatible memory card of u...

Page 11: ...nd The memory card when properly inserted will sit flush with the camcorder Note After you insert an SD memory card the SD card icon will appear on the right side of the LCD indicating that your SD me...

Page 12: ...erstand the safety precautions described below Do not try to open the case of the video camcorder or attempt to modify this video camcorder in any way Maintenance and repairs should be carried out onl...

Page 13: ...ill light up indicating that your DVR is ready for use Power off Press the Power button to turn your DVR camcorder off The DVR camcorder will switch off If the DVR camcorder is not in use or in an ope...

Page 14: ...o enter the Language submenu 6 Press the Up Down button to highlight and select the language you desire 7 Press the OK button to save your choice and for the language interface of the camcorder to cha...

Page 15: ...lose the menu and exit the Setup function Change the camcorder s mode There are four modes in this DVR camcorder 1 Press the POWER button to turn on the camcorder 2 The video default capture mode appe...

Page 16: ...le SD card of up to 8 GB to expand the memory capacity to capture even more and longer videos than can be captured using internal memory only The video icon will now appear on the top left corner of t...

Page 17: ...wnloaded to the PC view them using QuickTime and Windows Media Player 4 As the internal memory of the camcorder is limited it should be used for test files only 5 Please insert an SD memory card of up...

Page 18: ...You can also change the Frame Rate Metering and White Balance To enter the Settings options for the Video mode 1 Press the MENU button 2 Press the Up Down button to select the Setting you wish to chan...

Page 19: ...2 Press the OK button to open the Movie Size submenu 3 Press the Up Down button to highlight and select the resolution option VGA 640x480 QVGA 320x240 4 Press the OK button to confirm save your choice...

Page 20: ...to highlight and select the rate option 30fps High 15fps Low 4 Press the OK button to confirm save your choice and exit to the Setting menu 5 Press the MENU button to revert back to the Video capture...

Page 21: ...ring videos with the metering selected Note After selecting your metering choice the corresponding icon will appear on the top of the LCD White Balance This setting is used to adjust the color of your...

Page 22: ...n on the bottom left of the LCD screen The camera icon appears in the top left corner of the screen The camcorder s internal memory is limited per each resolution so it is recommended to insert a comp...

Page 23: ...tware as described below in the section Transfer photos and videos to your computer or insert an SD card to continue taking more photos and videos 6 The number of photos that can be captured not only...

Page 24: ...lude yourself in a photo by using this feature to delay the time between your pressing of the shutter button and when the photo is actually taken Place the camcorder on a tripod or on a flat and sturd...

Page 25: ...6 After the selected time delay the photo will be taken Method 2 1 In the camera mode press the MENU button 2 Press the Up Down button to select the Driver Mode menu option 3 Press the OK button to en...

Page 26: ...me delay the photo will be taken Burst Take 3 consecutive photos automatically You will need enough memory in the camcorder to use this option The Burst option is found together with the Self timer op...

Page 27: ...26 Capture Setting options...

Page 28: ...r Mode Effect and Date Stamp of the photos To enter the Settings options for the Capture mode 1 Press the MENU button 2 Press the Up Down button to select the Setting you wish to change from the menu...

Page 29: ...en the Resolution submenu 3 Press the Up Down button to highlight and select one of the resolution options 8M 3264X2448 5M 2592X1944 3M 2048X1536 1M 1024X768 VGA 640X480 4 Press the OK button to confi...

Page 30: ...lect one of the quality options Super Fine Normal 4 Press the OK button to confirm save your choice and exit to the Setting menu 5 Press the MENU button to revert back to the Camera capture mode to st...

Page 31: ...Press the OK button to confirm save your choice and exit to the Setting menu 5 Press the MENU button to revert back to the Camera capture mode to start taking photos with the metering selected Note Af...

Page 32: ...esponding icon will appear on the top of the LCD Exposure This setting allows you to manually compensate for unusual lighting conditions such as indirect indoor lighting dark backgrounds and strong ba...

Page 33: ...After selecting your Exposure choice the corresponding icon will appear on the top of the LCD Driver Mode Use this mode to activate the Self timer or the Burst continuous shot function 1 Press the Up...

Page 34: ...the Shutter button 3 photos will be taken automatically with 1 second intervals Effect This setting is used to change the image s color tone 1 Press the Up Down button to select the Effect menu 2 Pre...

Page 35: ...e Date Add date only to the image Date Time Add date and time to the image 4 Press the OK button to confirm save your choice and exit to the Setting menu 5 Press the MENU button to revert back to the...

Page 36: ...reen The amount of time that you have to record audio files appears on the top right corner of the LCD 1 Press the Shutter button to being recording 2 The lapsed time for the audio clip appears in the...

Page 37: ...the Playback icon only A Video file appears with an additional Video icon on the bottom left corner of the LCD An Audio file also appears with an Audio icon on the bottom left corner of the LCD In Pla...

Page 38: ...he images to appear as thumbnails 2 Press the OK button for the image to appear in full screen 3 If you selected a JPG file then once in full screen display mode you can press the Up button to Zoom in...

Page 39: ...ft Right Up Down buttons to navigate around your photo Press the OK button to exit the Zoom mode and revert back to the original photo You now have the option to edit these photos Lock Delete View as...

Page 40: ...firmation message will appear with Yes and No options 9 Press the Up Down button to select Yes to lock or No to exit 10 Press the OK button to confirm save and protect all the images 11 If you selecte...

Page 41: ...selected One and press the OK button a Delete This File confirmation message will appear with Yes and No options 6 Press the Up Down button to select Yes to delete or No to exit 7 If Yes press the OK...

Page 42: ...nd select one of the Slide Show options Start Interval Repeat 5 If you select Start the Slide Show will begin to play 6 Press the Up button to pause or again to continue 7 Press the OK button to exit...

Page 43: ...how will now play according to the new settings selected Effect This setting is used to change the image s color tone 1 Press the Up Down button to select the Effect menu 2 Press the OK button to open...

Page 44: ...he image each time 90 degrees to the right clockwise 6 Press the Up Down button to select the Back option to undo the last rotate before it is saved 7 Once you have rotated the image to your liking pr...

Page 45: ...captured in VGA cannot be resized 5 Press the OK button 6 A Waiting message appears while the image is saved and resized to the resolution you selected Voice Memo You can add a voice memo message to...

Page 46: ...tton to Rewind The Up button the pause the voice memo and the Right button to Fast Forward 10 If you wish to delete a voice memo from a photo select the Delete option 11 Press the OK button The voice...

Page 47: ...r AVI video files You can playback AVI files with audio recorded on your camcorder or view them on your TV when the camcorder is connect to the TV with the TV out cable provided 1 Use the Left Right b...

Page 48: ...MENU button 2 Press the Up Down button to select the Lock menu 3 Press the OK button to open the Lock submenu 4 Press the Up Down button to highlight and select one of the lock options Lock Unlock One...

Page 49: ...12 Press the Up Down button to select Yes to unlock or No to exit 13 Press the OK button to confirm save and unprotect all the previously protected images Note After selecting your lock preference the...

Page 50: ...s to delete or No to exit 7 If Yes press the OK button to confirm save and delete the selected image 8 If the selected file is locked a File locked message will appear To unlock the file follow Steps...

Page 51: ...Setup mode you can set Sounds Auto Review Power Frequency Power Save Date Time Language TV Out USB Start up Image Format and Reset All 1 Press the MENU button 2 Press the Right button to select the ic...

Page 52: ...e 6 The set the Start up sound press the Left Right button to select None 1 2 or 3 Each number has a different sound that sounds when selected 7 Press the OK button to save your choice 8 To turn on or...

Page 53: ...K button to save the Auto Review option that you selected 5 Press the MENU button to close the menu and exit the Setup function Power Frequency In this Setup mode you can adjust the light frequency de...

Page 54: ...re the camcorder will automatically power off if the camcorder is left on and not in use 1 Press the Up Down button to select the Power Save menu 2 Press the OK button to open the Power Save submenu 3...

Page 55: ...Date Time settings 3 Press the Left Right button to select the options Year Month Day Hour Minute and Date Format YYYY MM DD DD MM YYYY MM DD YYYY 4 Press the Up Down button to change the digits on e...

Page 56: ...terface of the camcorder to change to the language you selected 5 Press the MENU button to close the menu and exit the Setup function TV Out The image of the picture you wish to capture on the LCD can...

Page 57: ...our camcorder to the PC using the USB cable 1 Press the Up Down button and select the USB option from the menu 2 Press the Right button to enter the USB submenu 3 Press the Up Down button to highlight...

Page 58: ...My Image option the photo that you selected in the Startup image section of the Playback mode will appear on power on 7 Press the OK button to save your choice 8 Press the MENU button to close the me...

Page 59: ...camcorder is formatted Reset All Using this function will reset the camcorder to the original factory settings 1 Press the Up Down button and select the Reset All option from the menu 2 Press the OK b...

Page 60: ...video camcorder and then set the TV to AV mode 3 When the video camcorder is set to record capture or playback mode you can preview the subjects you want to record on the TV screen 4 When the video c...

Page 61: ...osh Click the icon to install the Vivitar Experience Image Manager 4 If you do not have internet access at the time of inserting the CD ROM connect to the internet and then click the Install Vivitar E...

Page 62: ...dow opens choose your language and click Next to open the next window 6 Select your camcorder model from the list and click Next to open the next window 7 Click Next to confirm your camcorder model se...

Page 63: ...se wait while the application continues the installation process on your computer 12 On PC Click the Close button when the installation is complete Note If your camcorder is also a PC camera the PC ca...

Page 64: ...our camcorder is in Mass Storage Mode 5 If your camcorder appears in PC Camera mode press the DV DSC button on the bottom left of the LCD screen to change it back to Mass Storage mode 6 To use your ca...

Page 65: ...64...

Page 66: ...ia button to transfer the photos and videos from your camcorder to your computer A media download progress bar appears on the bottom left showing the number of media files downloading to your computer...

Page 67: ...in Mass Storage Mode 3 If your camcorder appears in PC Camera mode press the DV DSC button on the bottom left of the LCD screen to change it back to Mass Storage mode 4 A window appears with a list o...

Page 68: ...evice icon and open the DCIM folder and the folder inside to view the media files 6 Select the files and drag them into your computer Optionally select the files and choose Copy from the Finder s Edit...

Page 69: ...ke sure the camcorder is in PC Camera mode To change to PC Cam mode if the MSDC mode appears press the DV DSC button on the bottom left of the LCD screen 4 Wait for the computer to recognize the new h...

Page 70: ...sulting from defects in material or workmanship and damages or malfunctions from other than normal use including but limited to repair by unauthorized parties tampering modification or accident What T...

Page 71: ...hone support in the US please call 1 800 592 9541 in the UK call 0800 917 4831 If you would like to call from anywhere else please visit www vivitar com for your local toll free number Technical Speci...

Page 72: ...orescent Cloudy Exposure control 2EV to 2EV in 0 3 counts Photo effect Color Sepia Monochrome Language English French German Italian Spanish Portuguese and Dutch Burst Included TV out NTSC PAL Microph...

Page 73: ...emory card again or use a new card Image is blurry or out of focus 1 The video camcorder was moving when the image was captured Hold the video camcorder steady when shooting picture Image is not displ...

Page 74: ...73 A00 090518GES...

Reviews: