background image

Mobile Generator

G 150
G 180
G 240

OPERATOR’S MANUAL

0171953en

003

0709

0

1

7

1

9

5

3

E

N

Summary of Contents for G 150

Page 1: ...Mobile Generator G 150 G 180 G 240 OPERATOR S MANUAL 0171953en 003 0709 0 1 7 1 9 5 3 E N ...

Page 2: ......

Page 3: ...rtion of this information without notice Copyright notice All rights especially copying and distribution rights are reserved Copyright June 29 2009 by Wacker Neuson Corporation This publication may be reproduced through photocopying by the original purchaser of the machine Any other type of reproduction is prohibited without express written permission from Wacker Neuson Corporation Any type of rep...

Page 4: ...Foreword G 150 180 240 wc_tx000869gb fm 4 ...

Page 5: ...nerator monitoring 26 2 5 Engine Monitoring 27 2 6 Engine Shutdown Faults 28 2 7 Current Overload Fault 29 2 8 Warning Light 30 2 9 Voltage Selector 31 2 10 Emergency stop switch 32 2 11 Main line circuit breaker 33 2 12 Engine start switch 34 2 13 Adjusting voltage with the rheostat 35 2 14 Connection Lugs 36 2 15 Ground connection 36 2 16 Convenience receptacles 37 2 17 Remote run terminal block...

Page 6: ...e 55 3 7 Checking the Engine Coolant Level 56 3 8 Maintaining the Trailer 57 4 Factory Installed Options 58 4 1 Block Heater 58 4 2 LCD Strip Heater 59 4 3 Low Coolant Shutdown 60 4 4 Lube Level Maintainer 61 4 5 Temperature Activated Shutters 62 4 6 Lockable Battery Disconnect 62 5 Schematics 64 5 1 DC Schematic G 150 G 180 G 240 64 5 2 DC Schematic Components 65 5 3 AC Schematic G 150 G 180 66 5...

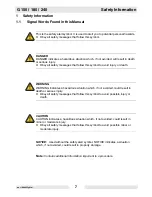
Page 7: ...ages that follow this symbol DANGER DANGER indicates a hazardous situation which if not avoided will result in death or serious injury f Obey all safety messages that follow this symbol to avoid injury or death WARNING WARNING indicates a hazardous situation which if not avoided could result in death or serious injury f Obey all safety messages that follow this symbol to avoid possible injury or d...

Page 8: ...enerator in standing water Make certain the machine is well grounded and securely fastened to a good earthen ground per national and local regulations Do not overload the generator The total amperage of the tools and equipment attached to the generator must not exceed the load rating of the generator WARNING Machines operated improperly or by untrained personnel can be hazardous f Read the operati...

Page 9: ...to or into the machine or exhaust compartment Storing the machine Store the machine properly when it is not being used The machine should be stored in a clean dry location out of the reach of children 1 3 Operator Safety While Using Internal Combustion Engines 1 Do not run engine indoors or in an area with poor ventilation unless exhaust hoses are used 2 Do not fill or drain the fuel tank near an ...

Page 10: ...at none are missing Brakes and lights Before towing follow the instructions below to ensure that the brakes and lights are ready for use Test the surge brakes on the trailer Test the brakes on the vehicle that will be used for towing Make sure directional and trailer lights are connected and working properly 1 5 Guidelines for Service Safety Prerequisites Before servicing this machine Stop the eng...

Page 11: ...rical components of this machine Service safety Do not modify the machine without the express written approval of the manufacturer Do not allow water to accumulate around the base of the machine If water is present move the machine and allow the machine to dry before servicing When cleaning the unit do not pressure wash the control panel or any other electrical components Replacing parts and label...

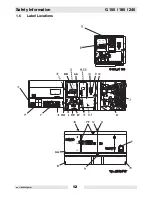
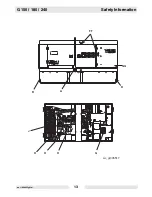
Page 12: ...Safety Information G 150 180 240 wc_si000265gb fm 12 wc_si000265gb fm 12 1 6 Label Locations ...

Page 13: ...G 150 180 240 Safety Information wc_si000265gb fm 13 wc_gr005517 G H J R GG FF R A H K ...

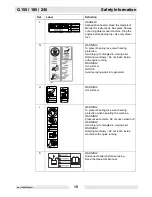
Page 14: ...lash or injury B WARNING Pressurized contents Do not open when hot C WARNING Read and understand the supplied Operator s Manual before operating the machine Failure to do so increases the risk of injury to yourself or others D NOTICE Never change switch position with engine running Results in damage to machine E WARNING Electric shock and arc flash can cause serious injury or death ...

Page 15: ...ed in moving belt Rotating machinery Do not reach inside with engine running WARNING Hot surface NOTICE Avoid spraying water into generator H WARNING Hot surface J WARNING To prevent hearing loss wear hearing protection when operating the machine WARNING Pressurized contents Do not open when hot WARNING Hand injury if entangled in moving belt WARNING Rotating machinery Do not reach inside machine ...

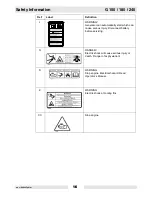
Page 16: ...atically start which can cause serious injury Disconnect battery before servicing O DANGER Electric shock will cause serious injury or death Danger of asphyxiation S WARNING Stop engine Electrical hazard Read Operator s Manual Z WARNING Electric shock at cooling fins CC Stop engine Ref Label Definition ...

Page 17: ...ored on machine Replacement Operator s Manual can be ordered through your local Wacker Neuson distributor G 240 G 150 G180 40Nm 29 5 Ft Lbs L3 N 277V L1 L2 480V L2 N 277V L1 N 277V L3 L1 480V L2 L3 480V L1 1 2 N 4 3 8 L L 12 5 6 L N L2 10 L3 9 7 11 L L L2 N 120V L1 L2 208V L3 N 120V L1 N 120V L2 L3 L1 208V L2 L3 208V 5 2 6 1 N 4 12 3 11 L1 9 L3 10 8 7 L N ...

Page 18: ... fm 18 wc_si000265gb fm 18 R Tie down point T Electrical ground U CAUTION Lifting point V Operating the main circuit breaker supplies or interrupts power to the customer connection lugs W Neutral bonded to frame X Engine wiring Ref Label Definition ...

Page 19: ... to specify the model number item number revision number and serial number of the unit BB This machine may be covered by one or more patents DD Remote start operation Read Operator s Manual for instructions EE NOTICE Receptacles not used when Selector switch set to 208 120V and voltage greater than 228V Selector switch set to 480 277V and voltage greater than 457V Ref Label Definition UTILITY 1591...

Page 20: ...r conforms with all Federal Motor Vehicle Standards in effect at the time of manufacture The label includes the Vehicle Identification Number VIN for the trailer Trailer Wiring G Right brake light and directional Y Left brake light and directional Br Tail side and license plate lights W Ground L Electric brakes B Battery charge if equipped CAUTION Do not use battery disconnect switch while engine ...

Page 21: ...ols or generator will occur Refer to Technical Data When using the generator as a standby or substitute power supply make sure the voltage and phase rotation of the line connections match those of the utility lines Failure to match phase rotation and voltage may cause equipment connected to the generator to operate incorrectly This could create unsafe operating conditions Do not exceed the rated c...

Page 22: ...Operation G 150 180 240 wc_tx000867gb fm 22 2 2 Control Panel wc_gr005090 m n u d e a t b f h c g j o l k ...

Page 23: ...aker n GFI receptacle 120 VAC 20 Amp two c Voltage adjustment rheostat o Remote run terminal block d Emergency stop p Interlock switch e Shutdown LED q Customer connection terminal lugs f Pre alarm LED r Ground connection g LCD panel s Voltage selector h Engine start switch t Voltage selector access door j Engine hours switch u Customer connection terminal lugs access door l Circuit breaker 120 24...

Page 24: ...service The timer starts at 250 and counts down to 0 The ECM displays this screen to indicate that the intake air is being heated The ECM displays this screen to signal that the intake air heating process is complete The ECM displays this screen as soon as the engine starts Note that some of the values such as voltage may not be up to their running values at this stage of the sequence The ECM disp...

Page 25: ...splays the line to line voltage This screen is shown for 3 phase VSS positions only At this point the ECM displays the run screen and the values for the main generator variables voltage phase leg amperage Hertz The ECM will also display the values for the main engine variables oil pressure fuel tank quantity engine temperature and battery voltage Note The ECM display scrolls through each phase P1 ...

Page 26: ...om scrolling press the ENG HRS switch down Volts V Displays the AC output voltage being produced by the generator Phase Ø Indicates which phase is currently being displayed Amps A Displays the AC output amperage produced by the generator If the generator is operating at no load output amperage will display a 0 Hertz Hz Displays output frequency ECM Display Description Sample display with engine ru...

Page 27: ... shut down BATTERY This gauge measures the engine starting battery voltage A normal reading is 13 5 14 5V If the gauge falls much below or above these values the engine charging system should be checked With the engine switch set to REMOTE START and the generator in stand by mode actual battery voltage is displayed ENGINE HOURS Pressing the switch UP causes the engine s running hours the periodic ...

Page 28: ...ber FMI Failure Mode Identifier Indicates that the engine speed exceeded approximately 2000 rpm 110 of its rated speed of 1800 rpm and the ECM has automatically shut the engine down Fault Overcrank is displayed when the engine fails to start during the normal cranking cycle and the Engine Control Module has automatically shut down the generator due to an overcrank condition A low fuel fault condit...

Page 29: ...fter a current overload fault Before restarting the generator Determine and eliminate the cause of the overload Review all loads attached to the generator Make sure these loads do not exceed the power rating of the unit Normal operating pressure is between 60 80 psi If oil pressure drops below 15 psi the engine will automatically shut down For machines with the Low Coolant Shutdown Option only Thi...

Page 30: ...ight serves as a pre alarm and turns on prior to a potential engine fault condition At the same time that the light goes on the LCD panel will begin blinking to indicate which engine function is approaching its fault value Engine pre alarms Fuel Level 15 High Temperature 226 F Low Oil Pressure 20 psi Time to Service 250 hours Shutdown 5 wc_gr005201 d ...

Page 31: ...VAC 3Ø 480 VAC 3Ø 139 240 VAC 3Ø Refer to section Voltage Adjustment Rheostat 139 240 VAC 3Ø Refer to section Voltage Adjustment Rheostat 277 480 VAC 3Ø 277 480 VAC 3Ø wc_gr005272 G 150 G 180 G 240 NOTICE NOTICE ACHTUNG ACHTUNG AVISO AVISO 208 208 120 120 Never change switch position Never change switch position with engine running with engine running Results in damage to machine Results in damage...

Page 32: ... located to the left of the control panel The button can be accessed with the panel doors closed It is electrically isolated from the switch and also from the rest of the metering panel Operation Activate the emergency stop switch by pressing the red button Activating the emergency stop switch opens the main circuit breaker and the fuel solenoid and results in the engine shutting down The switch w...

Page 33: ...ator or performing any service to the generator unit make sure the main line circuit breaker is in the off O position NOTICE The convenience receptacles are not connected through the main line circuit breaker but are connected directly to the generator windings As a result these receptacles are powered even with the main breaker in the off O position f To turn off power to receptacles open the ind...

Page 34: ...mote switch In the REMOTE START position the generator is in standby mode and will not start until the remote switch closes START RUN position In the START RUN position the switch immediately launches the engine start cycle and activates the starter motor to crank the engine Off O position In the off O position power to the engine s electrical system including the fuel solenoid is disconnected Not...

Page 35: ...is located directly to the left of the metering panel Use the rheostat to adjust the AC voltage output Operation To adjust the AC voltage output Loosen the locking nut Turn the adjusting screw clockwise to increase the voltage output Turn the adjusting screw counterclockwise to decrease the voltage output Monitor the voltage at the LCD panel f ...

Page 36: ...e slots in the bottom of the panel and into the lug Use a 5 16 inch or 8 mm Allen wrench to tighten the cable connections in place 2 15 Ground connection Location The ground connection r is located next to the connection lugs Connection Connect the ground lug to a good earthen ground for proper operating safety in compliance with NEC and local standards wc_gr005273 WARNING Electrocution hazard Hig...

Page 37: ...ime the generator is running even with the main line circuit breaker open Operating notes When the voltage selector switch is in the 480V 3Ø position voltage at the duplex receptacles is 139V and voltage at the 30 50A receptacles is 139 240V When the voltage selector switch is in the 208V 3Ø position voltage at the 30 50A receptacles is 120 208V When the voltage selector switch is in the 208V 3Ø p...

Page 38: ...onnection points for installation of a remote start switch When it is connected to a transfer switch it allows the generator to be used as a stand by power supply Connections When connecting a remote start switch or transfer switch use the inner two terminals on the remote run terminal block Note The bonding bar between the ground connections must remain in place at all times unless a qualified el...

Page 39: ...bs L3 N 277V L1 L2 480V L2 N 277V L1 N 277V L3 L1 480V L2 L3 480V L1 1 2 N 4 3 8 L L 12 5 6 L N L2 10 L3 9 7 11 L L L2 N 120V L1 L2 208V L3 N 120V L1 N 120V L2 L3 L1 208V L2 L3 208V 5 2 6 1 N 4 12 3 11 L1 9 L3 10 8 7 L N WARNING Hazardous voltage Improperly connected terminals can cause severe electrical shock burns or death f All connections to the terminals must be made by a qualified electricia...

Page 40: ...iler wheels Internal and pre operation checks check engine oil coolant and fuel levels fill as required check the fan belt and hoses on the engine for loose connections or fraying tighten or replace as required make sure that the generator is grounded to a good earthen ground per local regulations and NEC standards check that all electrical connections were made in compliance with local regulation...

Page 41: ...l and battery values 6 Press in the Emergency Stop Button d The LCD panel should read EMERGENCY STOP Release the stop button after verifying the display and return the Engine Start Switch to off O 7 Start engine by moving the Engine Start Switch to the START RUN position 8 After displaying INITIALIZING sequence the LCD display will read STARTING ENGINE as the engine begins its crank cycle The norm...

Page 42: ...uptor al estar marchando el motor Ya que esto podria el motor Ya que esto podria conducir a danos en el equipo conducir a danos en el equipo 240 240 120 120 480 480 277 277 176228 176228 Ne jamais changer la position Ne jamais changer la position de l interrupteur pendant que de l interrupteur pendant que le moteur est en marche Il le moteur est en marche Il pourrait en resulter risque pourrait en...

Page 43: ...r is running check for excessive vibration oil leaks or coolant leaks CAUTION Possibility of unexpected equipment start up f Disconnect all attached electrical devices before starting the machine f Before closing breakers make sure that any electrical devices attached down stream from the generator will not start up unexpectedly f Before placing the engine start switch in the REMOTE START position...

Page 44: ... 104 F fuel inlet temperature Refer to the table below to estimate the engine power decrease in percent as environmental factors vary from the standard conditions Engine power correction factors Model Fuel temp rise of 1 C 1 8 F Air temp rise of 12 C 10 F Altitude rise of 305 m 1000 ft above 3050 m 10 000 ft Relative humidity rise of 10 Altitude rise of 305 m 1000 ft below 3050 m 10 000 ft G 150 G...

Page 45: ...ntrolled heating system as shown in the illustration on the right This system prevents water vapor from condensing and freezing on the inner walls of the filter intake hose while operating the generator in extremely cold weather 2 24 Shutting off the generator Before shutdown Check with other personnel on the jobsite and let them know that power is being turned off Make sure that the power shutdow...

Page 46: ...ient capacity to lift the machine safely make sure the winch or crane to be used for lifting the machine is in operable condition and designed for such work Lifting the generator A central lifting eye is located at the top of the generator and is attached to a lifting frame inside the housing When lifting the generator attach a hook or sling securely to the lifting eye 2 27 Overnight storage When ...

Page 47: ...o complete the start circuit Wait for the engine to crank start and run Move the engine start switch to off O to stop the engine Remove the jumper wire from the remote run terminals after testing is complete 3 Secure the generator by closing and locking all doors 4 Set the engine start switch to REMOTE START and close the main line circuit breaker The generator is now ready for automatic starting ...

Page 48: ...els supplied with the switch WARNING Electrocution hazard Failure to isolate the generator from the utility s electrical distribution system could cause output from the generator to backfeed into the utility lines and cause injury or death to utility workers f When the generator is used as a standby power supply it must be equipped with a device which isolates it from the utility s distribution sy...

Page 49: ...the coupling and safety chains have failed The breakaway cable is not a parking brake and should not be used as one Check that all fasteners on the coupling are secure Check the tread wear and inflation on the tires Make sure that all lug nuts are in place and are tight Check the operation of the brakes by braking the vehicle at a slow speed before entering traffic Both the vehicle and the trailer...

Page 50: ...en towing maintain extra space between vehicles and avoid soft shoulders curbs and sudden lane changes If you have not pulled a trailer before practice turning stopping and backing up in an area away from heavy traffic Do not exceed 55 mph when towing a trailer ...

Page 51: ... Hrs Other Check engine oil and coolant level Check engine air filter gauge air cleaner dust cap Visual walkaround inspection Check tire inflation tread wear and lug nuts before towing Check fuel filter Service the battery Change engine oil and replace oil filter Clean unit inside and out Check air intake hoses connec tions and system Replace fuel filter element Check automatic belt tensioner and ...

Page 52: ...nd After maintenance has been performed on the generator it is necessary to reset the periodic maintenance timer Operation If the periodic maintenance timer is at zero press the ENG HRS switch UP and hold for 10 seconds until the TIME TO SERVICE resets to 250 hours If the service time is greater than zero maintenance was performed prior to the timer running out press and hold the ENG HRS switch UP...

Page 53: ...ilter element 5 Remove the end cover d then discard the entire air filter cartridge c 6 Insert a new air filter cartridge 7 Re install the end cover making sure that the dust cap is clean and pointing downward 8 Make sure that the intake piping a is fully engaged over the neck of the filter to ensure a good seal Maintenance Periodically make sure the inlet pipe is free from obstructions Check all ...

Page 54: ...t inside the canister so use caution to avoid spills 3 Pull the filter element down to remove it 4 Remove the O ring 5 from the top of the filter element end cap 7 Also remove the O ring 6 from the bottom of the filter head assembly Note Dispose of the used filter element and O rings in accordance with local envi ronmental protection regulations 5 Install a new O ring on the bottom of the filter h...

Page 55: ...the first 100 hour period a longer break in period may be required In these situations an additional 100 hour break in period is recommended using a new change of John Deere Engine Break In Oil and a new John Deere oil filter NOTICE Do not add more oil until the oil level is BELOW the ADD mark on the dipstick John Deere Engine Break In Oil TY22041 should be used to make up any oil consumed during ...

Page 56: ...ller cap seal for damage Clean the radiator filler cap or replace it if necessary 5 Re install the radiator filler cap NOTICE Solutions of antifreeze and supplemental coolant additives MUST be used year round Automotive type coolants do not contain the correct coolant additives to protect heavy duty diesel engines They often contain a high concentration of silicates which can damage the engine and...

Page 57: ...ng lug nuts immediately Axle Hubs Grease axle hubs using a good wheel bearing grease Brakes Check operation of brakes before each trip Check level of brake fluid in actuator at front of trailer at regular intervals Fill brake fluid to approximately 1 inch below top of reservoir using DOT 3 heavy duty brake fluid Tighten filler plug securely Note If fluid level has fallen too low bleed brake lines ...

Page 58: ...r Item Number Revision and Serial Number is attached to each unit Please have this information available when contacting Wacker Neuson Note The illustrations shown in this chapter represent typical installations The factory installed options on your machine may look different 4 1 Block Heater The engine block heater option includes a block heater a with a cord b The function of the block heater is...

Page 59: ...f the heater is sensed by the thermostat The resistance of the element changes with temperature At approximately 30 C 22 F the resistance value triggers the thermostat to send power to the element The LED c of the thermostat module flashes during operation It is important to note that the LCD strip heater is always on and thus draws power a very small amount from the battery even when the unit is ...

Page 60: ...olant levels are still sensed as being low the ECM shuts down the engine The ECM will then display the FAULT LOW WATER LEVEL Allow the engine to cool before adding additional coolant If it is necessary to open the radiator only do so with the engine off and only when coolant is cool enough to touch with bare hands Slowly loosen the radiator cap to relieve pressure first before removing it complete...

Page 61: ...he same as that measured by the engine dipstick A float inside the valve detects low oil levels and opens the valve to supply the needed oil The system is wired to the ECM and includes a low oil shutdown in case the oil in the reservoir is depleted If the engine shuts down due to low oil the ECM will display FAULT LOW OIL LEVEL Fill the engine and the additional oil reservoir with oil before placi...

Page 62: ...ing system As radiator coolant warms the wax pellet actuator engages a linkage c that opens the shutters As the coolant cools the shutters close 4 6 Lockable Battery Disconnect A lockable ON OFF switch is available which disconnects the battery A padlock not included securely locks the switch in the OFF position If equipped the battery disconnect switch is mounted to the upper skid beneath the acc...

Page 63: ...Factory Installed Options wc_tx000880gb fm 63 Notes ...

Page 64: ...Schematics G 150 180 240 wc_tx000879gb fm 64 5 Schematics 5 1 DC Schematic G 150 G 180 G 240 wc_gr005459 ...

Page 65: ...y 23 Main breaker 6 Remote start 24 Lug door safety switch 7 Fuel level 25 Mechanical lugs 8 Battery 26 Relay if equipped 9 Battery 27 Intake heater if equipped 10 Crank 28 Starter relay 11 Run fuel 29 Starter 12 Remote annunciator 30 Alternator 13 21 position connector 31 12V battery 14 Start relay 32 Battery disconnect switch 15 Alternator charge 33 John Deere engine ECU 16 B switched 34 Engine ...

Page 66: ...Schematics G 150 180 240 wc_tx000879gb fm 66 5 3 AC Schematic G 150 G 180 wc_gr005461 1 2 4 5 6 7 23 24 24 24 11 12 17 13 14 15 16 21 18 19 23 23 22 8 8 9 9 3 ...

Page 67: ...Plug 3 current transformer inputs 15 Rectifier 4 Phase switch 16 Rotor main field 5 Main breaker 17 Generator alternator 6 Lug safety limit switch 18 Stator aux winding 7 Mechanical lugs 19 Stator main windings 8 GFI receptacle 120V 21 Rotor 9 Circuit breaker 120V 20A 22 Terminate at strip on generator 11 Potentiometer 150K 23 Circuit breaker 240V 50A 12 Voltage regulator 24 Receptacle 240V 50A ...

Page 68: ...Schematics G 150 180 240 wc_tx000879gb fm 68 5 5 AC Schematic G 240 wc_gr005460 1 2 4 5 6 7 10 20 20 20 11 12 17 13 14 15 16 21 18 19 10 10 8 8 9 9 3 ...

Page 69: ...age inputs 13 Stator 3 Plug 3 current transformer inputs 14 Exciter 4 Voltage selector 15 Rectifier 5 Main breaker 16 Rotor main field 6 Lug safety limit switch 17 Generator alternator 7 Mechanical lugs 18 Stator aux winding 8 GFI receptacle 120V 19 Stator main windings 9 Circuit breaker 120V 20A 20 Receptacle 240V 50A 10 Circuit breaker 240V 50A 21 Rotor 11 Potentiometer 150K ...

Page 70: ...0305 G 240 0620300 0620301 0620302 Engine Engine make John Deere 6 8L Engine model 6068HF285 6068HF485 Number of cylinders 6 Displacement cm in 6800 415 Operating speed rpm 1800 Rated standby power 1800 rpm kW Hp 147 197 177 237 235 315 Coolant capacity l qts 11 9 13 Oil capacity l qts 32 5 34 3 Battery Volts CCA 12 1000 Fuel type type Clean filtered 1 or 2 diesel Fuel tank capacity l gal 1136 300...

Page 71: ...or 3 position switch 2 position reconnect able panel AC voltages available 1Ø V 3Ø V 120 127 139 240 254 277 208 220 240 416 440 480 Frequency 60 Hz Power factor 1Ø 3Ø 1 0 0 8 Voltage regulation 1 00 Insulation class H Sound level at 7 m 23 ft dB A 68 70 72 AC receptacles 2 duplex 3 twist lock 1Ø 120 GFI duplex Amps 2 20A 1Ø 120 240 V twist lock Amps 3 50A Standby output kW kVA 133 166 157 197 210...

Page 72: ... G 180 0620303 0620304 0620305 G 240 0620300 0620301 0620302 Generator Dry weight of skid kg lbs 2812 6202 2817 6213 3044 6714 Operating weight of skid kg lbs 3792 8362 3797 8373 4351 9594 Trailer weight without generator kg lbs 641 1414 GVWR kg lbs 5455 12 000 Surge brakes Fluid type Dot 3 Tires size 7 50 x 16E ...

Page 73: ...266gb fm 73 6 4 Dimensions G 150 G 180 G 240 Item Number 0620306 0620308 0620307 0620303 0620305 0620304 0620300 0620302 0620301 a mm in 3353 132 0 b 1321 52 0 c 1727 68 0 1816 71 5 1727 68 0 1816 71 5 1829 72 0 1918 75 5 wc_gr005159 b a c ...

Page 74: ...02 390 Wacker Neuson Corporation P O Box 9007 Menomonee Falls WI 53052 9007 Tel 262 255 0500 Fax 262 255 0550 Tel 800 770 0957 Wacker Neuson Limited Room 1701 03 1717 20 17 F Tower 1 Grand Century Place 193 Prince Edward Road West Mongkok Kowloon Hongkong Tel 852 3605 5360 Fax 852 2758 0032 ...

Reviews: