background image

I n s t a l l a t i o n   a n d   O p e r a t i o n   M a n u a l  

Electric Deep Fryer 

FN8127E 
FN8127EE 
FN8127E21 

FN8127EE21 
FN8224E 
FN8224EE 


Date Purchased 

Serial Number 

Dealer 


Service Provider 


228685-14 


For use in GB & IE 

FNL8127E 

FNL8127EE 
FNL8127E21 

FNL8127EE21 
FNL8224E 
FNL8224EE 

Summary of Contents for FN8127E

Page 1: ...a t i o n M a n u a l Electric Deep Fryer FN8127E FN8127EE FN8127E21 FN8127EE21 FN8224E FN8224EE Date Purchased Serial Number Dealer Service Provider 228685 14 For use in GB IE FNL8127E FNL8127EE FNL8...

Page 2: ...res tel 1800 337 963 Customer Service tel 1800 335 315 fax 1800 350 281 CANADA Serve Canada Web www servecanada com E Mail info servecanada com Sales tel 800 551 8795 Toll Free Service tel 800 263 145...

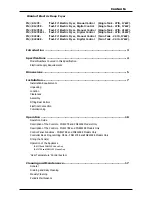
Page 3: ...overed in this Specification Electrical Supply Requirements Dimensions 5 Installation 7 Installation Requirements Unpacking Location Clearances Assembly Fitting Rear Rollers Electrical Connection Comm...

Page 4: ...7E21 Single Tank 21kW Model Only FN8224E Twin Tank FN8127EE Single Tank 17kW Model Only FN8127EE21 Single Tank 21kW Model Only FN8224EE Twin Tank Controller Advanced Programming Mode 29 Timing Mode Te...

Page 5: ...T TAKE GREAT CARE TO USE THE EQUIPMENT SAFELY AND TO GUARD IT AGAINST THE RISK OF FIRE THE APPLIANCE MUST NOT BE LEFT ON UNATTENDED IT IS RECOMMENDED THAT A REGULAR INSPECTION IS MADE BY A COMPETENT S...

Page 6: ...ghter than ordinary tough rubber sheathed oil resistant cord e g H05 RN F with sufficient current carrying capacity cable sizes The branch supply line shall be overload protected The point of connecti...

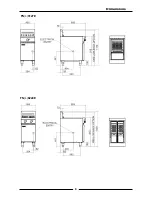
Page 7: ...5 Dimensions FN L 8127E FN L 8224E...

Page 8: ...6 Dimensions FN L 8224EE FN L 8127EE...

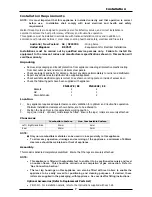
Page 9: ...g plate on inside of access door Check the following parts have been supplied with appliance FN8127E EE FN8224E EE Baskets 2 2 Lid 1 1 Drain Extension 1 2 Location 1 Any appliance requires adequate cl...

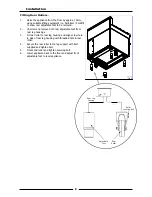
Page 10: ...rear leg housings 3 Fit rear roller to rear leg housing and align screw hole in side of rear leg housing with threaded hole in rear roller 4 Secure the rear roller to the leg support with bolt suppli...

Page 11: ...connections are correct and that all cover panels have been re fitted Check that the unit functions in accordance with the operating instructions Ensure the tank drain extension and this instruction m...

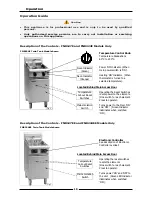
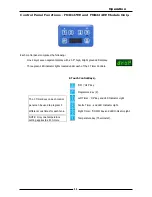
Page 12: ...s when switched ON Neon Indicator Green Neon Indicator Orange Temperature Cut out Reset Switches Located Behind Main Access Door Mains Isolation Switch Fig 2 FN8224EE Twin Tank Model shown Electronic...

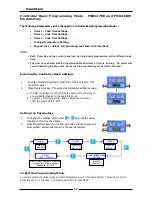
Page 13: ...ator lights located under each of the 3 Timer Controls NOTE Only one temperature setting applies to all 3 timers The 3 Timer Keys on each control panel can be used to program 3 different cook times fo...

Page 14: ...Programme Key P to access the parameter setting required a If LoC is displayed control panel is locked which will prevent any accidental change to the operating mode b To access parameters whilst LoC...

Page 15: ...n pre melting shortening only heat the shortening until it is just liquefied Do not bring the shortening up to high temperature as handling of hot shortening is dangerous If it is not possible to pre...

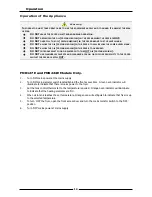
Page 16: ...fryer open the front access door and turn the mains Isolator Switch to the OFF position 6 Turn OFF mains power at mains supply THE OPERATOR MUST TAKE GREAT CARE TO USE THE EQUIPMENT SAFELY AND TO GUAR...

Page 17: ...c Programming Mode at the start of this section for the basic programmable settings for the controller Refer to the Controller Advanced Programming Mode section for controller advanced programming If...

Page 18: ...al Fail Safe Over Temperature Safety Cut Out for each tank Over Temp Control The over temp thermostat is mounted behind the transformer panel behind the access door and its sensing bulb is located alo...

Page 19: ...raining and Daily Cleaning 1 At the end of each day or at the end of each shift if frying schedule is heavy frying medium should be drained and filtered into a receptacle 2 Always filter the fryer whe...

Page 20: ...th a handle and dip into the hot frying medium from the container and pour around the sides and bottom of the fryer tank to wash out crumbs and particles adhering to the tank 8 Continue to dip and pou...

Page 21: ...sh as this will scratch the sides of the tank 6 Empty the fryer and rinse thoroughly with water Use a 1 part vinegar to 15 parts water solution to rinse the tank and neutralise any cleaner residue If...

Page 22: ...a thermometer or thermocouple Frying oil broken down Check amount of fresh frying medium added to fryer to be sure turnover is adequate Using wrong cooking frying medium Some frying mediums form gums...

Page 23: ...eating of oil Check thermostat setting with a thermometer or thermocouple Rapid breakdown of oil Use a stable frying oil Use of unrefined oils Dripping smokes at lower temperature than refined and deo...

Page 24: ...element is fully down in the flat cooking position Replace the thermostat Call service provider Over Temperature Thermostat Cuts Out Over temperature thermostat faulty Control thermostat not maintain...

Page 25: ...odel Only MICROSWITCH GEAR TRAY OVERTEMP PANEL ELEMENTS THERMOSTAT PANEL SELECTOR SWITCH THERMOSTAT POWER HEAT OVERTEMP L1 L2 L3 N EARTH 1 1 1 2 2 2 3 3 3 3 3 3 4 5 6 7 10 13 11 10 12 6 14 15 15 16 17...

Page 26: ...24 Wiring Schematics FN8127E21 Single Tank 21kW Model Only...

Page 27: ...3 N EARTH 1 1 1 2 2 2 3 3 3 7 9 10 27 26 26 25 23 29 24 23 25 35 36 7 7 3 3 3 8 8 4 4 6 6 6 15 7 5 7 31 22 16 17 30 31 SELECTOR SWITCH POWER HEAT 20 33 21 20 22 16 SELECTOR SWITCH POWER HEAT 13 28 14...

Page 28: ...ROL PANEL BROWN BROWN BROWN BROWN MICROSWITCH GEAR TRAY OVERTEMP PANEL ELEMENTS OVERTEMP L1 L2 L3 N 1 1 1 2 2 2 3 3 3 3 3 3 4 5 6 21 21 22 23 24 23 24 22 27 11 Com N O 26 7 7 8 8 9 19 12 13 14 15 16 1...

Page 29: ...27 Wiring Schematics FN8127EE21 Single Tank 21kW Model Only...

Page 30: ...26 27 25 51 7 7 3 3 3 8 8 4 4 6 6 6 15 5 5 5 43 44 22 28 42 43 5 5 5 45 44 7 7 7 ELEMENTS 50 26 30 11 29 29 10 10 50 51 11 12 41 34 35 36 37 38 33 33 40 39 22 15 16 17 18 19 14 14 21 13 20 31 PROBE P...

Page 31: ...is locked Unlock the control panel refer to Controller Basic Programming Mode Entering the Controller Basic Settings and repeat from Item 2 above Timing Mode 1 One of the following options will displa...

Page 32: ...screen 2 To change temperature offset option press either Timer 1 or Timer 3 Key to change selection 3 Press Program Key P to confirm the change and the display will step on to Temperature Display par...

Page 33: ...oximately 3 seconds Or not pressing any keys for 2 minutes during Advanced Programming Mode the appliance will exit Advanced Programming Mode and return to Idle Mode System Programmable Default Settin...

Page 34: ...Double Tank 6 6 017717 Temperature Probe 1 2 228660 Transformer 24Vac 1 2 020109 Fuse 2 Amp 1 2 229033 Fuse Holder 1 2 228707 Digital Controller 1 2 230101 Controller Overlay 3 basket timer 1 2 23173...

Page 35: ......

Reviews: