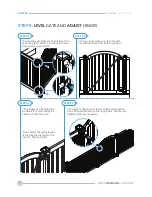
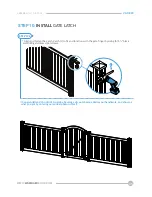
background image

WWW.

WAMBAM

FENCE.COM

1

ASSEMBLY


INSTRUCTIONS

VG13005

VG13005

ASSEMBLY


INSTRUCTIONS

60 MIN

Approximate assembly time

Want to see a video on how to 

assemble this product?  

Scan the QR code

YARD & POOL

VINYL GATE

(4’H X 4’W)

WWW.

WAMBAM

FENCE.COM

VER. 

051721

Summary of Contents for TRADITIONAL VG13005

Page 1: ...ASSEMBLY INSTRUCTIONS VG13005 VG13005 ASSEMBLY INSTRUCTIONS 60 MIN Approximate assembly time Want to see a video on how to assemble this product Scan the QR code YARD POOL VINYL GATE 4 H X 4 W WWW WAMBAMFENCE COM VER 051721 ...

Page 2: ...rvice department parts nychbrands com hmmm wambamfence com 704 892 5222 877 778 5733 Customer service agents are available to take calls weekdays from 9am 5pm EST If you call outside of business hours please leave a voicemail To help you quickly and accurately please have reference item number VG13005 and the specific part name which can be found on page 7 It is helpful if you can provide the batc...

Page 3: ...ines Fortunately this is made easy for you Local zoning laws and Home Owners Associations may reg ulate the height style and placement of your fence Some locations may even require a permit Ensure the installation of your fence is within your property line limits Your fence will become part of their yard too and you ll have an easier time building it if you can have access from both sides Besides ...

Page 4: ...fety Glasses 1ft Torpedo Level 4ft Level optional String Line Level 2in x 2in x 6in Inch Wood Spacer Block 2 for each panel Cordless Drill preferably with a high torque setting Shovel or Auger Any Power Or Hand Saw With A Fine Toothed Blade String Line Stakes Spool of String Tape Measure ...

Page 5: ...tter and last longer if your hinge post is connected to a panel of fence that is connected to another post This way the weight strain will be trans ferred onto two posts versus just one Installing fence panels on both sides of your gate is ideal in all situations If this is not possible because of space restrictions please contact us for alternative solutions It s easier to troubleshoot when thing...

Page 6: ...open outwards away from the pool c Latch releasing mechanism to be minimum 54 from the ground The Yard Pool gate will require a specialized latching system to meet pool code Use MagnaLatch Top Pull Hardware not included Magna Latch Top Pull Code is MLTPS2BGA Always confirm these and other requirements with the appropriate authorities in your area Code will change from one location to another acros...

Page 7: ...rew 14 Picket 1 2 x 1 x 54 Picket 2 2 x 1 x 53 Picket 3 2 x 1 x 521 8 Gate Hinge with Screws 2 C Top Rail 1 1 x 9 x 42 Bottom Rail 1 1 x 3 x 47 Pickets Gate Brace 1 F Vertical Stile 2 1 x 3 x 45 Picket 4 2 x 1 x 50 I Latch Finger 1 Latch Catch 1 N 23 4 Tension Pin 1 11 4 Black Self Drilling Stainless Steel Screw 24 K 11 4 White Self Drilling Stainless Steel Screw 16 ...

Page 8: ...S STEP 2 1 B STEP 2 2 Insert the Bottom Rail G all the way until it bottoms out inside the inside of the Corner Bracket B Note The bottom rail is ribbed internally Insert all the way to this point G STEP 2 3 Insert the bottom rail all the way until it bot toms out inside the opposite corner bracket as illustrated Insert the Vertical Stiles F They will bottom out against the bottom rail F 48in ...

Page 9: ...ICKETS STEP 3 1 Insert Pickets 1 2 3 and 4 E through the holes in the bottom rail in the pattern illustrated Slide the gate arch over the pick ets and vertical stiles A C Insert all the way to this point 1 2 3 4 STEP 4 1 STEP 4 2 1 2 3 4 Insert the Top Rail C inside the Arch Brackets A as illus trated E ...

Page 10: ...5 SECURE GATE FRAME AND BRACKETS STEP 5 1 Make sure your gate is square The corner to corner measurements must be the same and the width of the gate should be 48 Secure the brackets using 12 11 4 White Self Drilling Stainless Steel Screws K as illustrated 48 K ...

Page 11: ...NGES AND GATE LATCH STEP 6 1 1 Fasten the Latch Finger I onto the arch bracket using 6 11 4 Black Self Drilling Stainless Steel Screws L 2 Fasten the Gate Hinges H onto the opposite arch bracket and bottom bracket using 12 11 4 black self drilling stainless steel screws I H L ...

Page 12: ...emble the Gate Brace D by sliding the larger square tube over the smaller square tube Align the holes and install by using the included hardware D Double check that the gate is square and screw the gate brace into place by using 4 self drilling stainless steel screws packaged with the gate brace STEP 7 2 ...

Page 13: ... STEP 8 ALIGN GATE AND SECURE HINGES TO POSTS STEP 8 1 Use the wooden blocks as temporary spacers to rest the gate on during alignment and installa tion Fasten the gate hinges to the posts using 6 2 Black Self Drilling Stainless Steel Screws M STEP 8 2 M ...

Page 14: ...ss steel screws as illustrated Using a level make sure that the gate fits and functions with its latching post The hinges can be adjusted moderately to level the gate s alignment with the post The latch is designed for left and right hand applica tions Temporarily remove the spring bolt and reverse paddle portion as necessary Note Adjust the spring tension in the hinges as necessary Use the 23 4 T...

Page 15: ...10 1 Align and fasten the Latch Catch J to fit and function with the gate finger by using 6 11 4 black self drilling stainless steel screws Congratulations You did it Go grab a beverage of your choice admire your handiwork and show us what you got by entering our annual photo contest J ...

Page 16: ...WWW WAMBAMFENCE COM 16 ASSEMBLY INSTRUCTIONS VG13005 WWW WAMBAMFENCE COM 704 892 5222 877 778 5733 hmmm wambamfence com 6935 Reames Rd Ste K Charlotte NC 28216 ...

Reviews: