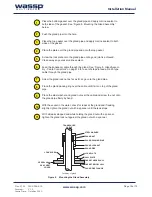
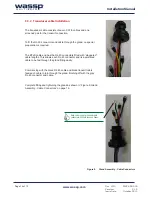
background image

Doc. P/N:


WSP-009-005

Version:


V1.1

Issue Date:


June 2012

INSTALLATION MANUAL

WMB-3250

Doc. P/N:


WSP-009-005

Version:


V1.5


Issue Date:


October 2013

Summary of Contents for WMB-3250

Page 1: ...Doc P N WSP 009 005 Version V1 1 Issue Date June 2012 INSTALLATION MANUAL WMB 3250 Doc P N WSP 009 005 Version V1 5 Issue Date October 2013...

Page 2: ...h incorrect installation Electrical Safety Fire electrical shock or equipment damage may occur if the BTxR becomes wet The equipment is rated for operation at BTxR 24 V DC WASSP Processor 9 32 V DC Ch...

Page 3: ...BTxR 6 1 BTxR Connections and Dimensions 18 6 2 BTxR Installation 19 6 2 1 BTxR Installation Considerations 19 6 2 2 BTxR Installation 19 6 2 3 Power to BTxR 21 7 WASSP Processor 7 1 WASSP Processor...

Page 4: ...ea Trial Commissioning Step 12 Beam Width Reduction 54 10 2 6 Sea Trial Commissioning Step 13 GPS Time Delay Required 55 10 2 7 Sea Trial Commissioning Step 14 Patch Test Roll 56 10 2 8 Sea Trial Comm...

Page 5: ...a user friendly mouse controlled Windows based operating system The system can output data to plotting and hydrographic software packages For optimal performance roll heave pitch heading and position...

Page 6: ...ams every ping For a 120 degree swath width the seafloor coverage is 3 4 x depth For example 200m depth gives over 600m seafloor coverage Unique power management system 14 power levels 14 power levels...

Page 7: ...c P N WSP 009 005 Version V1 5 Issue Date October 2013 www wassp com Page 7 of 73 Installation Manual 31 07 13 4 23 11 11 ADDED USB JW SR Figure 1 A fully functional WASSP system 3 System Configuratio...

Page 8: ...ASSP Processor Connect WASSP Processor to BTxR Set up WASSP Processor Software See 7 WASSP Processor on page 23 Position Motion Sensor Interface with WASSP Processor See 8 Sensors on page 27 Commissio...

Page 9: ...hull dead rise angle The transducer is best suited to steel and aluminium hulls A sea chest for housing and sealing the transducer should be designed and constructed by a reputable shipyard to suit th...

Page 10: ...Page 10 of 73 Installation Manual 5 2 Transducer Dimensions The drawing below gives the overall dimensions of the WASSP Transducer The recommended cut out dimensions for a mounting plate are also sho...

Page 11: ...beam is clear of hull Figure 4 Through Hull Transducer Mounting 5 3 Transducer Mounting Methods The above mounting example is provided as a guide WASSP Ltd recommend that a reputable boat builder is...

Page 12: ...tion sensors and be deployed on a rigid mount over the side or the stern of the vessel for use during survey operations AFT 90 90 90 FORWARD HORIZONTAL PLANE Keel Looking from above not to scale GPS T...

Page 13: ...planned in advance keeping in mind the fixed cable length of 10 meters and the following factors Air bubbles and turbulence caused by movement of the vessel seriously degrade the sounding capability o...

Page 14: ...gland pipe and a single gasket are the only parts of the gland that are located inside the sea chest or outside the hull all other parts are attached to the gland pipe inside the vessel Gland Mounting...

Page 15: ...and pipe and onto the top gasket Screw the lock plate onto the gland pipe until a good joint is achieved Clean away any excess marine sealant Feed the transducer cable through the gland See Figure 9 G...

Page 16: ...able through the gland no special preparation is required The BTxR cable end has the RJ 45 connectors fitted with staggered cable lengths This allows each RJ 45 connector and its associated cable to b...

Page 17: ...he BTxR and does NOT conform to T568A or B Pin 8 Pin 1 S c r e e n d r a i n w i r e B l u e a n d B l u e W h i t e Brown and Brown White G re e n a n d G re e n W h it e Orange and Orange White 5 5...

Page 18: ...EW SIDE VIEW Drawing not to scale All sizes in millimeters 19 19 497 535 456 172 5 24 5 FRONT VIEW 221 5 180 WASSP PC SENSOR 24V STATUS POWER TRANSDUCER Transmitter TRANSDUCER Receiver EARTHING STRAP...

Page 19: ...18 and Figure 11 BTxR Mounting Diagram on page 19 for BTxR dimensions and mounting clearances Using the mounting holes on the mounting flanges secure the BTxR to the mounting surface 80 Vertical Bulkh...

Page 20: ...Cables 24 Volt DC Power Supply Socket CAT5 Ethernet Cable Socket Figure 13 BTxR Cable Clamp The BTxR cable MUST be fitted with the supplied cable clamp to prevent strain on the RJ 45 connectors where...

Page 21: ...nector on the BTxR s faceplate end cover marked 24 V The power input uses a Switchcraft EN3 2 way connector to connect to the faceplate end cover See below for connection details Figure 15 Cable Clamp...

Page 22: ...Main Body Socket Locking Ring Locking Ring Tightening Tool E L N RED GREEN BLACK Push the socket into the main body rotating to make sure that the flat edge on the socket is aligned with the flat edg...

Page 23: ...er RS232 x 4 Serial communication ports for interfacing with GPS Satellite Antennae and Motion Sensors 7 2 WASSP Processor Mounting Considerations The supplied WASSP Processor must be mounted on a fla...

Page 24: ...K GUI WASSP PC DIAGNOSTICS TOOLS NAVIGATOR PROCESSING MODULE 7 3 1 User Dongle To run the system you must connect the supplied WASSP user dongle If you do not have a dongle attached to the system you...

Page 25: ...files specific to your system 1 Acquire the appropriate compensation files from your distributor 2 Copy the two files into the following folder on your WASSP Processor C Users WASSPUSER AppData Roami...

Page 26: ...3 Quit the WASSP GUI program a Click the Transmit Mode button to set the BTxR to standby b Click Close on the task bar The Exit System box appears c Click OK All files opened by the system are closed...

Page 27: ...ors For full details on installation and connection refer to Equipment Manuals NMEA sentences need to be converted from the current loop to the RS232 that is used by the computer If the data sources t...

Page 28: ...ort settings 1 Right click the WASSP Transfer Task icon on the Windows Task bar Click Setup The WASSP Transfer Task opens 2 The NMEA Settings are used to configure the transport protocol between senso...

Page 29: ...tput Sentence from the drop down menu d Select the Port Number as outlined in 8 2 WASSP Transfer Task Settings on page 28 e Set the Time Lag The Time Lag can be determined during the Commissioning Ste...

Page 30: ...ortant 3 Open the Sensor Values Tab under Ship Setup of the WASSP GUI and select either Use previous CTS 1 or Use previous CTS 0 4 Click Close The Ship Setup Options box closes 8 4 Accurate Time Synch...

Page 31: ...nces Table 3 Supported Sensors 8 5 Supported Sentences The following two tables show supported Sensors This is not a definitive list and is updated as required Device Configuration Suggestions Applani...

Page 32: ...he two systems 9 1 1 2 Serial Choose a device to use for time synchronisation This device must output NMEA or RS232 serial ZDA Use duplication a y cable or a low latency splitter 1ms to send this info...

Page 33: ...ethernet network as delays on this link will directly effect timestamp performance of the WASSP system This ethernet network card is configured for automatic configuration so if you wish it to use a s...

Page 34: ...the GPS device is created select the base of the HYPACK Configuration Tree This will then show an option to Synchronize the Computer Clock Select the GPS device from the list If this is not done the s...

Page 35: ...tion This should be a hard coded IP address rather than using DHCP or DNS server Enter the relevant values into the ethernet network Connection Settings spaces provided Figure 27 HYSWEEP Network Setup...

Page 36: ...ect Survey and HYSWEEP Survey This will open the HYPACK survey program and the HYSWEEP Survey interface The HYPACK side takes care of position and the HYSWEEP side connects to the WASSP Multibeam to c...

Page 37: ...evice Selections If a Roll sensor that is not recognised by HYSWEEP is used it may be possible to configure the WASSP system to convert the sentence to one recognised by HYSWEEP If the Roll sensor is...

Page 38: ...mpleted satisfactorily before continuing Failure to do this may invalidate the commissioning procedure Commissioning procedures are divided into two sets 1 Dockside Tests 2 Sea Trials For all commissi...

Page 39: ...igure 33 Ship Setup Options Offset Corrections Tab below Transducer Tx Depth Draft Displacement m GPS X Displacement from reference m GPS Y Displacement from reference m GPS Z Displacement from refere...

Page 40: ...Manual Figure 34 Ship Measurements Diagram R Tx X axis GPS X Tx X GPS GPS Tx R GPS Z Tx Z Tx Depth Displacement Z axis Y axis R Tx GPS Y Tx Y GPS Stern Negative Bow Positive Reference Sky Negative Re...

Page 41: ...GREEN the Q channel is displayed in RED and magnitude in YELLOW The letters along the lower axis are directly linked to the respective 26 channels on the receiver board and the transducer elements Th...

Page 42: ...October 2013 www wassp com Page 42 of 73 Installation Manual Figure 35 I Q Bar Graphs showing Good Reading Figure 36 I Q Bar Graphs showing problems I Q Bars with Channel X Disconnected Gain Slider Ch...

Page 43: ...is a typical shape When functioning correctly all 26 channels should display very similar information to each other Adjust the gain and range of the graph so that the graph s maximum range only just f...

Page 44: ...r effect see Figure 38 Sonar View with Transducer Number set to correct and incorrect values below Note In very shallow water it may help to increase the minimisation to 5000 as this will suppress pro...

Page 45: ...access Advanced Options by double clicking on the Gain Control button If possible do this test at rest with the engine out of gear and with all other sounding devices off Check the centre line of the...

Page 46: ...as a constant torch beam which moves with vessel motion Noise could fade in and out down this line depending on the frequency Figure 40 WASSP sonar display with low electrical noise Figure 42 Sonar di...

Page 47: ...to the Heading Offset The Heading offset can also be used to correct for alignment problems between the transducer and the heading source Refining this offset is a complex process and requires good po...

Page 48: ...e Current Local Time If not enter a number in the Local Time Adjustment until the Current Time is the same as the Local Time this number will be the Time Difference in hours of your current location f...

Page 49: ...ck bank or significantly sloped sea profile Use the waterfall view to navigate and cross your own track in opposite directions over this feature If the sonar display seems incorrect i e the bank appea...

Page 50: ...t it turns green Ensure that Automatic Power By Signal is selected in the Ship Setup Options Power Tab Wait until the blue power level display is set to at least 2 On the Menu Task Bar double click on...

Page 51: ...es less and less noticeable Set the Minimisation at the lowest value at which the ring is not visible See the Full Side Lobe Suppression image of Figure 46 Side Lobe Levels below If this value require...

Page 52: ...ry in the Ship Setup Options Sound Speed Tab Find a section of seafloor that is known to be flat preferably 20 100m deep Cross over the section of seafloor and adjust the sound speed value in the Ship...

Page 53: ...et the screen display user interface to Sonar view In Ship Setup Options in the Sound Speed tab set the sound speed computation method to Manual Entry or Use NMEA MTW Find a section of seafloor that i...

Page 54: ...ent consider reducing the beam width These variances can be seen as frilly edges at the side of the swath on the Waterfall View and as perpetually weak echoes on the outer beams on the Sonar display F...

Page 55: ...able Start a new database in Navigator and run over the distinct object at SOG e g 5kts Start a 2nd new database run back over object in the opposite direction same SOG eg 5kts Use the measure tool to...

Page 56: ...hings in the correct ballpark Configure Navigator to use Overwrite mode when mapping depths so that the full extent of any difference is recorded 10 2 7 1 Automatic Roll Patch Test Recommended This is...

Page 57: ...avelling with the tide wind swell whichever has the biggest effect on the ships course over ground if they are in different directions on the first pass will make things much easier Figure 51 Showing...

Page 58: ...er as the Patch Roll Quantity To compute the sign of the Roll patch look at the Starboard sidetrack as journey B is made If this is shallower than track A then the sign for the roll offset is positive...

Page 59: ...missioning step a Pitch Correction value can be ascertained by having the Ship travel over a distinct object in opposite directions The object will move if the Pitch offset is incorrect and use of tri...

Page 60: ...The Sidescan Gain control can be varied at any time Changing the Sidescan Gain Threshold will cause a big step in the Sidescan and the old data will not be reprocessed to conform to this gain change S...

Page 61: ...le was taken from for ease of file management Note No mention has been made of training the operator on how to use their system If there is time and the operator can spare some time during the sea tri...

Page 62: ...wireless applications Follow the steps below to set your WMB 3250 to output data via UDP 1 Open the Network Status window by double clicking on any of the Connection Status icons 2 Select the Map Con...

Page 63: ...ns This includes the WASSP GUI Processing Module and Transfer Task Check that the icons are not visible in the Task Bar Keep the BTxR ON as it may require a firmware upgrade 2 Insert Dongle or other u...

Page 64: ...of 73 Installation Manual 5 The default is to create a start menu shortcut folder named WASSP Click Next 6 The default is to create a desktop icon Click Next 7 Click Install Software will install 8 T...

Page 65: ...V1 5 Issue Date October 2013 www wassp com Page 65 of 73 Installation Manual 10 Upgrade window for BTxR This program will automatically upgrade the BTxR firmware to the version supplied with the inst...

Page 66: ...Doc P N WSP 009 005 Version V1 5 Issue Date October 2013 www wassp com Page 66 of 73 Installation Manual 13 Troubleshooting Installer Notes...

Page 67: ...ded with WASSP software w o Navigator WSP 002 048 1 8 kg USB dongle with software WSP 002 003 1 Required to operate transducer and BTxR Cable Clamp WSP 201 020 1 Clamps transducer cable Keyboard WSP 0...

Page 68: ...73 Installation Manual 15 APPENDIX B Remote Diagnostics Utilities 15 1 Open Remote Diagnostics Utilities To open the Remote Diagnostic Utility All Progams WASSP Diagnostics or from the Desktop Click...

Page 69: ...multibeam system This is shown as magnitude in YELLOW as well as I Q data in RED and GREEN The slider on the right hand side scales the display 15 2 Scope The Scope shows data for a single received c...

Page 70: ...returns 15 6 Nav Received navigation data from the sensors can be verified 15 7 NMEA Data By enabling Log Data raw NMEA data can be displayed on screen 15 8 Tech Engineer WASSP Processor BTxR communic...

Page 71: ...ssor Information This section contains information on different interfaces or connections between particular WASSP Processors 16 1 Shuttle 2 Q2 2012 Power Button hold for 4 seconds to turn on BTxR Eth...

Page 72: ...Supply DC IN 4 way Serial Cable Power Button DVI I Dual video output CFAST card slot Fanless industrial grade WASSP Processors rely on air convection to maintain operating temperatures As such DO NOT...

Page 73: ...mit 4 fore aft Receive 10 fore aft 2 200 m 75 mm Display Display range Range Shift 5 to 200 m 5 to 200 m Display modes Sonar View Single Beam View Waterfall View Sidescan View Display windows The eigh...

Reviews: