
Assembly Instruc�ons
1. Check that you have all of the
components listed above.
2. Peel the protec�ve plas�c off the
rails and corner panels.
3. Join 1 x le�-side and 1 x right-side
bracket rail to 1 x end rail and screw
in the 4 x self-tapping screws to
secure the rails. You should now
have a U-shaped rail.
4. Repeat to create a second U-shaped
rail.
5. Join the 2 x U-shaped rails using the
Joiner Inserts to form the base for
the Oasis bed as shown in Figure 1.
Adjust the posi�on of the inserts so
that the screw holes align and screw
in the 4 x self-tapping screws.
6. Now turn the connected U-shaped
rails over so that you can see the
channel for the corner and wall
panels. Locate the corner panel with
the hole for the overflow pipe and
posi�on it in the base with the hole
closest to the bo�om. Align the
screw hole in the corner panel and
the matching hole in the rail and
insert the self-tapping screw to
secure.
WaterUps
®
Oasis 1680 wicking bed assembly guide
This guide is designed to assist you with the assembly of your new WaterUps
®
Oasis 1680 wicking bed kit.
What is in the kit?
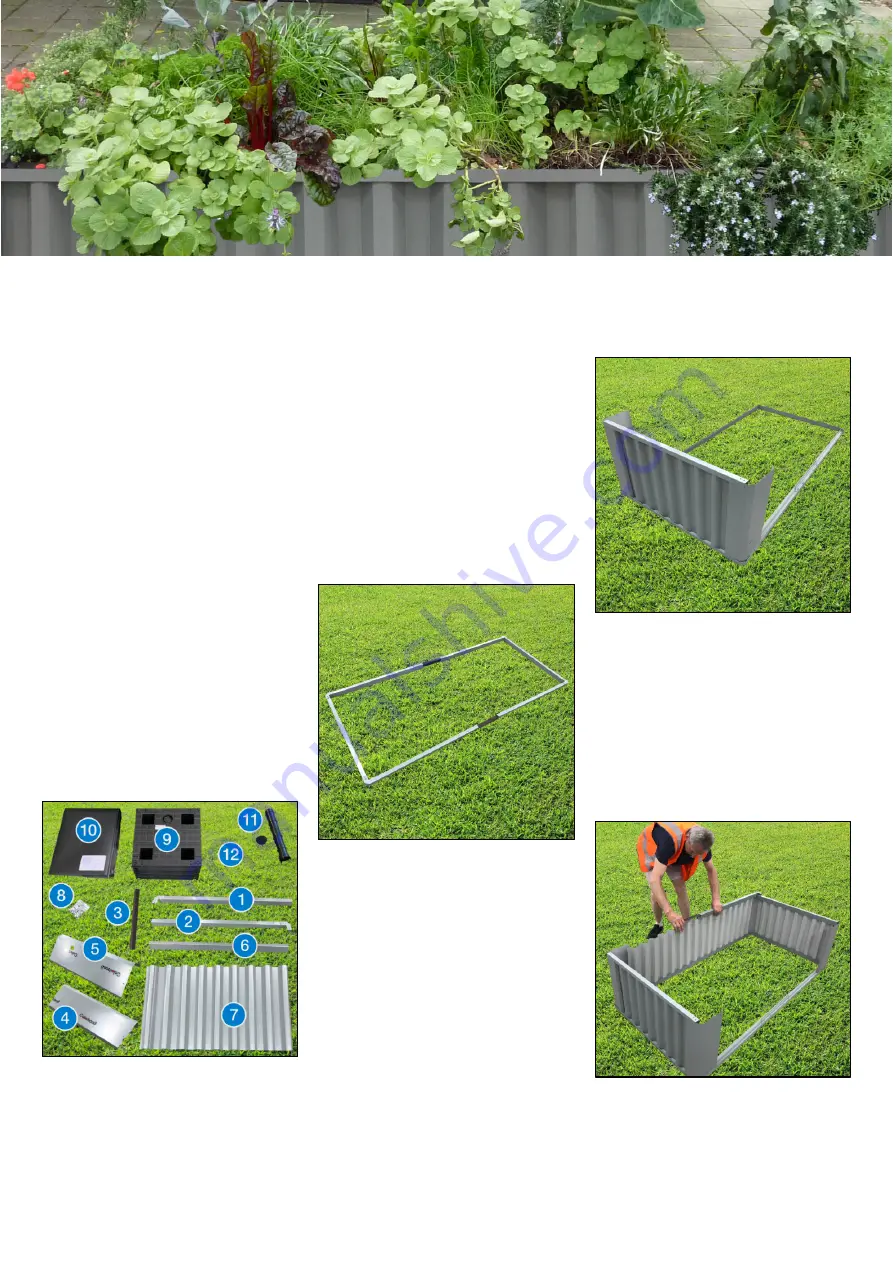
The following items should be included:
1. 4 x Le�-side Bracket Side Rails
2. 4 x Right-side Bracket Side Rails
3. 4 x Joiner Inserts
4. 3 x Corner Panels
5. 1 x Corner Panel with the hole for
the overflow pipe
6. 4 x End Rails
7. 6 x Wall Panels
8. 1 x bag of screws
9. 8 x WaterUps
®
Wicking Cells
10.1 x WaterUps
®
1680 Reservoir Liner
11.1 x WaterUps
®
Black Inlet Pipe & Cap
12.1 x WaterUps
®
Overflow Pipe Set
(screw pipe fi�ng, washer, spacer
pipe and nut)
Figure 1.
Both U-shaped bo�om rail
sec�ons being joined together using the
joiner inserts.
Figure 2.
The first end wall is complete
with the top rail in place.
Figure 3.
Securing the top rail to the wall
panels, with the joiner insert in place.


