background image


Betriebsanleitung 
DUO 315 

Summary of Contents for DUO 315

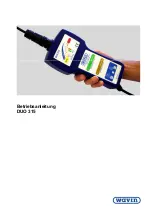
Page 1: ...Betriebsanleitung DUO 315...

Page 2: ...ielf ltigung und Verbreitung sowie der bersetzung vorbehalten Vervielf ltigungen oder Reproduktionen in jeglicher Form Druck Fotokopie Mikrofilm oder Datenerfassung bed rfen der schriftlichen Genehmig...

Page 3: ...ationen 3 4 Bestimmungsgem sse Verwendung 4 5 Einf hrung 4 6 Lieferumfang 4 7 Elektrische Sicherheit 5 8 Nutzung des Ger tes 6 9 Mehrfachschweissungen 7 10 Fehlersuche 8 11 Wartung 10 12 Entsorgung 10...

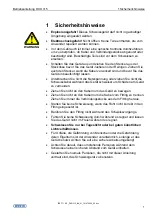
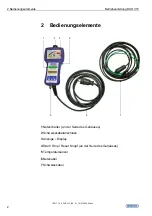
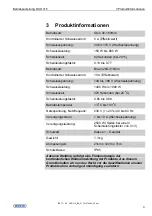
Page 4: ...Inhaltsverzeichnis Betriebsanleitung DUO 315 05 11 KS_DUO 315_BA_01_701474600_00 doc II...

Page 5: ...bel w hrend das Ger t schweisst um Sch den am Ger t zu vermeiden Ziehen Sie nicht an den Kabeln um das Ger t zu bewegen Ziehen Sie nicht an den Kabeln um die Kabel vom Fitting zu trennen Ziehen Sie im...

Page 6: ...KS_DUO 315_BA_01_701474600_00 doc 2 2 Bedienungselemente 1 Netzschalter an der Seite des Geh uses 2 Schweisskabelanschluss 3 Anzeige Display 4 Start Stop Reset Knopf an der Seite des Geh uses 5 Temper...

Page 7: ...8 V Wechselspannung Schweissleistung 1490 W bis 1980 W Schweisszeit 370 Sekunden bei 20 o C Scheinleistungsfaktor 0 65 bis 0 86 Betriebstemperatur 10o C bis 40o C Netzspannung Netzfrequenz 230 V 20 40...

Page 8: ...den sicheren Umgang mit dem Schweissger t Es ist wichtig dass Sie die Anweisungen aufmerksam lesen und die Anleitung f r die Lebensdauer des Ger ts aufbewahren Diese Bedienungsanleitung gibt keine det...

Page 9: ...er Trommel abgewickelt sein um Heizeffekte aufgrund von Induktivit t zu vermeiden Die Kabel sollten wie folgt dimensioniert sein 1 5mm2 Kabel 25m 2 5mm2 Kabel 50m 4 0mm2 Kabel 75m Das Schweissger t so...

Page 10: ...r tes Verbinden Sie das Schweisskabel mit dem Schweissger t und es wird das eingesteckte Kabel erkennen und die Leuchte 5 gr n oder Leuchte 6 braun aufleuchten lassen berpr fen Sie ob das richtige Kab...

Page 11: ...verbundene Fittings schweissen Hierzu muss das gr ne Verbindungskabel angeschlossen werden Die kumulierten Durchmesser der verbundenen Fittings d rfen 200mm nicht berschreiten Zum Beispiel k nnen bei...

Page 12: ...n Sie sich dass der Generator l uft und dass genug Treibstoff eingef llt ist berpr fen Sie die Kabel auf Besch digungen berpr fen Sie ob die Sicherung im Schweissger t OK ist Fehler 2 Stopp Knopf gedr...

Page 13: ...nde Vergewissern Sie sich dass die korrekten Fittings geschweisst werden Falls sie eine Mehrfachschweissung durchf hren vergewissern Sie sich dass die kumulierten Durchmesser der Fittings 200mm nicht...

Page 14: ...et werden k nnen Das Ger t sollte zu Wartung und Kalibrierung zu einem anerkannten Servicepartner gebracht werden Es wird empfohlen das Schweissger t alle 12 Monate kalibrieren zu lassen Reinigen Sie...

Page 15: ...er mangelhafte Wartung Nichtautorisierte Modifizierung Unsachgem sser Gebrauch oder jeglicher Gebrauch der nicht im Einklang mit der Bedienungsanleitung oder der bew hrten Verfahrensweise der Industri...

Page 16: ...t und zur Gebrauchstauglichkeit Advance Welding gibt keine anderen Garantien weder ausdr cklich noch stillschweigend jeglicher Art hinsichtlich der Produkte Wenn diese Garantieerkl rung im Widerspruch...

Page 17: ...ing co uk Web www ElectrofusionWelding com Konformit tserkl rung Dieses Schweissger t wurde konzipiert um den harmonisierten Normen der Richtlinie des Neuen Konzepts zu entsprechen und wurde dementspr...

Page 18: ...701 474 600_00 01 05 11 CH 8201 Schaffhausen 2011 Printed in Switzerland...

Page 19: ...Operating instructions DUO 315...

Page 20: ...articular the rights of duplication and distribution as well as translation Duplication and reproduction in any form print photocopy microfilm or electronic require the written permission of Georg Fis...

Page 21: ...ation 3 4 Intended Use 4 5 Introduction 4 6 Delivered Items 4 7 Electrical Safety 5 8 Using the equipment 6 9 Multiple Welds 7 10 Fault Finding 8 11 Maintenance 10 12 Disposal 10 13 Calibration and Wa...

Page 22: ...Index Operating instructions DUO 315 05 11 KS_DUO 315_BA_04_701474600_00 doc II...

Page 23: ...interrupt the supply voltage or disconnect the welding cable while the unit is welding a fitting Do not lift or pull the equipment by its cables Do not disconnect the welding cables by pulling on the...

Page 24: ...ons DUO 315 05 11 KS_DUO 315_BA_04_701474600_00 doc 2 2 Operating Controls 1 Power Switch on side of case 2 Welding Socket 3 Display 4 Start Stop Button Reset on side of case 5 Temperature Sensor 6 Su...

Page 25: ...nt 10 A ac true rms Welding Voltage 149 to 198 V ac Welding Power 1490 VA to 1980 VA Welding Time 370 seconds 20o C Apparent Power Factor 0 65 to 0 86 Operating Temperature 10o C to 40o C Supply Volta...

Page 26: ...of your welding unit It is important that you read these instructions carefully and keep these instructions for the life of the unit This manual does not detail the specific welding procedure for the...

Page 27: ...standard All cables must be unwound from the reel to stop inductive heating effects The cable dimensions should be as follows 1 5mm2 cable 25m 2 5mm2 cable 50m 4 0mm2 cable 75m The welding unit should...

Page 28: ...of the front on the front of the unit Connect the welding cable to the unit and it will detect the type of lead fitted and flash light 5 Green or 6 Brown Check that the correct lead has been identifi...

Page 29: ...imultaneously weld multiple fittings connected in series using the optional green link cable The combined diameters of the fittings to be joined must not exceed 200mm For example a 45o 75 50mm tee can...

Page 30: ...or breaker has not tripped If using a generator check the generator is operating and there is enough fuel Check the cables are not damaged or broken Check the fuse is OK in the welding unit Error 2 S...

Page 31: ...sure the combined diameters do not exceed 200 mm Make sure the supply is within limits 230 volts with a capacity of 2500 watts Make sure any extension leads being used are the correct length and ratin...

Page 32: ...for use this equipment must be separately collected and sent for recycling According to the European Directive 2005 95 EC Restriction of Hazardous Substances RoHS this equipment does not contain more...

Page 33: ...l be free from defects in materials and workmanship for a period of twelve months and its mechanical products for six months from the date of purchase by the end user customer If during this period no...

Page 34: ...l law To the extent allowed by local law the remedies provided in this warranty statement are the customer s sole and exclusive remedies This equipment has been designed for use with the range of fitt...

Page 35: ...o comply with the harmonised standards under the New Approach directives and has been CE marked accordingly The applicable standards are 89 336 EEC Electromagnetic compatibility 73 23 EEC Low voltage...

Page 36: ...701 474 600_00 01 05 11 CH 8201 Schaffhausen 2011 Printed in Switzerland...

Page 37: ...Manuale Operativo DUO 315...

Page 38: ......

Page 39: ...Uso previsto 4 5 Premessa 4 6 Oggetto della fornitura 4 7 Sicurezza elettrica 5 8 Uso dell attrezzatura 6 9 Saldature multiple 7 10 Diagnostica 8 11 Manutenzione 10 12 Smaltimento 10 13 Calibratura e...

Page 40: ...Indice Manuale Operativo DUO 315 05 11 KS_DUO 315_BA_03_701474600_00 doc II...

Page 41: ...rica o non scollegare il cavo di saldatura mentre si salda un manicotto elettrico Non utilizzare i cavi collegati all attrezzatura per sollevarla o tirarla Non scollegare i cavi di saldatura tirandoli...

Page 42: ..._DUO 315_BA_03_701474600_00 doc 2 2 Comandi Operativi 1 Interruttore generale lato cassetta 2 Connettore cavo di saldatura 3 Display 4 Pulsante di accensione lato cassetta 5 Sensore di temperatura 6 C...

Page 43: ...98 VAC Potenza di saldatura da 1490 VA a 1980 VA Tempo di saldatura 370 secondi 20o C Fattore di potenza apparente da 0 65 a 0 86 Temperatura d esercizio da 10o C a 40o C Tensione di alimentazione 230...

Page 44: ...corretto montaggio e l utilizzo in sicurezza della saldatrice che avete acquistato fondamentale leggere le presenti istruzioni con attenzione e conservarle per tutta la vita utile dell unit Il manual...

Page 45: ...I cavi devono essere dimensionati come indicato di seguito cavo da 1 5 mm2 25m cavo da 2 5 mm2 50m cavo da 4 0 mm2 75m La saldatrice deve essere utilizzata con un interruttore di protezione dalle corr...

Page 46: ...riore dell unit Collegare il cavo di saldatura all unit dopo aver rilevato la tipologia di cavo installata inizia a lampeggiare la spia 5 verde o la spia 6 marrone Verificare che sia stato identificat...

Page 47: ...serie utilizzando il cavo di collegamento verde fornito come optional La somma dei diametri dei raccordi da unire non deve per superare 200 mm Per esempio prendiamo in considerazione un raccordo a T...

Page 48: ...ioni correttamente e abbia abbastanza carburante Verificare l integrit dei cavi non devono essere danneggiati o interrotti Verificare il buono stato del fusibile nella saldatrice Errore 2 Pressione de...

Page 49: ...urarsi che la somma dei diametri non superi 200 mm Assicurarsi inoltre che l alimentazione sia compresa nei valori seguenti 230 Volt con capacit pari a 2500 Watt Assicurarsi che le eventuali prolunghe...

Page 50: ...i mesi Dopo il suo utilizzo necessario pulire l esterno dell unit utilizzando una spazzola con le setole morbide o un panno Avvolgere accuratamente i cavi e riporli nella custodia protettiva 12 Smalti...

Page 51: ...zzo in condizioni normali e decade nei casi seguenti mancato rispetto delle istruzioni operative manutenzione scorretta o inadeguata modifiche non autorizzate uso improprio dell unit o uso non conform...

Page 52: ...uno scopo specifico Advance Welding non offre alcun altro tipo di garanzia per i propri prodotti sia esplicita che implicita Qualora la presente garanzia sia in contrasto con le leggi del luogo di ut...

Page 53: ...Web www ElectrofusionWelding com Dichiarazione di conformit La presente saldatrice stata realizzata in conformit con le norme armonizzate previste dalle direttive di Nuovo Approccio ed stata di conse...

Page 54: ...701 474 600_00 01 05 11 CH 8201 Schaffhausen 2011 Printed in Switzerland...

Reviews: