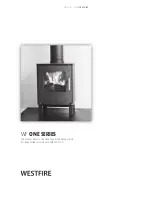
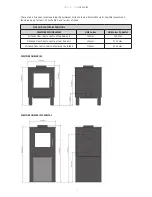
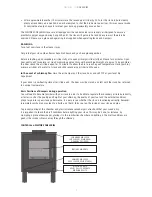
background image

WESTFIRE · WF 

ONE SERIES

1

daNSk INgENIøRkuNSt

WF 

ONE SERIES

uk: INSTALLATION MANUAL AND OPERATING INSTRUCTIONS

Summary of Contents for WF ONE

Page 1: ...WESTFIRE WF ONE SERIES 1 dansk ingeniørkunst WF one series UK INSTALLATION MANUAL AND OPERATING INSTRUCTIONS ...

Page 2: ...WESTFIRE WF ONE SERIES This manual refers to the stove type listed above which has been tested in accordance with EN13240 WF ONE SERIES ...

Page 3: ...SERIES wood stove although detail may need slight modification to suit particular local site conditions In all cases the installation must comply with current Building Regulations Local Authority Byelaws and other specifications or regulations as they affect the installation of the stove It should be noted that the Building Regulations requirements may be met by adopting the relevant recom mendati...

Page 4: ...tallation is into an existing chimney then it must be sound and have no cracks or other faults which might allow fumes into the house Older properties especially may have chimney faults or the cross section may be too large i e more than 160 mm x 160 mm Remedial action should be taken if required seeking expert advice If it is found necessary to line the chimney then a flue liner suitable for soli...

Page 5: ...omply in size and construction so that it is in accordance with the provisions of the current Building Regulations Approved Document J The clearance distances to combustible material beneath surrounding or upon the hearth and walls adjacent to the hearth should comply with the guidance on the separation of combustible material given in Building Regulations Approved Document J and also in these sto...

Page 6: ...10 cm behind and to sides of stove WESTFIRE ONE SERIES FLUE AND AIR INTAKE POSITIONS WESTFIRE WF ONE SERIES ONE Series ONE Series Pedestal Distance from rear to centre of top flue exit 120mm 120mm Distance from floor to centre of rear flue exit 650mm 734 5mm Distance from rear to centre of external air intake 174mm 454 5mm WESTFIRE ONE SERIES PEDESTAL ...

Page 7: ... Operating your stove WESTFIRE ONE SERIES The first lighting of your stove The heat resistant paint on your stove will cure and harden the first time you light your appliance The curing process produces a good deal of smoke and odour it is therefore important that the first time you light your stove the room should be well ventilated During the process it is important to open and close the stove d...

Page 8: ...econdary air slider to 50 open In the event of a chimney fire Close the air damper and the stove door and call 999 or your local fire department If your stove is overheating close all air sliders and the door must be closed and left until the stove has returned to nominal temperature Basic Positions of dampers during operation You will need to become familiar with your stove in order to be able to...

Page 9: ...hen close the secondary air valve to its operational position On returning to the stove in the morning the fire will have burned out reload with some paper or firelighter and some kindling and open all the slider fully to relight quickly Beware as the ash bed will have hot embers Use of operating tools Always use the operating tools provided when handling parts likely to be hot when the stove is i...

Page 10: ...eight of the chimney in relation to the surroundings 6 Soot in the chimney a The firewood may be too wet b intake of secondary air may be insufficient Chimney Fires If the chimney is thoroughly and regularly swept chimney fires should not occur However if a chimney fire does occur turn the air control setting to the minimum and tightly close the doors of the stove This should cause the chimney fir...

Page 11: ...nt that the flue connection and chimney are swept prior to lighting up after a pro longed shutdown period If the stove is fitted in place of an open fire then the chimney should be swept one month after installation to clear any soot falls which may have occurred due to the difference in combustion between the stove and the open fire In situations where it is not possible to sweep through the stov...

Page 12: ...moved Step three fit one side brick into place Step five fit lower baffle rest on top of rear fire brick and left into place push in securing pins on each side baffle 2 in total Step two fit rear brick into place sloping section upper most with slop to back of stove Step four fit top baffle in place against steel guides fit second side baafle with the two side baffles in place top baffle will stay...

Reviews: