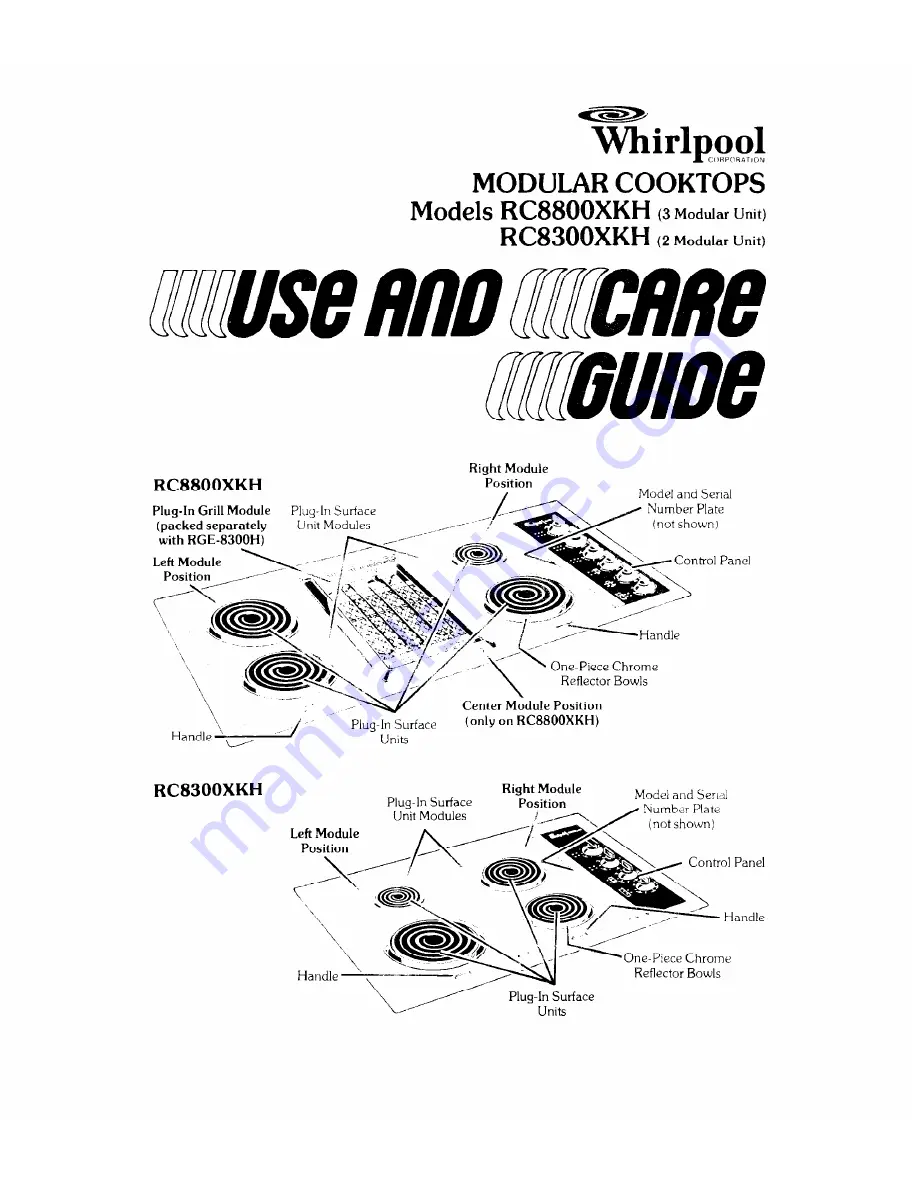
background image

Summary of Contents for RC8300XKH

Page 1: ... Position Model and Senal Plug In Grill Module Plug In Surface packed separately L nit Modules with RGE 8300H Lefi Module One Piece Chrome Reflector Bowls Center Module Position I 1 c I_ only on RC8300XKH RC8300XKH Left Module Position Plug In Surface Unit Modules Right Module h J Control Panel Handle r A Plug I ace ...

Page 2: ...le Signal Light Left Module Signal Light Left Moduie Controi Knob 44 Grill Griddle Control Knobs Right Module COiltrOl Knob I 0 The rectangular boxes or indicate which control knob to use for the grill or griddle The grill or griddle may be used in either the left or right positions Use the Module Control Knob which corresponds with the grill or griddle placement ...

Page 3: ...dule is on I he dts yn to the leit of the knob indicates which unit is controlled b that knob For example Indicate the left t earsurface unit 1 ear ar Module signal Lisht Right Module Signal Light Center M e Sisnd Light It Left Modde Signal Light Right Module Co i l Knab Center Module PfionkOl Kmb Left Module Control Knob The rectangular boxes 7 Z or indicate which control knob s to USCfor the gri...

Page 4: ...R COOKTOP 10 OPTIONAL GRIDDLE 12 OPTIONAL ROTISSERIE 13 OPTIONAL CUTTING BOARD 15 IF YOU NEED SERVICE OR HELP 15 1 Before you call for service 15 2 If you need service 16 3 Ifyouhaveaproblem I 16 IMPORTANT SAFEGUARDS Safety is everyone s responsibility Whirlpool has re searched and designed your cooktop to help you prepare meals easily and safely You as the owner of the cooktop also have a respons...

Page 5: ...mperature 7 iixn 1x1I lt3nliit inwal d ye1 tlOt over other surface tinits Tii v il r elp mir mize theI possibiliry of burns jnition 0 arrlmabl2 materials and spills due to acciden allv bLiIll 3iIly hcJ Far 0 4lu a s c i c c k h position of the Looktop controi knobs iI ldti e lc ca or lights tcl make sure cooktop is off when 1 III arc fln iht r c ookq I i 1s alum1 um fog to line surface unit reflec...

Page 6: ...removable heating elements in water 10 Do not heat unopened food containers such as baby food jars and cans Pressure build up may cause the container to burst and result in injury 11 CAUTION Do not store items of interest to children in cabinets above a cooktop or near the surface units Chil dren could be seriously injured while climbing on a cook top to reach these items Before using your cooktop...

Page 7: ...or dif to desired setting ferent foods A 4 inch surface unit is a special feature on your cooktop Deslgned only for small pans it may be used to l warm coffee pot small tea kettle oven proof casseroles l melt chocolate cream cheese butter marshmallows at low temperatures The Signal Light to the left of each Surface Unit Control Knob will glow whenever the surface unit is on Be sure all lights are ...

Page 8: ...s Turn every 17O F iq I HI 15 Min 12 Mln few minutes 17o F 2 1 Hi 10 Mln 10 Min Ham Slice fullv cooked 15o F I HI 6 MI 7 Min S age P ties Links 17O F 4 z thxk HI 8 Mm 12 Mln 150 F lOor Med Hi 6 Min Total Other Frankfurters 150 F 8 Franks HI 8 MI Total Turn frequently Sandwches hSand Hi 18 MI Total fal wrapped tiches POt OeS 4 potatoes HI 45 Min Total Wrap tightly n oil cut IntO pK ces Corn on the ...

Page 9: ...ting slightly Pull toward you to unplug the heating element See Step 2 l Lrft ceramic rcIrk basket from grease well using basket handle See Step 3 1 Remove grease well by lifting the module using the handle at the back Slide grease well back about one inch and up until the tab on the front edge is clear of the cooktop frame See Step 4 Lift grease well out of the cooktop Remove as directed to avoid...

Page 10: ...lovers and to reflect heat into utensils for faster cooking Frequent washing will keep them cleaner more efficient and looking more like new If a reflector bowl turns blue or gold the pan you are using may not be flat enough to make good contact with the surface unit or it may be too large for the unit size Heat then goes down into the reflector bowl instead of being absorbed Into the pan This res...

Page 11: ... with other cooking utensils l Clean frequently l Do not use harsh abrasives Control panel Grill frame and grease well Cutting board Soft clorh iarm soapy water Warm soapy water and plastic scounng pad Soft cloth warm soapy water l Wipe off frequently and dry with soft cloth l Wash rinse and dry l Clean frequently l Wipe off after each use l Do not soak in water To season or sterilize l See page 1...

Page 12: ...unir off Lcher finished An empty griddle can be damaged by 1711 percods ok high heat Repiace griddle cover on after gr ddle la coole7d j 5 the iollow y table as a cookjng guide for the griddle IJse higher Y iuer st ttlncl as lecded for your recipes tL Medjum Preheat only UCtil fat meits i i i on High IXied Sandwjcties High Pallcakes High Hr mburgers Med um Hugh The Signal Light to I if the Module ...

Page 13: ... on the end supports into the opening in the grill frame Slide or Lrard Push top of the end supports back until level on the grill frame set step 2 i 4 I hc lnotor fits on the back of the rear end support In either the high or i LAposition h s See Step 3 4 The spit rests in a slot in the front end support Push the end of the spit firmly into the motor socket at the Openings r 7 rear of the cooktop...

Page 14: ...t firmly into the motor socket at the rear of the q ktop 3 i t t thr c lart or approximate cooking times Approximate rotisserie cooking times hltP i C W l Spll b I Trmperarur i4qht Setting Position Time C me t5 _ Beef I I nt 141 5 lb ki Hlgtl 1 hr Meat wth an outer layer r 55 mln of fat may take longer to cook i rilt l rump 1411t 3 1 Ibs Hi High 2 hrs 170 t lb HI High i hrs 15 min 171 1 1 i Ibs H ...

Page 15: ...emove surface duit rirlzc and u 11 drb If you need service or help we suggest you follow these three steps 1 Before you call for service If your cooktop does not seem to be operating proprrli check the following befol e callilly for service If nothing operates l Is the cooktop wired Into a live circuit with the proper voltage See Installation Instructions l Have you checked the main fuse or circui...

Page 16: ...e f you Include the model and serial number of your I r mce i ilerl questiny servict Also retain your sales slip and ivar m T Vpr tl rL JI warranty status Remember _ r I TECH CARE service representative ISspeciallv Trained t t exp t r Ji rlny anal servlclrlg of vour WHIRLPOOL appliances I t an lrip L J ma ntaln the quality origlnalli bull1 into your I lH KI POOI _ r p ance 5o whv 111t take the tim...

Reviews: