background image

Summary of Contents for SF378PEW

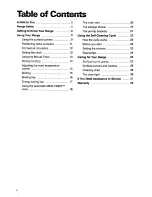
Page 1: ...ange 9 Using the Self Cleaning Cycle 22 Caring for Your Range 25 If You Need Assistance or Service 31 Warranty 36 1 800 253 I 301 Call us with questions or comments SELF CLEANING GAS RANGE TO THE INSTALLER PLEASE LEAVE THIS INSTRUCTION BOOK WITH THE UNIT TO THE CONSUMER PLEASE READ AND KEEP THIS BOOK FOR FUTURE REFERENCE MODEL SF378PEW ...

Page 2: ...oven temperature control 15 Broiling 15 Broiling tips 16 Energy saving tips 17 Using the automatic MEALTIMERTM clock 18 The oven vent 20 The storage drawer 20 The anti tip brackets 21 Using the Self Cleaning Cycle 22 How the cycle works 22 Before you start 22 Setting the controls 23 Special tips 24 Caring for Your Range 25 Surface burner grates 25 Surface burners and cooktop 26 Cleaning chart 28 T...

Page 3: ...appliance The card helps us notify you about any new information on your appliance Please record your model s information Whenever you call to request service for Model Number your appliance you need to know your complete model number and serial number Youcan find this information on the model and serial number plate see diagram on page 8 for location of plate Please also record the purchase date ...

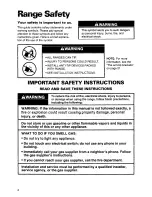
Page 4: ... the risk of fire electrical shock injury to persons or damage when using the range follow basic precautions including the following WARNING If the information in this manual is not followed exactly a fire or explosion could result causing property damage personal injury or death Do not store or use gasoline or other flammable vapors and liquids in the vicinity of this or any other appliance WHAT ...

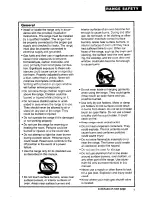
Page 5: ... intended use as described in this manual l Do not touch surface burners areas near surface burners or interior surfaces of oven Areas near surface burners and interior surfaces of an oven become hot enough to cause burns During and after use do not touch or let clothing or other flammable materials contact surface burners areas near surface burners or interior surfaces of oven until they have had...

Page 6: ...ning oven door Let hot air or steam escape before removing or replacing food Grease l Grease is flammable Do not allow grease to collect around cooktop or in vents Wipe spillovers immediately Do not use water on grease fires Never pick up a flaming pan Smother flaming pan by covering with a well fitted lid cookie sheet or flat tray Flaming grease outside of pan can be extinguished with baking soda...

Page 7: ...ifically recommended in this manual All other servicing should be referred to a qualified technician l Any additions changes or conversions required in order for this appliance to satisfactorily meet the application needs must be made by a Whirlpool service company or Qualified Agency l Disconnect the electrical supply and the gas supply at the shutoff valve near the range before servicing the ran...

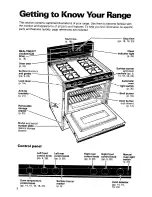
Page 8: ...ean indicator liaht __ P 24 P 18 Oven vent P 20 Surface burners and orates Surface burner and oven pmtrrdc inn a mm a pp 4 14 16 18 23 pp C 25 Lock lever I P 24 __ P 30 Anti tip braclcda Broil burner P 16 P 21 v Oven burner not shown P 14 Removable ntnrane Model and serial number plate behind storage drawer Control panel Left front Left rear control knob control knob PP 9 28 PP 9 28 I I Right rear...

Page 9: ...eck that burner has lit To stop the clicking sound after the burner lights turn the control knob to the desired setting The control knob has stops for HI medium and low However you can set the control knob anywhere between HI and OFF Push in and turn counterclockwise Surface burner markers The solid dot in the surface burner marker shows which surface burner is turned on by that knob Burner heat s...

Page 10: ...ure all control knobs are turned to OFF when you are not cooking Someone could be burned or a fire could start if a burner is accidentally left ON l If the flame should go out while cook ing or if there is a strong gas odor turn the burners OFF Wait five minutes for the gas odor to disappear before relighting burner If gas odor is still present see safety note on page 4 Failure to follow these pre...

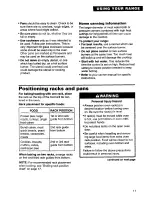
Page 11: ...et on high Reduce heat setting to lowest position needed to keep water boiling l Refer to your canner manual for specific instructions Positioning racks and pans For baking roasting with one rack place the rack so the top of the food will be cen tered in the oven Rack placement for specific foods FOOD Frozen pies large roasts turkeys angel food cakes Bundt cakes most quick breads yeast breads cass...

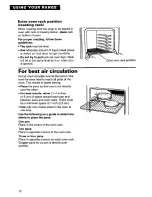
Page 12: ...r must circulate around the pans in the oven for even heat to reach all parts of the oven This results in better baking l Place the pans so that one is not directly over the other l For best results allow 1X 2 inches 4 5 cm of space around each pan and between pans and oven walls There must be a minimum space of 1 inch 2 5 cm l Use only one cookie sheet in the oven at one time Use the following as...

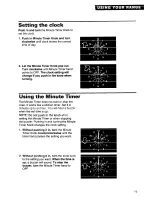
Page 13: ...start or stop the oven It works like a kitchen timer Set it in minutes up to an hour You will hear a buzzer when the set time is up NOTE Do not push in the knob when setting the Minute Timer or when stopping the buzzer Pushing in and turning the Minute Timer Knob changes the clock setting 1 Without pushing it in turn the Minute Timer Knob counterclockwise until the timer hand passes the setting yo...

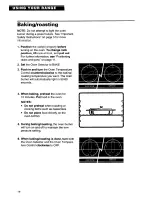
Page 14: ...Push in and turn the Oven Temperature Control counterclockwise to the baking roasting temperature you want The oven burner will automatically light in 50 60 seconds 4 When baking preheat the oven for 10 minutes Put food in the oven NOTES l Do not preheat when roasting or cooking items such as casseroles l Do not place food directly on the oven bottom 5 During baking roasting the oven burner will t...

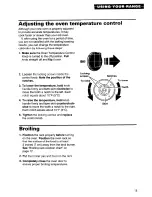
Page 15: ...5 notches To lower the temperature hold knob handle firmly and turn skirt clockwise to move the tooth a notch to the left Each notch equals about 10 F 5 C To raise the temperature hold knob handle firmly and turn skirt counterclock wise to move the tooth a notch to the right Each notch equals about 10 F 5 C Tighten the locking screws and replace the control knob Locking screws h Notches Sk irt Bro...

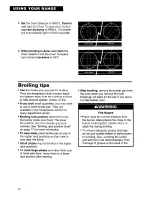
Page 16: ...n the more broiler grid area covered See Broiling rack position chart on page 17 for more information l To sear meat place broiler pan at one of the higher rack positions so that meat is very near the flame l Small steaks may be broiled in the higher rack positions l To cook large steaks and other thick cuts of meat well done move them to a lower rack position after searing l After broiling remove...

Page 17: ...commended and for the shortest time possible l Start food on higher heat settings then set surface burner control on low to finish cooking l Use the more efficient surface burners instead of the oven when possible l Turn on the surface burner only after placing filled pan on the burner grate l Oven peeking may cause heat loss longer cooking times and unsatisfactory baking results Rely on your time...

Page 18: ...c undercooking will result Before using the MEALTIMER clock make sure the clock is set to the correct time of day See Setting the clock on page 13 To delay start and stop automatically 1 Position the oven rack s properly and place the food in the oven 2 Push in and turn the Start Time Knob clockwise to the time you want baking roasting to start 3 Push in and turn the Stop Time Knob clockwise to th...

Page 19: ...ng is done or to cancel the setting at any time turn both the Oven Selector and the Oven Tempera ture Control to OFF To avoid sickness and food waste when using the MEALTIMER clock l Do not let most UNFROZEN food stand for more than two hours before cooking starts l Do not allow food to remain in oven for more than two hours after the end of cooking cycle NOTE Do not use foods that will spoil whil...

Page 20: ...ve pans Oven vent The storage drawer You can remove the storage drawer to make it easier to clean under the range and to check for installation of the anti tip bracket s Use care when handling the drawer Removing the storage drawer 1 Empty drawer before removing Pull drawer straight out to the first stop Lift the front and pull out to the second stop 2 Let the drawer rest on the floor Place hands ...

Page 21: ...leaning or service check that anti tip bracket s is engaged before using range Failure to follow the above precautions could result in personal injury To verify the anti tip bracket s is engaged l Grasp rear of range and carefully try to tilt forward If anti tip bracket s is attached to floor with screws and rear leveling leg s is positioned under bracket s range should not tilt forward OR l Remov...

Page 22: ...ing cycle However you can adjust the cycle time to the amount of soil in your oven You can set the cycle anywhere between 2 and 4 START 1 Time 1 Hours 3 STOP hours See Setting the controls on page 23 The graph at the right is representative of a normal 3 hour Self Cleaning cycle Note that the heating stops when the 3 hour setting is up but it takes longer for the oven to cool enough to unlock Befo...

Page 23: ...ard l Do not touch the oven during the Self Cleaning cycle It could burn you l Do not use commercial oven cleaners in your oven Cleaners could produce hazardous fumes or damage the porcelain finish NOTES l Do not force the Lock Lever You could bend or break it The lever is designed to stay locked until the oven is cool enough to safely open Wait until it moves freely l Do not block the vent during...

Page 24: ...s with a soapy steel wool pad To stop the Self Cleaning cycle at any time 1 Push in and turn the Stop Time Knob clockwise until it points to the correct time of day 2 Turn the Oven Selector and Oven Tem perature Control to OFF When the Clean Indicator Light goes off move the Lock Lever back to the left DO NOT FORCE IT Wait until it moves easily Special tips l Keep the kitchen well ventilated durin...

Page 25: ... l Do not obstruct the flow of combustion and ventilation air l Keep appliance area clear and free of combustible materials gasoline and other flammable vapors and liquids Failure to follow these guidelines could result in burns electrical shock fire or explosion Sutface burner grates 1 Make sure all surface burners are off and the surrounding parts are cool 2 Lift off the surface burner grates 3 ...

Page 26: ...sed area located around each burner If spills occur in contoured well section 1 Blot up spills with a paper towel 2 Wipe with a clean damp sponge 3 Dry NOTE When cleaning the cooktop area or around the burner base use care to prevent damage to the ignitor If a cleaning utensil should catch it the ignitor could be damaged or broken If the ignitor is damaged or broken the surface burner will not lig...

Page 27: ...check burner cap to make sure it is level and covers burner completely l Occasionally check the burner flames for proper size and shape as shown A good flame is blue in color If flames lift off ports are yellow or are noisy when turned off you may need to clean the burners To clean burners 1 Remove the burner grate 2 Pull the burner cap straight up from the burner base 3 Clean burner cap and burne...

Page 28: ...m control panel l Wash rinse and dry thoroughly Do not soak l Do not use steel wool or abrasive cleansers They may damage the finish l Replace knobs Make sure all knobs point to OFF Control panels Sponge and warm l Wash wipe with clean water and dry soapy water thoroughly OR l Do not use steel wool or abrasive cleansers They may damage the finish Paper towel and spray l Do not spray cleaner direct...

Page 29: ...r OR The Self Cleaning cycle l Wash rinse and dry thoroughly OR l Leave in oven during Self Cleaning cycle NOTE Racks will permanently discolor and become harder to slide if left in oven during Self Cleaning cycle Apply a small amount of vegetable oil to the side rungs to aid sliding Oven door glass Paper towel and spray l Make sure oven is cool glass cleaner l Follow directions provided with the ...

Page 30: ...in place when using the oven The cover protects the bulb from breaking and from high oven temperatures Because bulb cover is made of glass be careful not to drop it Broken glass could cause injury To replace the oven light 1 Unplug appliance or disconnect at the main power supply 2 Remove the glass bulb cover in the back of the oven by screwing it out counter clockwise 3 Remove the light bulb from...

Page 31: ... Instructions Range is not properly con Contact an authorized Whirlpool netted to gas supply service technician to reconnect range to gas supply See Installation Instructions A household fuse has blown Replace household fuse or reset or a circuit breaker has circuit breaker tripped Controls are not set correctly Reset controls if needed The flow of combustion and Remove blockage to airflow to and ...

Page 32: ...f day or the knob is not all the way out The Stop Time Dial is not set ahead to the time you want the Self Cleaning cycle to stop SOLUTION Plug the power cord into a live circuit with proper voltage See Installation Instructions Replace household fuse or reset circuit breaker In case of prolonged power failure manually light burners see page 10 Clean with a straight pin see page 27 Clean with a st...

Page 33: ...does not fit the cooking utensil being used When broiling you have not completely closed the oven door SOLUTION Level range See Installation Instruc tions Adjust the oven temperature control See Adjusting the oven temperature control on page 15 Preheat oven if called for in recipe Use only tested recipes from a reliable source Refer to a reliable cookbook for recommended pan type and size Allow 1l...

Page 34: ...E HOUSEHOLD WASHING MACHINES 8 MAJOR SERVICE 8 REPAIR DRYERS SERVICE REPAIR See Whirlpool Appliances or See WhIrlpool Appliances or Authorized Whirlpool Service Aulhonzed WhIrlpool Service Example XYZ Service Co Example XYZ Service Co 4 If you need FSP replacement parts FSP is a registered trademark of Whirlpool Corporation for quality parts Look for this symbol of quality whenever you need a repl...

Page 35: ...unauthorized modifications made to the appliance 5 93 WHIRLPOOL CORPORATION SHALL NOT BE LIABLE FOR INCIDENTAL OR CONSE QUENTIAL DAMAGES Some states do not allow the exclusion or limitation of incidental or consequential damages so this limitation or exclusion may not apply to you This warranty gives you specific legal rights and you may also have other rights which vary from state to state Outsid...

Reviews: