background image

OPERA

TING AND INST

ALLA

TION INSTRUCTIONS

 FOR WHISP

AIR RANGEHOODS

Summary of Contents for W5R09S2

Page 1: ...OPERATING AND INSTALLATION INSTRUCTIONS FOR WHISPAIR RANGEHOODS ...

Page 2: ...void misuse and hazards We recommend that you keep this instruction booklet for future reference and pass it on to any future owners AFTER UNPACKING THE RANGEHOOD PLEASE REVIEW YOUR NEW ITEM TO ENSURE THAT IT HASN T BEEN DAMAGED IN TRANSIT OR IS MISSING ANY COMPONENTS FAILURE TO REPORT ANY ISSUE WITHIN 72 HOURS OF RECEIPT OF YOUR ITEM MAY RESULT IN ADDI TIONAL CHARGES Information on disposal for u...

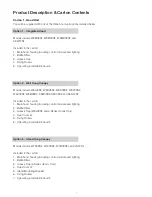
Page 3: ...dels include W5L09S2 W5S09S2 W5R09S2 W5P09S2 W5V09S2 W5B09S2 A5M09S2 A5C09S2 and A5N12S2 Included in the carton 1 Main hood housing including control module and lighting 2 Baffle Filters 3 Grease Trap W5L09S2 and A Series Hoods Only 4 Flue Cover x2 5 Fixing Screws 6 Operating Installation Guide Option 3 Island Hung Canopy Models include W7S09S2 W7V09S2 W7B09S2 and A7N12S2 Included in the carton 1 ...

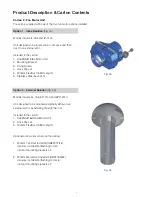
Page 4: ...5 Mtr Length 6 Stainless Steel Eave Vent Option 2 External Solution Fig 4b Models include EL 765 EP 1140 and EPP 2010 Unit designed to be mounted externally either on an external wall or penetrating through the roof Included in the carton 1 KLEENAIR External Motor Unit 2 Hose Clips x2 3 200mm FlexiDuct 5 Mtr Length Optional accessories when roof mounting 1 200mm Tile Roof Install Kit HBX200TILE In...

Page 5: ...these installation instructions may result in electrical hazards injury damage to your appliance and loss of warranty Specifically failure by the installer to install the screws or fixing devices in accordance with these installation instructions may result in electrical hazards Please install the appliance as detailed in these instructions The rangehood is not intended for use by children or infi...

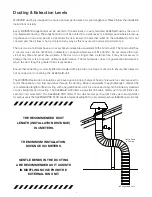
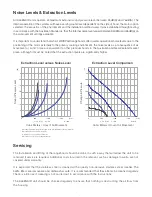
Page 6: ...nufacturer does not guarantee performance when the duct length is greater than six 6 metres Ensure that all ducting is correctly fitted and sealed with pipe clips duct tape or silicone to ensure that fumes do not escape prior to reaching the KLEENAIR unit The WHISPAIR extraction calculations are based upon a 50pa change of head of pressure loss and are used to factor the variance of air flow resis...

Page 7: ...ing of the rangehood should be done in such a way that will allow the unit to be removed if service is required Additional costs incurred in the removal such as damage to walls are not covered under warranty It is expected that the stainless steel is cleaned with a quality non abrasive stainless steel cleaner The baffle filters are removable and dishwasher safe It is recommended that these items b...

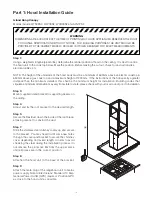
Page 8: ...the roof cavity Step 3 Refer to Part 2 Motor Installation Guide Step 4 Place the hood in the cabinet in the level position ensuring that the controls and display will be visable when standing in front of the unit Step 5 Using the six 6 mounting holes screw the hood into position Both of the side panels and the rear panel of the hood have two mounting holes each Step 6 Attach the male plug of the r...

Page 9: ...h two 2 suitable screws into the wall at the positions marked in step 3 to allow the body of the hood to be hung on the wall Step 5 Hang the body of the hood on the wall using the bracket attached in step 4 Identify and mark several screw holes located inside the hood Remove the hood from the wall and drill and plug holes with suitable sized wall plugs Step 6 Replace the hood back on the wall and ...

Page 10: ... ceiling Step 4 Adjust and fix the roof bracket to the desired length Step 5 Secure the FlexiDuct down the inside of the roof brack et taking care not to constrict the duct Step 7 Slide the stainless steel chimney covers up and secure to the bracket You may need to drill some new holes through the cover and bracket to secure the chimney cover depending on desired length In order to avoid streaking...

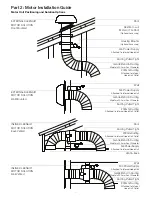
Page 11: ...d Unit 200mm Ducting Attached to Internal Hood Unit Outlet Ducting Pulled Tight Gentle Bend In Ducting Maintain 200mm Duct Diameter EXTERNAL KLEENAIR MOTOR SOLUTION Roof Mounted Roof INLINE KLEENAIR MOTOR SOLUTION Wall Vented Wall Fan Power Supply Attached to Internal Hood Unit 200mm Ducting Attached to Internal Hood Unit Outlet Gentle Bend In Ducting Maintain 200mm Duct Diameter Ducting Pulled Ti...

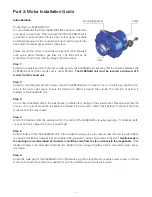
Page 12: ...re the direction of airflow is toward the outside The direction of air flow is marked on the KLEENAIR unit Step 3 Cut a 200mm diameter hole in the wall or eave to enable the mounting of the external vent Please ensure that the hole is cut in a practical position to enable the FlexiDuct to be secured Attach the FlexiDuct to the vent and then mount vent to the wall or eave Step 4 Attach the FlexiDuc...

Page 13: ... FlexiDuct remains firm and stable during operation Avoid sharp bends in the duct Gentle bends in the ducting are recommended as it assists in muffling noise from the fan unit back to the rangehood If the FlexiDuct needs to be extended attach the two FlexiDuct ends using a RigidDuct insert secured by pipe clips or duct tape Step 6 Attach the male plug of the KLEENAIR unit to the female plug of the...

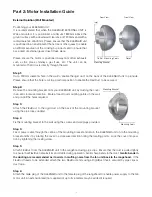
Page 14: ...ensure that back draft of external gases doesn t take place Please ensure the motor is positioned away from other exhausts such as fire place chimneys gas flues etc The unit can be mounted so that it ducts directly through the roof Step 1 Cut a 200mm diameter hole in the roof to enable the RigidDuct on the base of the KLEENAIR unit to protrude down into the roof space Affix the dektite optional ac...

Page 15: ...mode Turning the timer function ON or OFF In operating mode press button 4 to engage the timer function then press button 1 or 2 to adjust the delay time The default time set is 10min and can be increased in increments of 10min up to 1 hour For the controller without the LCD the LED positioned behind button 4 will periodically blink quickly to indicate the delayed time remaining i e For 30min rema...

Page 16: ...ion within the hood and washed in the dishwasher or by hand Use hot water and liquid detergent After cleaning leave the filters and trap to dry before placing back in the hood Changing the lamp WARNING Please be aware that whilst in use both LED and halogen lighting units will become very hot and will remain hot for some time after switching off Please allow the lamp area to cool before operating ...

Page 17: ... Zealand call 64 0 9 964 0400 to speak with our friendly customer service consultants We suggest you have the following information close at hand to make the process as easy as possible 1 Model number of your rangehood 2 A copy of your WHISPAIR pro forma invoice 3 Address details of where the appliance has been installed Any associated or ancillary costs to be incurred by you as a result of replac...

Page 18: ...______ _______________________________________________________________________________________________ _______________________________________________________________________________________________ _______________________________________________________________________________________________ _______________________________________________________________________________________________ _________...

Page 19: ...______ _______________________________________________________________________________________________ _______________________________________________________________________________________________ _______________________________________________________________________________________________ _______________________________________________________________________________________________ _________...

Page 20: ...esearch and develoment th reserves the right to change specifications without notice If specifications are critical to end use please ask your local retail agent This informa tion is provided without prejudice to the standard terms and conditions of the sale of the manufac turer This installation guide supersedes all previ ous installation guide All due care has been taken while compiling this ins...

Reviews: