

ASSEMBLY INSTRUCTIONS
C1
A1
A2
B
C2
C3
Assembly
•
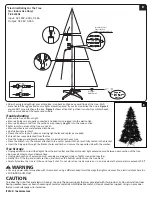
Assemble the tree stand by pulling apart the legs of the sta
nd so that they are X-shaped. Match the hole of the plas�c
flange with the pre-drilled hole in the stand. Screw the eyebolt through the hole in the stand, making sure it does not
protrude into the center of the stand so that the tree trunk can be inserted easily into the stand.
(See Figure A1 and A2)
Helpful Tip:
The eye bolt should easily screw into the stand. If you are having difficulty inser�ng the eye bolt, realign the
flange and stand holes to avoid stripping the eye bolt or cracking the flange.
•
Locate the bo�om sec�on of your tree -it should have a tag with the first number printed on it. Fully insert the bo�om
sec�on of your tree (with branches s�ll �ed) into the stand. Tighten the eyebolt(s) on your tree stand so that the sec�on is
straight.
(See Figure B)
•
Un�e the branches and allow branches to fall into place.
Helpful Tip:
Remember, the tree is highly-compressed for shipping and requires proper shaping for a full, realis�c look.
•
For best results, shape each sec�on as you go working from bo�om to top. Start with the branch �ps closest to the trunk.
The inner branches should be separated with each branch �p poin�ng up toward the ceiling to create a full look and hide
the trunk from view. For the outer branch �ps, separate them so that they point up and out to create your desired silhoue�e.
(See Figure C1 to C3)
Insert the subsequent sec�ons, untying and shaping one sec�on at a �me, un�l you have inserted and
shaped all of the sec�ons.
Helpful Tip:
If you have
purchased a tall tree,
you may
want to shape
the top sec�on
before
inser�ng it into Sec�on 2.
•
FOR PRELIT TREES:
As you are assembling the tree, Connect the plug(s) securely to the extension cord(s) as per the color
labels indicated in
Figure D
and plug the adaptor connected with green labeled extension cord into the wall outlet.
Your en�re tree should now be lit. If some bulbs do not light or flicker, search for any loose plugs and/or broken, loose or
missing bulbs. Replace bulbs promptly in order to maint
ain the performance and life expectancy of your pre-lit tree.
Getting Ready
•
Before you start to assemble your tree, choose a loca�on that provides enough space for the width of your tree.
For pre-lit trees, choose a loca�on near an electrical outlet.
•
Unwrap the plas�c wrap from around all the sec�ons and notate the iden�fying tag on each sec�on. All sec�ons are labeled
for ease of assembly (for example, a three sec�on tree will be comprised of Sec�ons 1, 2 and 3. Sec�on 1 is the bo�om
sec�on). Keep the �es holding the branches fastened un�l the sec�on has been either inserted into its corresponding
sec�on or tree stand.
•
Iden�fy and safely store the included extra bulbs, hinge pins provided, so you can find them easily if bulbs or hinges need to
be replaced over the years.


