
MADE IN CHINA
1
ASSEMBL
Y INSTR
UCTIONS
ITEM #: TG90M3649L05
*Electrical Rating For The Tree
(For Indoor Use Only)
Input: AC 120V, 60Hz, 0.38A
Output: DC 28V 0.643A
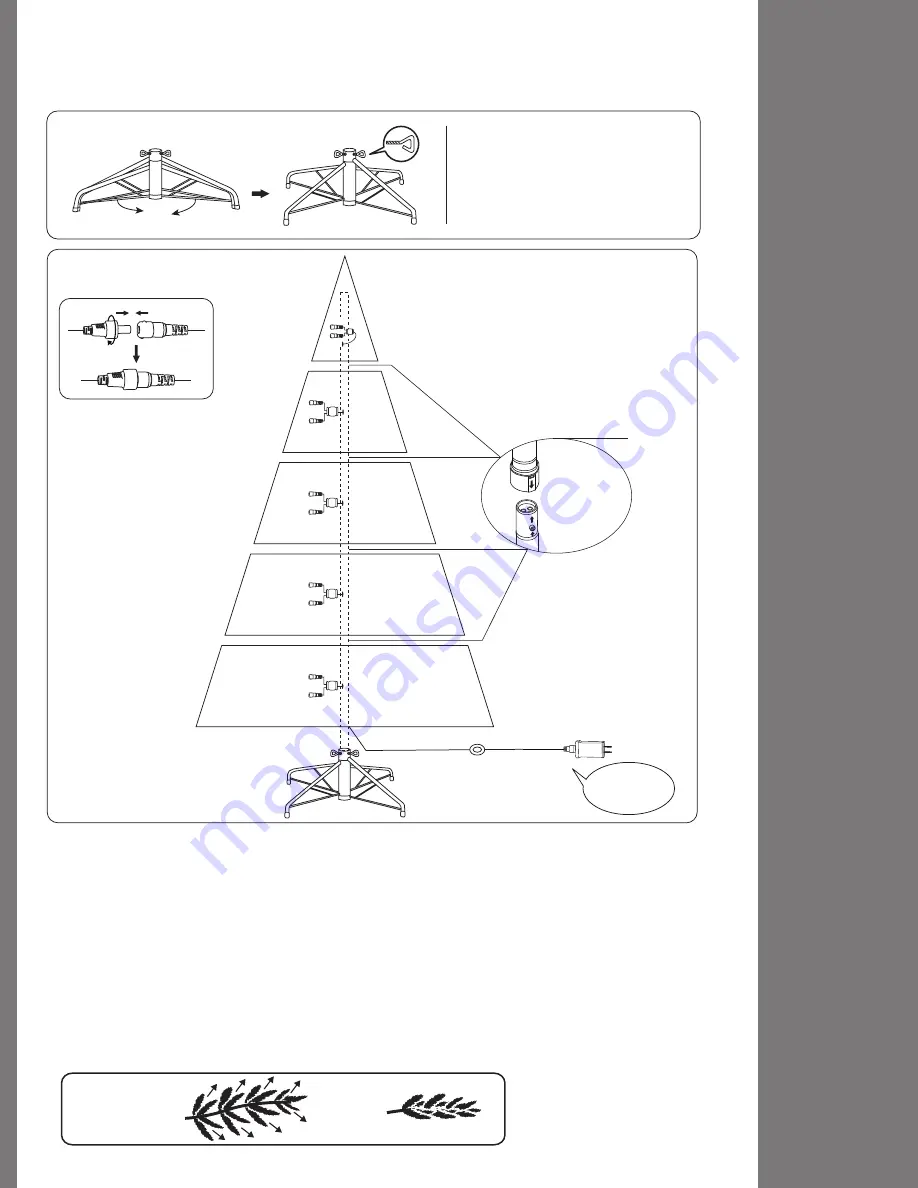
Fig. B - Assembling the tree
Adapter
To Be Plugged
Into Wall
Outlet
Foot Pedal
On/Off Switch
Top view
Side view
Fig. C
2. Each tree section is numbered with a tag. Please identify all sections before assembling.
3. Assemble the tree from the bottom to the top. Insert the pole of Section 1 into the assembled stand.
Make sure the pole is firmly inserted and secured into the stand.
4. Follow the direction of the arrow marked on the adapter to insert. Ensure that all poles are firmly secure.
Continue this step until the entire tree is set up. Be sure that all wires are free of branch hinges.
5. Plug the adapter into the wall outlet (
See Fig. B
). This section of your tree should now be lit. If some bulbs do
not light or flicker, search for any loose plugs and/or broken, loose or missing bulbs. Connect the plugs or
replace the bad bulbs promptly in order to maintain the performance and life expectancy of your pre-lit tree.
6. Begin to shape the branches and tips in the bottom section inserted into the tree stand. Start with the tips
closest to the middle of the tree; pull the individual tips alternately upward and outward working your way
to the tip of the branches (
See Fig. C
). Work row by row to the upper part of the tree section leaving no tip
untouched. Continue to shape each branch as described above as you set up each tree section.
Thank you for purchasing your Christmas tree. The instructions below will help you quickly and easily
set up your new tree.
1. Find a level surface near an electrical outlet and assemble the tree stand as shown in
Figure A
.
LIGHT ASSEMBLY DIAGRAM
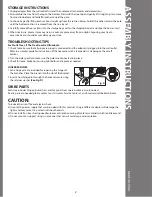
Fig. A - Tree Stand Assembly
1. Pull apart the legs of the stand so
that they are x-shaped.
2. When inserting the bottom section
of the tree into the assembled stand,
thread the eyebolt into the stand
and tighten until the pole is firmly
secured.
Eye Bolt
Align both arrows
in a straight line
before sliding
down to insert
Do Not Tamper
Internal Parts
Section 2
Section 3
Section 4
Section 5
Section 1


