Thank you for purchasing a great product from Wirepath Structured
Wiring. The Wirepath ONE™ Media Enclosure is designed to provide
the most flexibility for your equipment installation.
Wirepath ONE™ Media Enclosure
A
B
C
D
E
F
J
G
H
I
Included Accessories
See the chart below for the included accessories based on the size of the can purchased. Other accessories are available for
purchase on our website, including doors, shelving, and the compact wattbox to name a few.
WP-ONE-ENCL-14
WP-ONE-ENCL-20
WP-ONE-ENCL-28
WP-ONE-ENCL-40
Enclosure Shelves
2
2
2
2
4-Position Mounting Platform
N/A
1
1
2
Hardware Pack
1
1
1
1
Grommets
8
8
8
8
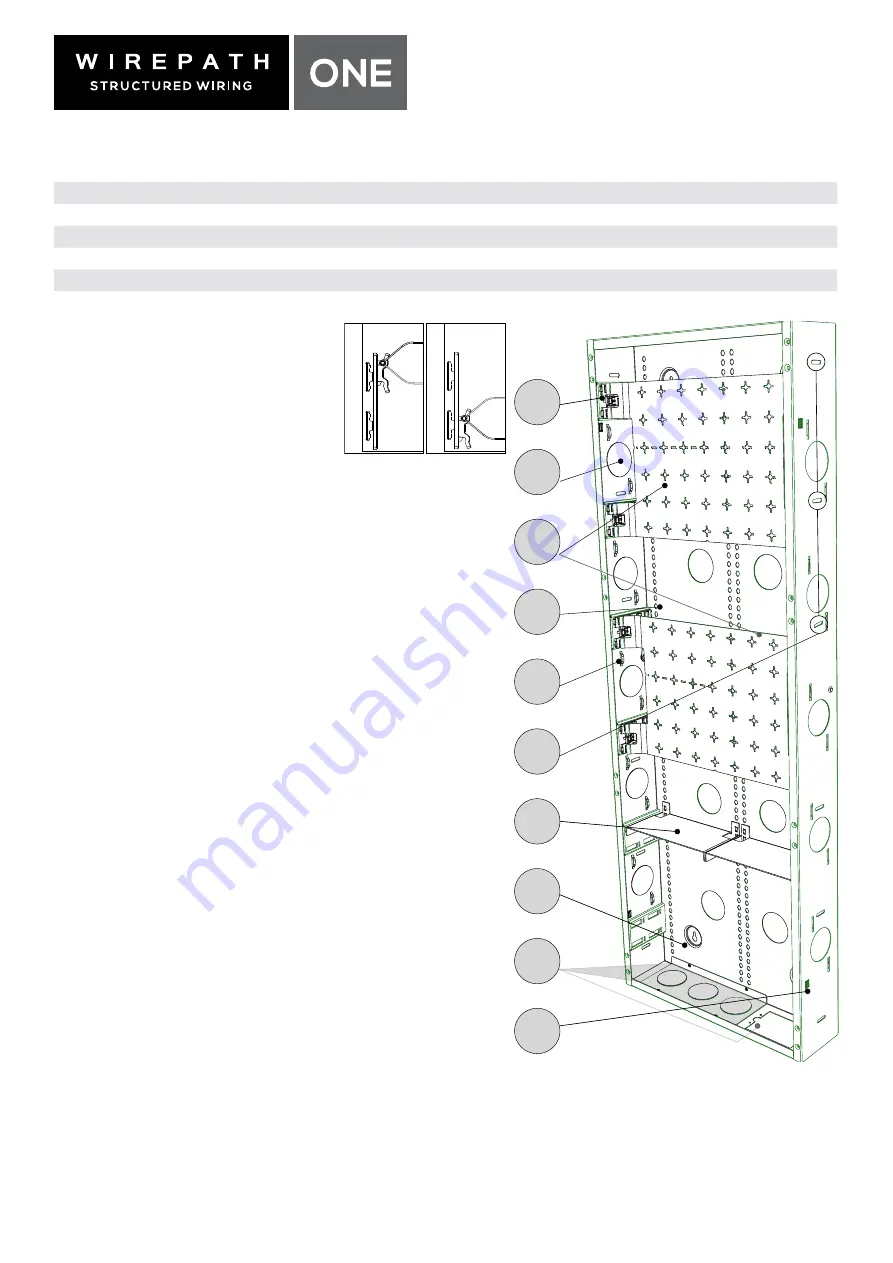
A - Adjustable Platform Standoff*
You have the option to orientate the standoff
toward the front or rear of the enclosure. These
2 different positions provide the Platforms with
4 different levels (1A, 1B, 2A, 2B), as illustrated.
The standoffs and positioning of the Mounting
Platforms effectively give you the option to raise
or lower the platforms to the desired height, up
to being flush with the front of the can. *See
back for more details on the removal process.
B - Conduit Entry
The knockouts on the top, bottom, back, and sides of the can may be used
for installing low voltage rings or for wire management.
C - Mounting Platform
The platform allows for almost any mounting configuration possible.
Additional sections may be trimmed out using a pair of tin snips for further
utilization of mounted equipment. See back for adjusting the platforms to
customize the height of each platform.
D - Module Attachment Holes
Attach modules or rest one of the included shelves on the holes.
E - Zip Tie Place Holders
Manage your wires to run along the side of the can so they stay out of the
way of modules or other equipment for a clean install.
F - Enclosure Mounting Locations
To mount the enclosure to the studs, drive screws into the open screw holes
located along the sides of the enclosure.
G - Media Enclosure Shelves
Place them wherever you want! The shelves can be mounted on the
Mounting Platform or the Module Attachment Holes as depicted in the
illustration. If mounting the shelf to a platform, you may need to press in
the center hook to attach it properly. Additional shelves (WP-ONE-ENCL-
SHELF) are available for purchase if needed.
H - Surface Mount Holes
If surface mounting is desired, drill four screws in the allotted holes and rest
the can on them.
I - Removable Conduit Knockout Panel & Single Gang Knockouts
Knockout more panels for conduit, or remove the panel to add the Compact
Wattbox. Remove the 4 screws from the Panel and follow the installation
instructions included with the WB-200-VB (sold separately). The electrical
knockout is designed to fit a single gang metal junction box.
J - Drywall Markings
As an extra measure, see the drywall hole markings for an indication of the
current depth of the can at 1/2”, 5/8”, or 3/4”.
*Hardware Pack and grommets not shown
1A
2A
1B
2B
Raised Front
Raised Rear
Recessed Rear
Recessed Front


