background image

GL1300

User Guide

I. Product Overview

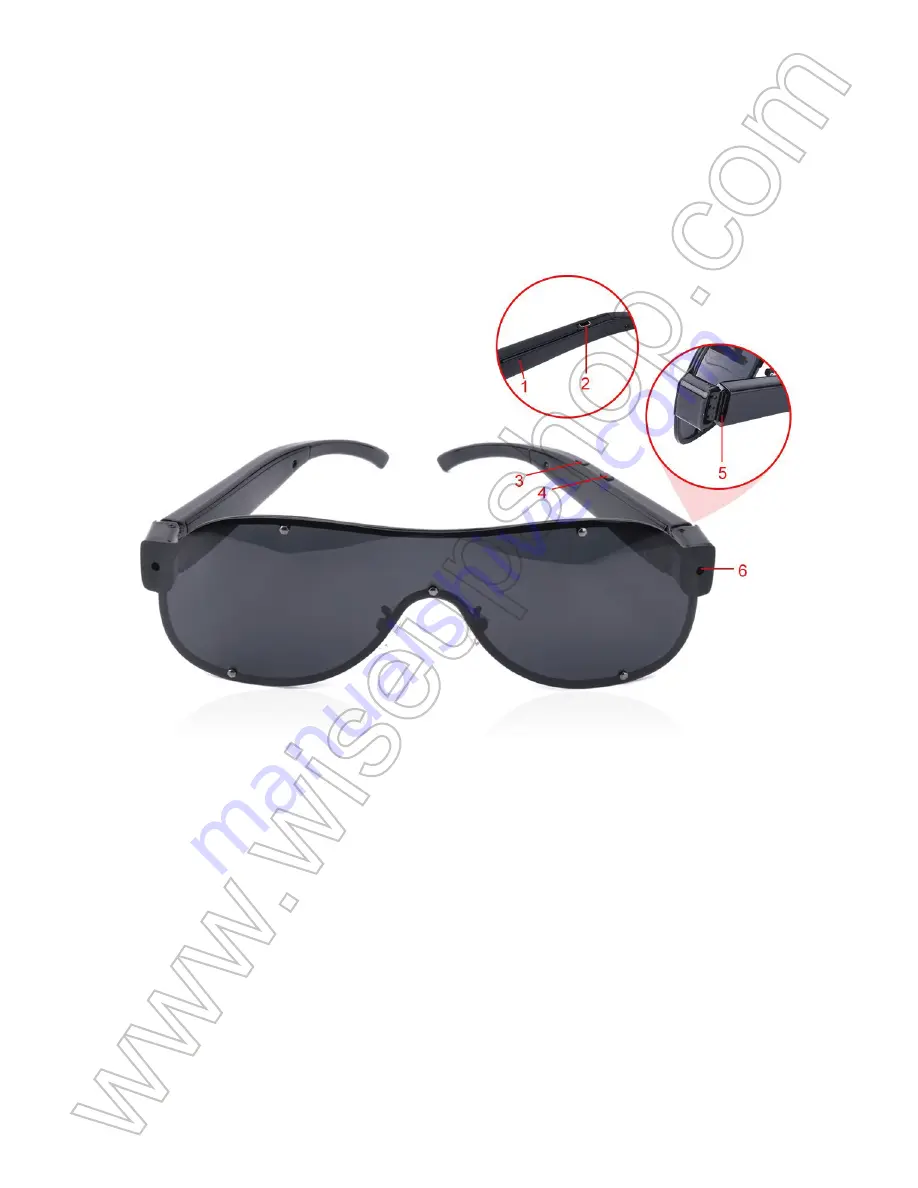
1. Blue/Red Indicator Light
2. Mini USB Port
3. Power/Camera Button
4. Video Recording Button
5. Micro SD Card Slot
6. Camera Lens

II. What’s in the Box

-1 × Sunglasses Camera
-1 × USB Cable
-1 × AC110-240V to DC 5V Power Adapter
-1 × 8GB Micro SD Card (fitted into the SD card slot already)

III. Operation

>> Please make sure your camera is fully charged before using.
>> Please make sure the Micro SD card has been formatted already and is securely fitted 
into the camera’s SD card slot, or it will not work. We recommend you use a SDHC Class 
10 Micro SD card.

[Note]:


If no Micro SD card is fitted into the camera, the camera will shut down automatically. 

The blue indicator light will be illuminated for 3 seconds, then both blue and red indicator lights 

will keep flashing alternatively for 30 seconds and then turn off.

3.1. POWER ON/OFF

3.1.1. Power on the camera by pressing the Power Button for 2 seconds. The blue 
indicator light will come on and flash once, then stay illuminated, indicating the camera 
has entered into standby mode.
3.1.2. Power off the camera by pressing the Power Button for 2 seconds again. Both blue 
and red indicator lights will come on and then turn off in 1 second.

[Note]: 

The camera will shut down automatically if it is in standby mode without any operation 

more than 1 minute.

3.2. VIDEO RECORDING

3.2.1. Power on the camera by pressing the Power Button for 2 seconds. The blue 
indicator light will come on and flash once, then stay illuminated, indicating the camera 
has entered into standby mode.
3.2.2. Press the Video Recording Button once to start video recording. The blue indicator 
light will flash 3 times and then turn off.
3.2.3. Press the Video Recording Button once again to stop video recording. The blue 
indicator light will flash twice and then stay illuminated, indicating the camera is back to 
standby mode.

[Note]:

1). A video clip will be generated and saved every 10 minutes automatically.

2). The camera can record video for 1 hour continuously on a full charge.

3). Video Resolution: 1920x1080P                                  Video Format: AVI

4). If the camera is in low battery, it will save all video files and then shut down automatically. Both 

blue and red indicator lights will flash alternately 3 times and then turn off, next, both blue and red 

indicator lights will come on one after the other and then turn off in 1 second.

3.3. CAMERA/STILL PHOTOGRAPHY

3.3.1. Power on the camera by pressing the Power Button for 2 seconds. The blue 
indicator light will come on and flash once, then stay illuminated, indicating the camera 
has entered into standby mode.
3.3.2. Press the Camera Button once to take photos. The blue indicator light will flash 3 
times and then turn off. The camera will take a photo every 5 seconds.
3.3.3. Press the Camera Button for 2 seconds to stop taking photos. The blue indicator 
light will come on and then stay illuminated, indicating the camera is back to standby 
mode.

IV. Video/Image File Uploads

4.1. Option One: Using a Card Reader

4.1.1. Power off the camera, remove the Micro SD card and insert it into a card reader.
4.1.2. Insert the card reader into a proper PC computer USB port.
4.1.3. The Micro SD card will be recognized as a removable disk drive.
4.1.4. All the files can be accessed in the “

DCIM

” folder.

4.2. Option Two: Using the USB Cable

4.2.1. Power off the camera and connect it to a proper PC computer USB port using the 
USB cable provided.
4.2.2. The camera will be recognized as a removable disk drive.
4.2.3. All the files can be accessed in the “

DCIM

” folder.

V. Setting Time/Date Stamp

5.1. Power off the camera and connect it to your PC computer USB port using the USB 
cable provided.
5.2. Removable disk drive folder appears.
5.3. Click on the drive in the root directory and inside the root directory, open the file 
named “TIME.TXT”.

5.4. Write the current date and time in the “TIME.TXT” file with the correct format:
YYYY-MM-DD HH:MM:SS (For example: 2016-04-12 14:24:32). Save this file.
5.5. Restart the camera and the system will upgrade the program automatically.

VI. Charging

6.1. Connect the camera to an outlet AC power supply using the DC5V power adapter 
and the USB cable provided.
6.2. The blue indicator light will stay illuminated during the charging process.
6.3. It will take 2.5 hours to obtain a full charge.
6.4. The blue indicator light will turn off and the red one will stay illuminated when the 
camera is fully charged.

Summary of Contents for GL1300

Page 1: ...tor Light 2 Mini USB Port 3 Power Camera Button 4 Video Recording Button 5 Micro SD Card Slot 6 Camera Lens II What s in the Box 1 Sunglasses Camera 1 USB Cable 1 AC110 240V to DC 5V Power Adapter 1 8...

Page 2: ...e and red indicator lights will come on and then turn off in 1 second Note The camera will shut down automatically if it is in standby mode without any operation more than 1 minute 3 2 VIDEO RECORDING...

Page 3: ...ting the camera is back to standby mode IV Video Image File Uploads 4 1 Option One Using a Card Reader 4 1 1 Power off the camera remove the Micro SD card and insert it into a card reader 4 1 2 Insert...

Page 4: ...rade the program automatically VI Charging 6 1 Connect the camera to an outlet AC power supply using the DC5V power adapter and the USB cable provided 6 2 The blue indicator light will stay illuminate...

Page 5: ...icht 2 Mini USB Anschluss 3 Power Kamerataste 4 Videoaufnahme Taste 5 Mikro Sd Einbauschlitz 6 Kameraobjektiv II Was ist in der Box 1 Sonnenbrille Kamera 1 USB Kabel 1 AC110 240V bis DC 5V Netzteil 1...

Page 6: ...us indem Sie den Netzschalter nochmals 2 Sekunden lang dr cken Beide blauen und roten Kontrollleuchten leuchten auf und schalten dann in 1 Sekunde ab Hinweis Die Kamera schaltet sich automatisch ab we...

Page 7: ...ein Foto auf 3 3 3 Dr cken Sie die Kamera Taste f r 2 Sekunden um die Aufnahme von Fotos zu beenden Die blaue Kontrollleuchte leuchtet auf und bleibt dann leuchtend und zeigt an dass die Kamera wieder...

Page 8: ...HH MM SS zB 2016 04 12 14 24 32 Diese Datei speichern 5 5 Starten Sie die Kamera neu und das System wird das Programm automatisch aktualisieren VI Aufladen 6 1 Schlie en Sie die Kamera mit dem DC5V Ne...

Page 9: ...SB 3 Bouton Marche Cam ra 4 Bouton d Enregistrement 5 Emplacement pour Carte micro SD 6 Objectif de la Cam ra II Qu y a t il dans la boite 1 Lunettes de soleil 1 c ble USB 1 AC110 240V DC 5V Adaptateu...

Page 10: ...limentation pendant 2 secondes Les voyant bleus et rouges s allument et s teignent en 1 seconde Remarque La cam ra s arr te automatiquement s il est en mode veille sans aucune op ration de plus d une...

Page 11: ...chargement de fichiers vid o image 4 1 Option 1 Utilisation d un lecteur de carte 4 1 1 Mettez l appareil hors tension retirez la carte Micro SD et ins rez la dans un lecteur de carte 4 1 2 Ins rez le...

Page 12: ...t le syst me mettra automatiquement niveau le programme VI Chargement 6 1 Branchez la cam ra une prise de courant secteur en utilisant l adaptateur secteur DC5V et le c ble USB fourni 6 2 Le t moin lu...

Page 13: ...Mini USB 3 Pulsante Camera Potenza 4 Pulsante Registrazione video 5 Slot Micro SD Card 6 Camera Lens II Cosa c nella scatola 1 Occhiali da sole Camera 1 Cavo USB 1 AC110 240V a CC adattatore di alime...

Page 14: ...secondi Entrambi gli indicatori blu e rosso le luci si accendono e poi si spegne in 1 secondo Nota La fotocamera si spegne automaticamente se in modalit standby senza alcuna operazione pi di 1 minuto...

Page 15: ...in modalit standby IV Video Immagine Carica i File 4 1 Opzione uno Uso di un lettore di schede 4 1 1 Spegnere la fotocamera rimuovere la scheda Micro SD e inserirla in un lettore di schede 4 1 2 Inse...

Page 16: ...l sistema aggiorner automaticamente il programma VI Ricarica 6 1 Collegare la fotocamera a una presa di alimentazione CA mediante l adattatore di alimentazione DC5V e il cavo USB in dotazione 6 2 La s...

Page 17: ...USB Puerto 3 Bot n de Encendido C mara 4 Bot n de Grabaci n de V deo 5 Ranura para Tarjetas MICRO SD 6 Lente de C mara II Qu hay en la caja 1 Gafas de Sol C mara 1 Cable USB 1 AC110 240V a DC 5V Adapt...

Page 18: ...a presionando de nuevo el bot n de encendido durante 2 segundos Las luces indicadoras azul y roja se encienden y luego se apagan en 1 segundo Nota La c mara se apagar autom ticamente si est en modo de...

Page 19: ...se el bot n de la c mara durante 2 segundos para detener tomar de fotograf as El indicador luminoso azul se encender y permanecer iluminado indicando que la c mara vuelve al modo de espera IV Subida d...

Page 20: ...o 2016 04 12 14 24 32 Guarde este archivo 5 5 Reinicie la c mara y el sistema actualizar el programa autom ticamente VI Cargando 6 1 Conecte la c mara a una toma de corriente de CA con el adaptador de...

Page 21: ...GL1300 I 1 2 USB 3 4 5 SD 6 II 1 1 USB 1 AC110 240V DC 5V 1 8GB SD SD...

Page 22: ...III SD SD SDHC 10 SD SD 3 30 3 1 ON OFF 3 1 1 2 3 1 2 2 1 1 3 2 3 2 1 2 3 2 2 1 3 3 2 3 2 1 10 2 1 3 1920x1080P AVI 4 3 1 3 3...

Page 23: ...2 1 3 5 3 3 3 2 IV 4 1 1 4 1 1 SD 4 1 2 USB 4 1 3 SD 4 1 4 DCIM 4 2 2 USB 4 2 1 USB USB 4 2 2 4 2 3 DCIM V 5 1 USB USB 5 2 5 3 TIME TXT 5 4 TIME TXT YYYY MM DD HH MM SS 2016 04 12 14 24 32 5 5 VI 6 1...

Page 24: ...6 2 6 3 2 5 6 4...

Reviews: