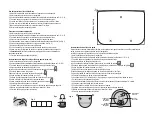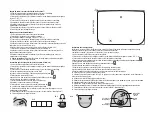
Reset
Reset
Using the Stor-More Key Safe™
1. Locate concealed pre-set combination on the back of the packaging.
2. Open protective door to reveal the dials.
3. Rotate the dials to the current combination.
(The initial combination is set at the factory to F-R-E-E).
4. Pull down and detach the steel bottle from the lock head.
5. Fill the Stor-More steel bottle with your keys and valuables.
6. Insert steel bottle back into lock head until it clicks.
7. Scramble the dials to lock the Stor-More Key Safe™.
8. Close the door to protect the wheels.
Setting a new combination
1. Open protective door to reveal the dials.
2. Rotate the dials to the current combination.
(The initial combination is set at the factory to F-R-E-E).
3. Pull down and detach the steel bottle from the lock head.
4. Locate the reset slot at the bottom of the lock head.
5. Using a coin, rotate the slot counterclockwise so that it points to "Reset". (fig.1)
6. Choose your new word and write it down in the space provided. (fig. 2)
7. Rotate the dials to your new word combination.
8. Using a coin, rotate the slot clockwise back to its original position.
9. Insert steel bottle back into lock head until it clicks.
10.
To Lock
: Scramble dials. Your combination is now set.
11. Close the door to protect the wheels.
Instructions for Hanging (On Door Knob, Fence, etc.)
1. Open protective door to reveal the dials.
2. Rotate the dials to the current combination.
(The initial combination is set at the factory to F-R-E-E).
3. Pull down and detach the steel bottle from the lock head.
4. Locate the shackle release lever at the bottom of the lock head.
It should be in the closed position.
5. Slide lever to the left. It should now be in the shackle release position.
6. Remove shackle from lock head. (fig. 3)
7. Place shackle around the door knob or other object.
8. Insert shackle back into lock head.
9. Slide lever back to the right (closed position).
10. Shackle is now locked to the head.
11. Insert steel bottle back into lock head until it clicks.
12. Scramble the dials to lock the Stor-More Key Safe.
13. Close the door to protect the wheels.
Fig. 3
Fig. 4
Fig. 1
Fig. 2
Instructions for Wall-Mounting
Tools required: Philips head screwdriver, level, drill, drill bit, (hammer and wall anchors may be required for certain
surfaces like masonry)
Included in package: (2) rubber plugs, (3) screws, mounting template
1. Open protective door to reveal the dials.
2. Rotate the dials to the current combination (The initial combination is set at the factory to F-R-E-E).
3. Pull down and detach the steel bottle from the lock head.
4. Locate the shackle release lever at the bottom of the lock head. It should be in the closed position.
5. Slide lever to the left. It should now be in the shackle release position.
6. Remove shackle from lock head. (fig. 3)
7. Locate the 2 rubber plugs inside the steel bottle.
8. Insert rubber plugs firmly into the shackle holes. (fig. 4)
9. Locate mounting template in the upper right of instructions sheet.
10. Position the template on the wall in your desired location.
11. Use a 3/16-inch drill bit to drill 3 pilot holes in the wall through the paper mounting template.
12. If necessary, hammer in wall anchors.
13. Use Philips head screwdriver to insert center screw until only 1/4 of an inch is visible.
14. Hang lock head on center screw.
15. Using the 2 remaining screws, fasten lock head to the wall.
16. Insert steel bottle back into lock head until it clicks.
17. Scramble the dials to lock the Stor-More Key Safe™
18. Close the door to protect the wheels.
Mounting T
empla
te
K E Y S
S A F E
L O C K
open
position
shackle
release
lever
closed
position
combination
reset
slot


