background image

O

WNER

S

 M

ANUAL

UR24A

8-

IN

-1

L

EARNING

S

UPER

R

EMOTE

Summary of Contents for SUPERREMOTE UR24A

Page 1: ...OWNER S MANUAL UR24A 8 IN 1 LEARNING SUPERREMOTE ...

Page 2: ...n outlet on a different electrical circuit from the radio TV experiencing the interference If necessary consult your local Dealer for additional suggestions NOTE Modifications to any of the components in this kit will void the user s authority to operate this equipment READ THIS FIRST SAFETY CONSIDERATIONS Remember to exercise good common sense when using your X 10 remote s home automation feature...

Page 3: ... with your SuperRemote This manual will explain how to set up your SuperRemote to use it with your existing Audio Video equipment Next it will show you how you can use it to set up and use an X 10 Transceiver Module and Lamp Module sold separately to operate electrical devices in your home Finally the manual will show you can expand your system with some of the many additional X 10 products you ca...

Page 4: ... need to understand is that there are two different devices you need to control your house Controllers and Modules Any light or appliance that you want to control is plugged into a Module and that Module is then plugged into a standard AC outlet Modules receive commands from Controllers Examples include the Lamp Module sold separately The Transceiver Module also sold separately is another example ...

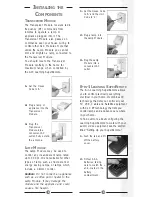
Page 5: ...ransceiver Module receives radio frequency RF commands from remotes to operate a lamp or appliance plugged into it The Transceiver Module also passes on commands over your house wiring to control other X 10 Modules Note that unlike the Lamp Module you cannot dim and brighten a lamp connected to the Transceiver Module You should locate the Transceiver Module centrally in the home for maximum range ...

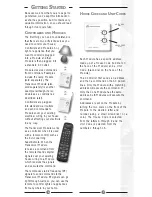
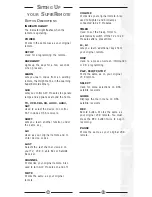
Page 6: ...SETTING UP YOUR SUPERREMOTE BUTTON DESCRIPTIONS INDICATOR LIGHT The indicator light flashes when the remote is operating POWER Works in the same way as your original remote SET UP Used for programming the remote BACKLIGHT Lights up the keys for a few seconds when pressed LEARN Lets you learn codes from an existing remote that might not be in the Learning SuperRemote s library X 10 Lets you control...

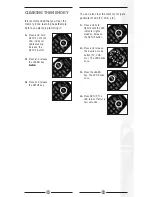
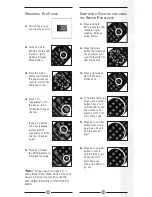
Page 7: ...V VCR etc The LED blinks once 3 Press the LEARN key The LED blinks once 4 Press SETUP The LED turns off after a few seconds CLEARING THE MEMORY It is recommended that you clear the memory in the Learning SuperRemote before you start programming it 1 Press and hold SETUP until the LED indicator lights steadily Release the SETUP button 2 Press and release the LEARN key twice 3 Press and release the ...

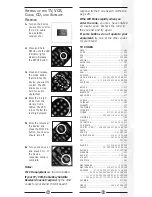
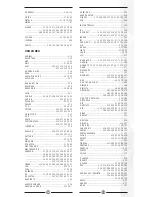
Page 8: ...8 139 140 184 DAYTRON 017 022 184 DIMENSIA 013 DUMONT 017 164 DYNASTY 055 DYNATECH 191 ELECTROBAND 015 189 ELECTROHOME 016 017 022 034 035 EMERSON 017 022 025 027 036 037 038 039 040 043 044 045 046 047 048 049 050 051 052 053 054 055 056 057 058 059 060 062 136 137 176 184 189 190 192 210 ENVISION 017 022 FISHER 062 063 064 193 FUJITSO 059 SETTING UP FOR TV VCR CABLE CD AND SATELLITE RECEIVER 6 T...

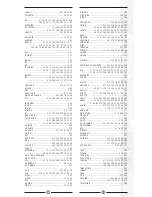
Page 9: ...026 029 051 055 059 084 089 095 096 118 183 184 187 TELECAPTION 130 TELERENT 096 TERA 199 TMK 017 022 TOSHIBA 062 084 102 118 122 130 131 173 214 TOTEVISION 184 FUNAI 051 055 059 FUTURETEC 051 055 GE 013 016 017 022 035 065 067 068 100 176 177 178 179 180 181 194 GIBRALTER 017 164 GOLDSTAR 017 018 022 025 069 070 071 168 169 184 185 GRUNDY 051 059 184 HALLMARK 017 022 HARVARD 051 HITACHI 017 022 0...

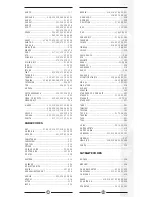
Page 10: ...6 026 034 068 069 095 096 097 098 099 100 101 102 103 104 120 128 133 138 RADIOSHACK REALISTIC 014 015 024 026 027 034 035 036 039 042 062 063 109 RADIX 027 RANDEX 027 RICOH 141 UNIVERSAL 065 100 VICTOR 079 195 VIDTECH 017 018 022 VIKING 187 WARDS 013 014 017 018 022 037 046 059 065 075 081 082 087 088 089 096 100 101 108 132 133 197 YAMAHA 017 018 022 YUPITERU 055 ZENITH 096 134 164 165 166 167 V...

Page 11: ...6 028 046 066 125 SANKY 014 117 SANSUI 023 105 124 136 SANYO 024 026 036 SCOTT 025 028 038 045 051 078 106 129 SEARS 024 027 034 036 061 062 063 064 068 069 120 131 SHARP 014 015 030 042 107 108 109 SHINTOM 017 069 074 111 145 SHOGUN 026 SIGNATURE 015 SINGER 034 074 SONY 017 111 112 132 141 STS 034 120 SYLVANIA 015 034 035 039 075 076 078 137 SYMPHONIC 015 039 TANDY 015 024 TASHIKO 027 TATUNG 071 ...

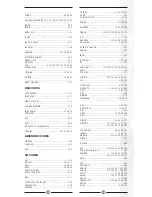
Page 12: ...0 022 025 026 031 042 050 052 ROTEL 019 SAE 019 SAMSUNG 094 SANSUI 019 025 057 076 087 SANYO 020 058 071 088 095 SCOTT 014 025 026 SEARS 025 037 042 070 SHARP 037 042 SHERWOOD 034 042 051 059 SHURE 043 SONY 060 061 FUJITSU 044 045 GENERAL INSTRUMENTS 017 018 019 046 047 048 JANEIL 049 JEROLD 050 KENWOOD 051 LUXOR 052 MACOM STATE 053 NORSTAT 054 REALISTIC 020 056 057 SCIENTIFIC ATLANTA 060 SIERRA I...

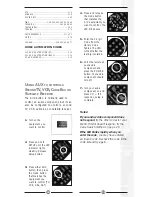
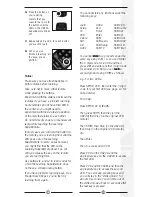
Page 13: ...have entered an invalid code Recheck the code in the code list and try again STS 013 SYLVANIA 019 SYMPHONIC 062 TEAC 029 042 052 062 063 064 TECHNICS 069 086 089 THETA DIGITAL 084 TOSHIBA 074 VECTOR RESEARCH 017 032 VICTOR 035 YAMAHA 018 065 066 077 HOME AUTOMATION CODES X 10 HOME AUTOMATION RF 013 X 10 HOME AUTOMATION IR543 014 GE HOMEMINDER 015 USING AUX TO CONTROL A SECOND TV VCR CABLE BOX OR S...

Page 14: ...h number button in turn to find the third digit When the third digit has been found the LED will go out SEARCHING FOR CODES 1 Turn on the device you want to control 2 Press and hold SETUP until the LED indicator lights steadily Release Setup button 3 Press the mode button that matches the equipment you want to control The LED blinks once 4 Press CH repeatedly until the device to be controlled chan...

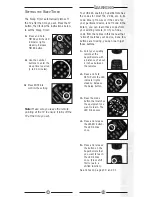
Page 15: ...the mode button that matches the equipment you want to learn The LED blinks once 4 Press and release the LEARN button The LED blinks once 5 Press and release the button on the SuperRemote that you want to teach The LED blinks once Press shift first to learn a shifted function See notes on pages 30 and 31 SETTING THE SLEEP TIMER The Sleep Timer automatically turns off the TV after the time you set ...

Page 16: ... for about 10 seconds You will time out of the shifted mode about 10 seconds after the last key is pressed 6 Press the button on your existing remote that you want to learn Hold the button until the LED on the UR24A SuperRemote blinks off 7 Repeat steps 5 and 6 for each button you want to learn 8 When you ve finished learning all the keys press ENTER Notes Make sure you have fresh batteries in bot...

Page 17: ...ease the X 10 button If you have already installed the Transceiver Module you can control it and other X 10 modules as follows 1 Press and release the X 10 button 2 Use the number buttons to enter the Unit Code number of the chosen module You do not need to enter 0 first for a single digit number 3 Press the appro priate button for the function you require see below X 10 FUNCTIONS On CHANNEL Off C...

Page 18: ...Transceiver Module you are using it with CONTROLLING AN IR MINI CONTROLLER IR543 If you already own an IR Mini Controller you will need to change the X 10 Home Automation code in the remote to use it The code for standard X 10 Home Automation is 013 The code to control the IR mini controller is 014 To change the code 2 Press and hold SETUP until the LED indicator lights steadily Release the Setup ...

Page 19: ...They are available from electrical outlets department stores and mail order catalogs X 10 Home Automation products also integrate with X 10 security systems so you can use the security remotes that come with them to control macros and flash lights when the security system is tripped Check out our W Check out our W Check out our W Check out our W Check out our Web Site at eb Site at eb Site at eb S...

Page 20: ...ed to it The Transceiver Module works but other modules don t respond Check that the module has the same Housecode as the Transceiver Module Try plugging the module into a different outlet The Remote won t control your A V equipment or doesn t work at all Use manual controls or the original remote control to confirm the equipment is working properly Be sure you pressed the device key for the devic...

Reviews: