background image

Xerox 700 Digital Color Press 

          User 
               Guide

Version 1.0

June 2008

Summary of Contents for DocuMate 700

Page 1: ...Xerox 700 Digital Color Press User Guide Version 1 0 June 2008...

Page 2: ...re trademarks of XEROX CORPORATION Other company brands and product names may be trademarks or registered trademarks of the respective companies and are also acknowledged Microsoft MS DOS Windows Wind...

Page 3: ...ating the Serial Number 2 1 Billing Meters 2 2 Paper Storage and Handling of Paper and Media 3 1 Storing of Paper Stock 3 1 Handling of Paper Stock 3 2 3 1 Stock and Tray Selection 3 2 Paper Trays 3 4...

Page 4: ...1 4 1 Loading documents 4 3 Document Handler 4 3 Document glass Bound originals 4 6 2 Sided Copying 4 9 Reduction and enlargement 4 11 Image Quality 4 15 Original Type 4 15 Image Options 4 17 Image En...

Page 5: ...42 Face Up Down Output 4 44 Folding 4 46 Job Assembly 4 47 Build Job 4 47 Sample Set 4 49 Combine Original Sets 4 51 Delete Outside Delete Inside 4 52 Layout Adjustment 4 54 Book Copying 4 54 2 Sided...

Page 6: ...Supplies 7 2 Cleaning Your Machine 7 3 The Document Glass 7 3 Control Panel Touch Screen Trays and Document Handler 7 4 Loading Staples 7 4 Advanced Finisher or Professional Finisher 7 4 Light Produc...

Page 7: ...11 Output Tray 8 12 Staple Jam 8 13 Advanced Finisher Professional Finisher 8 13 Light Production Finisher 8 15 Booklet Maker Staple Jam 8 16 Hole Punch Jam 8 18 Document Feeder Jam 8 19 Bypass Tray T...

Page 8: ...arance 10 6 Fault codes 10 8 Loss of power 10 12 Specifications 10 12 Interface Module 10 13 Overview 10 13 Control Panel 10 13 Paper path 10 14 Paper curl 10 14 Auto Decurler 10 15 Preset Decurler se...

Page 9: ...200 2 sided documents can be scanned at one time using the Document Handler Documents from 216mm x 140mm 8 5 x 5 5 to A3 11 x 17 can be accommodated Document Handler Document Glass This main area is...

Page 10: ...l machine information Services Allows access to the Services screen where different features copy scan etc can be viewed and programmed Access to the All Services button is also available from the ser...

Page 11: ...tivate the machine when in this mode touch a button on the touch screen or the Power Save button Clear All If pressed once resets the default settings and displays the first screen for the current pat...

Page 12: ...loading The trays accommodate paper weights from 17lb to 110lb and are fully adjustable for all stock sizes in the range 8 5 x5 5 to 11 x17 All stock types pre formatted paper letterhead can be used e...

Page 13: ...able you to successfully install the new cartridges so you do not have to wait for a service call Toner Cartridges The Toner Cartridges can be loaded while the machine is running Supplied with the ton...

Page 14: ...an receive up to 500 sheets of paper The Stacker Tray is used for offset and or stapled output and can hold up to 3000 sheets Both trays can be used for hole punched output optional Professional Finis...

Page 15: ...put to a Stacker Tray Light Production Finisher with Booklet Maker This output device requires the Interface Module to interface between the IOT and the Light Production Finisher This Finisher provide...

Page 16: ...machine e g copying will be available before other functions e g printing Power On and Off Power On Press the power switch to turn your machine off Power Off If the Power Save option is selected the...

Page 17: ...management system and browse a list of patient forms Users can quickly scan and capture paper documents preview thumbnails and add them to frequently used document storage locations For example A tut...

Page 18: ...software supplied with your machine will help you use and configure your machine Software Networking Facilities Your machine can be installed on your company or local network enabling you to scan fro...

Page 19: ...system support user help and service support call the appropriate number US 1 800 821 2797 Includes TTY Support Canada 1 800 939 3769 Xerox also provides web based customer support Go to www xerox com...

Page 20: ...Impressions 5608 7209 1601 Total Impressions Black Impressions Counter Count The Billing Meters information is shown here Customers can view the various billing meters and machine serial number for t...

Page 21: ...ng the edges Do not stack more than five reams on top of each other Storing of Paper Stock It is important for optimum printing that paper stock is stored correctly Take note of the following when sto...

Page 22: ...p y DocuCol or 700 N e t w o r k S c a n n i n g H o m e W e b A p p l i c a t i o n s Close Paper Supply Paper Tray Full Paper Size Paper Type Paper Weight Tray 1 Tray 2 Auto Paper Select Tray 5 Tray...

Page 23: ...or Paper via the following path Control Panel Press the Log In Out button System Administrator Login Screen Input Password and select Enter System Administrator Menu Select Machine Status button and s...

Page 24: ...ong or short edge feed portrait or landscape Bypass Tray Load pre formatted paper letterhead and pre printed stock face down and with the top towards the front of the machine Load punched paper with t...

Page 25: ...5 to 11 x17 paper in a variety of different media stock The following procedure shows you how to load Tray 1 with 8 5 x11 paper The paper guides in the trays must be adjusted so that they touch the st...

Page 26: ...the Paper Size and select the Custom Size button The Custom Size screen allows you to specify the exact size of the paper you load into the paper tray You can use the arrow buttons on the touch scree...

Page 27: ...pe C If paper curl is a problem using one of the preset Decurler Paper Type A C Profile Settings usually eliminates the problem These profile settings cover a broad range of paper variables image cove...

Page 28: ...and 13 x19 and has a capacity of approximately 250 sheets of 20lb paper or a maximum stack height of 0 4 Hole punched paper should be loaded with the holes on the leading right edge Tabbed stock shou...

Page 29: ...loaded above the maximum fill line Move the front and rear guides to just touch the edges of the stack Locate the sheet s against the right of the tray and move the front and rear guides to touch the...

Page 30: ...usually eliminates the problem These profile settings cover a broad range of paper variables image coverage and environmental factors If the System Default setting is not correcting curl then you can...

Page 31: ...you change or confirm the size and type of stock NOTE This feature may be enabled disabled by the System Administrator Alternatively you can change the paper size and paper type by accessing the Paper...

Page 32: ...y Feeder If enabled by your System Administrator the Paper Tray settings screen may be displayed on the touch screen Register the stack of paper or media against the front right side of the paper tray...

Page 33: ...pression Paper Color The Paper Size options allow you to specify the size of the paper you load into the paper tray The Auto Size Detect option allows standard sized paper loaded in the trays to be au...

Page 34: ...acity Feeder a pop up window may appear asking you to change or confirm the type and size of the stock The tray may not be ready for use until you change or confirm the size and type of stock NOTE Thi...

Page 35: ...a must not be loaded above the maximum fill line Move the paper guides to just touch the edges of the stack Loading the Oversized High Capacity Feeder Move both Paper Weight Switches to their appropri...

Page 36: ...ou load into the paper tray The Auto Size Detect option allows standard sized paper loaded in the trays to be automatically detected by the machine The Paper Type Paper Weight options allow you to sel...

Page 37: ...led Paper Paper Colored Paper Non tearing Papers Perforated Paper Envelopes In this section you will learn about the different types of stock and stock sizes that can be used on your machine the trays...

Page 38: ...st of three layers the face sheet pressure sensitive adhesive and the backing or release sheet When printing self adhesive labels it is best to use stock designed for use in xerographic printers The a...

Page 39: ...nd multiple sheets can be fed to the printer at once Be sure to carefully fan these types of paper Transparency Usage Hints Fan transparencies to stop them sticking together Load transparencies on top...

Page 40: ...rated Paper Perforated papers is defined as having been pierced with one or more rows of holes to permit easy tearing or separation into sections Perforated card stock may also be used to print sheets...

Page 41: ...gital Color Press User Guide 3 21 Paper Envelopes Envelopes can only be loaded into the Bypass Tray Place the envelopes into the Bypass tray face up The flaps should ALWAYS be closed and on the leadin...

Page 42: ...Xerox 700 Digital Color Press User Guide 3 22 Paper...

Page 43: ...e any staples and paper clips from your documents and ensure that the documents are in a good condition A document glass Used to scan only one original at a time and suitable for any type of document...

Page 44: ...able Enter the Quantity On your machine the maximum copy quantity is 9999 Use the numeric keypad to enter the number of copies The number entered is displayed in the top right hand corner of the touch...

Page 45: ...ill be scanned once only and stored in memory If the document is 2 sided the Document Handler will automatically turn it over so that both sides are scanned Document Handler Loading documents The Docu...

Page 46: ...ment Handler Mixed size originals The Document Handler can even feed documents containing different size pages However the top left corners of the original documents must be aligned in the document ha...

Page 47: ...or stapled documents any size up to 11 x 17 heavyweight or lightweight very shiny glossy damaged torn or crumpled documents With the exception of bound originals simply place the document face down o...

Page 48: ...Right Page Only Binding Edge Erase Load your originals as shown below 0 Inches Ready To Copy Quantity 1 Bound originals can be placed on the document glass to make single sided or two sided copies Th...

Page 49: ...Cancel Starting Page and Ending Page Left Page Binding Erase Right Page Load your originals as shown below 0 mm You also have the option to use the Binding Edge Erase feature which deletes the shadow...

Page 50: ...e either left or right for your 2 Sided Book Copy job When you have saved your selections apply a light pressure to the spine of the document and press the Start button This completes the Document Gla...

Page 51: ...1 2 Sided 2 2 Sided 2 1 Sided Cancel Rotate Side 2 Save 1 1 Sided 2 Sided Copying 1 2 Sided 2 2 Sided 2 1 Sided Cancel Rotate Side 2 The machine provides options to make one or two sided copies from...

Page 52: ...ing 1 2 Sided 2 2 Sided 2 1 Sided Cancel Rotate Side 2 Save 1 1 Sided 2 Sided Copying 1 2 Sided 2 2 Sided 2 1 Sided Cancel Rotate Side 2 Use this option if you want to make two sided copies from two s...

Page 53: ...options to adjust the size of the output image Originals can be enlarged or reduced by between 400 and 25 Various automatic and pre set selections are available to help you choose the most common redu...

Page 54: ...a t i o n s 1 2 3 1 2 3 2 2 1 1 Paper Supply Reduce Enlarge Output Color Copy Output 100 Plain 100 Auto 64 78 129 More More Plain Plain Plain Auto Detect Color Black and White More Dual Color Single C...

Page 55: ...Auto Detect Color Black and White More Dual Color Single Color Red Black Red 2 Sided Copying Original Type Lighten Darken Auto Paper Select Quantity Image Quality Layout Adjustment Output Format Job A...

Page 56: ...Y The Independent X Y option allows you to specify different height and width ratios to scale the height and width independently The Auto X Y option ensures copies are made with the height and width...

Page 57: ...Copy Photo and Text Text Photo Auto selection of original type is determined by setting made by the System Administrator Maps Cancel Quantity 1 The Original Type feature provides a convenient way to...

Page 58: ...Photo and Text Text Photo Auto selection of original type is determined by setting made by the System Administrator Maps Cancel Quantity 1 Text is for use if your original contains only text or line a...

Page 59: ...button on the Image Quality tab When you have made your selection you must select Save so that you can program any other features you may require from the control panel Access the Image Options settin...

Page 60: ...n Vivid Image Options Soften Cancel Pastel Saturation Saturation allows colors to become more or less vivid To make the colors on your output more vivid move the slide bar up To create a less vivid ou...

Page 61: ...ontrast Access the Image Enhancement settings by selecting the Image Quality tab and the Image Enhancement button Background Suppression prevents reproduction of unwanted shading from originals where...

Page 62: ...Saturation Normal Ready To Copy Color Effects Ready To Copy Quantity 1 Save Off Color Effects Lively Bright Warm Shadow Suppression Cool Cancel When you choose one of the Color Effects options an enti...

Page 63: ...r Effects Lively Bright Warm Shadow Suppression Cool Cancel Ready To Copy Quantity 1 Save Off Color Effects Lively Bright Warm Shadow Suppression Cool Cancel The Bright setting produces images that ha...

Page 64: ...Guide 4 22 Copy Ready To Copy Quantity 1 Save Off Color Effects Lively Bright Warm Shadow Suppression Cool Cancel The Shadow Suppression setting reduces or eliminates any background shadow caused by c...

Page 65: ...t w o r k S c a n n i n g H o m e W e b A p p l i c a t i o n s Color Saturation Normal Ready To Copy Save Color Balance Magenta Yellow Cancel Cyan Black Highlights Midtones Shadows 0 0 0 0 0 0 0 0 0...

Page 66: ...t Color Shift allows you to adjust your document so that the colors appear warmer or cooler You can access the Color Shift button on the Image Quality tab Select the Color Shift button shown above to...

Page 67: ...r Staple Divide Output Off Off Output Offset Stacking Booklet creation enables the production of booklets or multi page copies from 1 or 2 sided originals The machine will scan your originals and auto...

Page 68: ...ancel Original Input Covers Rotate Side 2 2 Sided Originals 1 Sided Originals Booklet Options Fold and Staple Booklet Fold Only Booklet Fold and Staple No Fold or Staple Divide Output Off Off Output O...

Page 69: ...e 1 Printed Back Cover Side 2 No Covers Blank Covers Printed Back Cover Side 1 This feature adds covers to the copy sets Colored or heavyweight paper can be used as covers Printed Back Cover 2 Sided P...

Page 70: ...o Covers Blank Covers Printed Back Cover Side 1 Printed Back Cover 2 Sided Printed Back Cover Side 2 Printed Back Cover 2 Sided Front Cover Back Cover You now need to select the tray that contains you...

Page 71: ...rgin Shift Off Off Face Up Face Down Off ID Card Copying Off Watermark Page Layout Save Cancel Off Multiple Up Repeat Image The Page Layout options are ideal for handouts storyboards or for archival p...

Page 72: ...Covers Tab Margin Shift Off Off Face Up Face Down Off ID Card Copying Off Watermark Page Layout Save Cancel Off Multiple Up Repeat Image You can simply touch the number of images you want printed on...

Page 73: ...to Repeat and Variable Repeat When you select Auto Repeat the machine automatically sets the number of images per page according to the document size and paper size and then repeatedly copies the docu...

Page 74: ...and Handouts No Separators Blank Separators Transparency Set and Handouts Transparency Options Save Cancel Blank Separators and Handouts No Separators Blank Separators Transparency Set and Handouts Tr...

Page 75: ...printed transparency In addition a distribution set of copies will also be printed on the stock you specify using the Paper Supply Settings button Select the Transparency Set and Handouts button When...

Page 76: ...ansparency Options No Separators No Covers Tab Margin Shift Off Off Face Up Face Down Off ID Card Copying Off Watermark Poster Save Cancel Off Output Size Enlargement The Poster feature allows you to...

Page 77: ...time ID Card Copying Follow the instructions below to complete the ID Card Copy process Step 1 Lift the Document Feeder and place the ID Card on the top left corner of the document glass Gently lower...

Page 78: ...er Folding Covers Off Transparency Options No Separators No Covers Tab Margin Shift Off Off Face Up Face Down Off ID Card Copying Off Watermark Annotations Off Off Save Cancel Off Head to Top Head to...

Page 79: ...ht existing stamped messages to be printed on the first page or all pages of your copied sets You can also change the position and appearance of the stamped message using the Print On Position and Det...

Page 80: ...tion Print On Page 1 N Page 2 N Page 3 N Style Annotations Off Off Save Cancel Off Head to Top Head to Left Comment Date Stamp Page Numbers Off Bates Stamp Upright Images Original Orientation Format a...

Page 81: ...of Digits The Bates Stamping screen is shown here Press the On button to continue You can add an independent Bates Prefix Number to one or many copied pages You can also change the number of digits po...

Page 82: ...Time Serial Number Stored Watermarks Off Watermark Effect Save Off On Cancel Control Number Serial Number Date and Time Stored Watermarks Off Start Number 1 Off Watermark Effect The Control Number opt...

Page 83: ...ges to be printed on one page or many pages You can choose from the following text messages Copy Prohibited Copy Duplicate Press the Save button to continue Press the Date and Time button to continue...

Page 84: ...p p l i c a t i o n s Booklet Creation Page Layout Image Quality Layout Adjustment Output Format Job Assembly General Settings Off 1 Up Annotation Off Poster Folding Covers Off Transparency Options N...

Page 85: ...required by using the Shift Value arrow keys on the touch screen For both shift options you can specify the Tab Stock Size and Tab Stock Type using the buttons on the touch screen The Tab Margin Shift...

Page 86: ...Settings Off 1 Up Annotation Off Poster Folding Covers Off Transparency Options No Separators No Covers Tab Margin Shift Off Off Face Up Face Down Off ID Card Copying Off Watermark Output Orientation...

Page 87: ...ce Up Reverse Order Selecting the Face Down button causes all output to be delivered face down with the first page on the bottom of the output stack Selecting the Face Up Reverse Order button causes a...

Page 88: ...Job Assembly General Settings Off 1 Up Annotation Off Poster Folding Covers Off Transparency Options No Separators No Covers Tab Margin Shift Off Off Face Up Face Down Off ID Card Copying Off Watermar...

Page 89: ...for a particular segment of the job Copy Output Booklet Creation Off Off Covers Auto Annotations Separators Off No Separators Ready To Copy Quantity 1 Build Job Build Job Off Build Job On Save This fe...

Page 90: ...nt into the document handler or place the segment on the glass one page at a time Press the Start button on the keypad When the first segment has finished scanning the Copy Status screen will appear R...

Page 91: ...In Out Language Start Interrupt Stop Dial Pause Energy Saver Clear All When copying a large number of sets use the Sample Set feature to review a proof copy You can ensure that the proof copy is exact...

Page 92: ...1 1 Pages 1 1 One copy set of the job the sample set is printed The remainder of the job is held After the sample set is printed the machine will pause You will be able to change settings change quant...

Page 93: ...n Save Cancel The Combine Original Sets feature allows you to copy sets of documents that cannot be loaded into the Document Handler at one time Combine Original Sets If you select the Off button the...

Page 94: ...iginals Delete Inside Delete Outside Delete Inside Off Delete Outside Save Cancel Area 2 Area 3 Not Set Area 1 Not Set Not Set Delete Inside Both Sides Side 1 Only Side 2 Only Originals Area Settings...

Page 95: ...he coordinates of two diagonally opposite corners Clear Area 1 Use the Delete Outside Delete Inside Area screen to define each of the areas you want to use as targets for deletion To define an area en...

Page 96: ...n g H o m e W e b A p p l i c a t i o n s Layout Adjustment Book Copying Bound originals can be placed on the document glass to make single sided or two sided copies The bound original should be plac...

Page 97: ...m e W e b A p p l i c a t i o n s 2 Sided Book Copy Bound originals can be placed on the document glass to make single sided or two sided copies The bound original should be placed face down and regi...

Page 98: ...originals as shown below You will be required to select a start page either left or right and an end page either left or right for your 2 Sided Book Copy job When you have saved your selections apply...

Page 99: ...an select the Auto Detect option which enables automatic detection of scanned paper sizes The machine can detect the size of the document if it is a standard size If the document is not a standard siz...

Page 100: ...Originals the machine will detect the size of the documents This means that you can either 1 Select Auto Reduce Enlarge and a specific copy paper size The image will be modified to fit the selected pa...

Page 101: ...nal Orientation Upright Images Invert Image Off None Off Off Normal Image All Services Positive Image C o p y DocuCol or 700 N e t w o r k S c a n n i n g H o m e W e b A p p l i c a t i o n s Edge Er...

Page 102: ...Edges All Edges Print to Edge Margin Erase Erase Value 0 50mm Ready To Copy Quantity 1 Presets Available Available Available Inches Individual Edges This option allows you to independently set the amo...

Page 103: ...Book Copying Original Size Auto Detect Original Orientation Upright Images Invert Image Off None Off Off Normal Image All Services Positive Image C o p y DocuCol or 700 N e t w o r k S c a n n i n g...

Page 104: ...opy Save Cancel Quantity Margin Shift Presets Shift Right Shift Down Available Margin Shift allows you to independently set the shift for each side of your copied output This feature is often used to...

Page 105: ...rmal Image All Services Positive Image C o p y DocuCol or 700 N e t w o r k S c a n n i n g H o m e W e b A p p l i c a t i o n s Image Rotation Off This option causes copies to be made as they are lo...

Page 106: ...Rotation Direction Image Rotation Off Always On Save Cancel On During Auto The image of the original is rotated to match the orientation of the paper On During Auto When Reduce Enlarge or Paper Supply...

Page 107: ...irror Image feature reverses the original image creating a mirror of the original This feature can be used when you want to change the apparent direction of an image or where the original is inked on...

Page 108: ...l Orientation Upright Images Invert Image Off None Off Off Normal Image All Services Positive Image C o p y DocuCol or 700 N e t w o r k S c a n n i n g H o m e W e b A p p l i c a t i o n s Original...

Page 109: ...Images Original Orientation Copy Save Cancel Quantity Select the orientation of your originals Place the original against the left corner of the glass Once you have selected your Original Orientation...

Page 110: ...Xerox 700 Digital Color Press User Guide 4 68 Copy...

Page 111: ...documents and ensure that the documents are in a good condition Touch the Services button on the Control Panel Then touch the All Services icon on the touch screen Finally touch the Network Scanning...

Page 112: ...Start button on the Control Panel Select the template that contains the destination and other settings required for your scan job from the template list on the touch screen Contact your system admini...

Page 113: ...lows the viewing and managing of the job queue For print tasks you have submitted to your machine via the print driver the job type is identified by the filename or document title The most recently su...

Page 114: ...The job has been converted into the appropriate format and is being scheduled to print Formatting The job is being converted into the appropriate format For print tasks the job is decompressed for sca...

Page 115: ...fully completed without errors Completed with Errors The job was completed with errors For example a fax job is sent to 2 recipients only 1 recipient received the fax The job has been temporarily stop...

Page 116: ...ompleted Jobs tab to continue The completed jobs are shown on the screen When you touch a job listed on this screen you can view detailed information about that job Print Waiting Jobs Active Jobs Secu...

Page 117: ...l Jobs To view the Print Waiting jobs on the machine select the Print Waiting Jobs tab Select the Print Waiting Jobs tab to continue The Print Waiting jobs are shown on the screen When you touch a job...

Page 118: ...Energy Saver Clear All The Machine Information screen allow you to view details that apply specifically to your machine This topic shows you the various options available to you Machine Information P...

Page 119: ...ine Configuration Software Version General Information Machine Serial Number xxxxxxxxxx Current System Software 0 210 0 Website The Machine Information screen provides you with the telephone number us...

Page 120: ...The paper Size Type and Color are the attributes set when loading the trays Close Items Paper Tray Status Filled Paper Size Paper Type Tray 1 Tray 2 Tray 6 Tray 5 Tray 4 Tray 3 100 100 Ready 100 100...

Page 121: ...ebsite A variety of useful reports are available on the Print Report List screen Touch the Print Report List button Print Report List An example of a typical Print Report screen is shown here To begin...

Page 122: ...trieved The number of overwrites is set by the System Administrator The Overwrite Hard Disk feature prevents the document image and registered data recorded on the hard disk from being illegally retri...

Page 123: ...ation Current Faults Machine Status Tools Current Messages Fault History The Faults tab allows access to the Error History Report which displays a list of errors that have or are currently occuring on...

Page 124: ...ge 75 Remaining Drum Cartridge 75 Remaining Drum Cartridge 75 Remaining Drum Cartridge 75 Remaining Waste Container OK Toner Remaining 100 100 100 100 100 0 0 0 0 0 View the status of the machine supp...

Page 125: ...Impressions Total Impressions Total Impressions Total Impressions Total Impressions 2000 1000 500 526 5568 To access the Billing Meters Select the Machine Status button on the Control Panel Touch the...

Page 126: ...Xerox 700 Digital Color Press User Guide 6 14 Machine Job Status...

Page 127: ...r Replacing the Waste Toner Container Replacing the Drum Cartridges Ordering Supplies Replacing the Toner Cartridges Replacing the Fuser Replacing the Charge Corotron Note The User Interface UI screen...

Page 128: ...x for assistance you will be asked to supply your machine serial number Locating the Serial Number The serial number can be located from the touch screen as follows 1 Select the Machine Status button...

Page 129: ...h screws You cannot maintain or service any of the parts that are behind these covers and guards Do NOT attempt any maintenance procedure that is NOT specifically described in the documentation suppli...

Page 130: ...ine Simple step by step instructions are provided here to assist you in loading staples into the various available finishers such as Advanced Finisher or Professional Finisher Light Production Finishe...

Page 131: ...e Hold the orange lever and pull the cartridge towards you to remove Dispose of the staple cartridge according to the instructions contained in the new staple cartridge box Insert the staple cartridge...

Page 132: ...artridge straight out of the machine Push the cartridge back to its original position Remove the staple cartridge from the staple case Insert a new staple cartridge into the staple case Push the cartr...

Page 133: ...to remove an empty booklet staple cartridge from the Professional Finisher or Light Production Finisher and replace it with a new booklet staple cartridge To gain access to the staple cartridge make s...

Page 134: ...nance Return the unit to its original position and close the front door Open a new staple cartride Holding the tabs of the new booklet staple cartridge return the cartridge to the original position an...

Page 135: ...d to order a new cartridge and when to install it The Drum Cartridges can be recycled so please follow the disposal instructions you receive with the new items Replacing the Drum Cartridges 1 Leave th...

Page 136: ...ce it under the cartridge Some drum cartridges may include a protective film Remove the the film on the drum cartridge if it is present CAUTION Do not touch or scratch the surface of the drum when you...

Page 137: ...pen the Drum Drawer 8 Remove the old drum cartridge by holding the finger rings provided at the both ends of the drum cartridge and gently lifting up 9 Place the new drum cartridge in the machine foll...

Page 138: ...turn the Release Handle to its original position 13 Return the R1 R4 handle to the original position and close the front door 14 Insert the used drum cartridge into an empty container for recycling Th...

Page 139: ...w to remove a used toner cartridge and replace it with a new toner cartridge The machine will notify you when a new toner cartridge is needed and when installation is to occur If you continue copying...

Page 140: ...tilt the new cartridge up and down and then left and right to redistribute the toner 7 Install the toner cartridge by aligning the arrows on the cartridge evenly with the printer until you hear a clic...

Page 141: ...ransfer Module 1 Make sure the machine has stopped running and open the Front Door 2 Grasp Handle 2 and turn it to the unlocked position Warning To avoid burns wait at least 5 10 minutes after powerin...

Page 142: ...ser Guide 7 16 Maintenance 4 Grab and lift the Amber Gold colored handle only lift and pull up and out of the Transfer Module 5 Dispose the fuser as normal office waste or recycle the fuser 6 Remove t...

Page 143: ...d handle 9 Turn Handle 2 to the locked position 10 Close the Front Door of the printer That completes the procedure for replacing the Fuser This procedure shows you how to remove the used Charge Corot...

Page 144: ...le 4 Raise the Release Handle 1 Make sure the machine has stopped running 2 Open the Front Door CAUTION Do not expose this item to direct sunlight or strong light from indoor fluorescent lighting Imag...

Page 145: ...ne 6 Pull out the Drum Drawer CAUTION Remember to minimize the amount of time that the drum cartridges are exposed to light Exposure for more than two minutes may result in light shock to the drums 7...

Page 146: ...Guide 8 Remove the old charge corotron by holding the amber gold colored casings provided at the both ends of the charge corotron and gently pulling straight up 9 Gently lower the new charge corotron...

Page 147: ...p the amber gold colored casings on the new charge corotron and pull towards the front of the machine until you hear a clicking noise to indicate the charge corotron is in place This procedure shows y...

Page 148: ...TION Never use a vacuum cleaner when you clean spilled toner It can cause explosion as the toner fills the vacuum cleaner and gets sparks Use a broom or a cloth moistened with a neutral detergent 3 Gr...

Page 149: ...remaining the container may be full before the next message is displayed It may cause machine malfunctions This procedure shows you how to empty the hole punch waste container Emptying the Punch Scrap...

Page 150: ...Xerox 700 Digital Color Press User Guide 7 24 Maintenance...

Page 151: ...Module Fuser Inverter Bottom Right Cover Document Feeder Bottom Left Cover Tray 6 Tray 7 OHCF Jam Clearance The machine has designated paper jam clearance areas which are highlighted in the above fig...

Page 152: ...emove the jammed document Open the Document Feeder Top Cover until it comes to a stop Document Feeder This section describes how to clear paper jams that occur in the Document Feeder Open the Left Cov...

Page 153: ...instructions displayed on the screen Close the Inner Cover Close the Top Cover until it clicks into place Close the Left Cover until it clicks into place If the document cannot be found raise the Doc...

Page 154: ...ection describes how to clear paper jams that occur in the Transfer Module and Fuser area Turn Handle 2 to the right until it is in the horizontal position then pull out the transfer module Warning Ne...

Page 155: ...User Guide Problem Solving 8 5 Pull down Handle 2b and remove the jammed paper Return Handle 2a and Handle 2b to their original position Push in the transfer module completely and turn Handle 2 to th...

Page 156: ...s how to clear paper jams that occur in Paper Trays 1 to 3 NOTE Paper is sometimes torn and remains inside the machine if you open a tray without checking the paper jam position This may cause machine...

Page 157: ...ass Tray Tray 5 Jam Clearance This section describes how to clear paper jams that occur in the Bypass Tray Tray 5 When two or more sheets of paper are loaded remove all of the sheets from the tray Fan...

Page 158: ...t Cover while gripping the release handle Bottom Left Cover Jam Clearance This section describes how to clear paper jams that occur inside the Bottom Left Cover NOTE If paper is torn check for any tor...

Page 159: ...Tray 6 HCF Jam Clearance This section describes how to clear paper jams that occur in Paper Tray 6 HCF Gently close Tray 6 NOTE If paper is torn check for any torn pieces of paper inside the machine...

Page 160: ...s section describes how to clear paper jams that occur in Paper Trays 6 and 7 OHCF Note Tray 7 on the OHCF may not be present Remove the jammed paper Note To avoid tearing paper review where the paper...

Page 161: ...over This section describes how to clear paper jams that occur in the Bottom Right Cover If the Output Catch Tray is installed open the Bottom Right Cover while pressing the down arrow button Pull she...

Page 162: ...r is installed return Handle 1a to its original position then close the front door of the finisher Remove jammed paper from the Output Tray NOTE If paper is torn check for any torn pieces of paper ins...

Page 163: ...anced Finisher Professional Finisher Staple Jam Grip the Handle R1 of the staple cartridge holder and pull out the holder to the right towards you Remove the staple cartridge holder by gripping the or...

Page 164: ...the inside of the finisher for any remaining staples Pull up th e metal part of the staple cartridge Remove the jammed staples and return the metal part pulled up in the previous step to the original...

Page 165: ...er Staple Jam Pull out the Staple Cartridge Open the staple cartridge cover and remove the jammed staple After removing the staple cartridge check the inside of the finisher for any remaining staples...

Page 166: ...Make sure that the machine has stopped before opening the front cover of the finisher Booklet Maker Staple Jam Press the levers together then pull out the Booklet Maker Staple Cartridge Hold the tabs...

Page 167: ...lem Solving 8 17 Holding the tabs of the Booklet Maker Staple Cartridge gently push the cartridge to its original position until it clicks into place Return the unit to its original position and close...

Page 168: ...olor Press User Guide 8 18 If the Hole Punch feature jams remove and empty the chad tray as well as removing the paper jam For more information on removing paper jams go to the topic titled Paper Jams...

Page 169: ...t your originals are within specification and that the loaded orginals do not cover the maximum fill line on the document handler guides Document Specification Loose leaf 8 5 x5 5 to 11 x17 13 32lb Up...

Page 170: ...on the following pages Bypass Tray Tray 5 Jam or Misfeed Prevention Fan the paper and load into the bypass tray Ensure that the paper does not cover the maximum fill line NOTE Do not add paper to the...

Page 171: ...ter clearing the jam the envelope jams again follow the steps on the following pages Envelope Jam Ensure that the guides are against the edges of the envelopes Check that the attributes of the paper t...

Page 172: ...an 11 x 17 page Check to see if Transparencies are selected on the Paper Type screen The machine automatically adjusts for different types of media paper can tolerate more heat than transparencies Def...

Page 173: ...ing Started section of this program Alternatively you can place the documents on the Document Glass Documents will not feed correctly Check the external device to ensure that it is properly connected...

Page 174: ...print data of the machine as well as print data stored in the machine s built in memory is discarded Cause Unable to store any documents with 2 Sided Book Copy feature Remedy Check the 2 Sided Book C...

Page 175: ...nt from the paper size of the tray selected for Auto Repeat Remedy Change the paper size for the tray or change the Paper Type Priority settings Cause An error occurred when reading the Gradation Adju...

Page 176: ...ions and IP address retrieve method Cause Documents stored in the mailbox have reached the limit and hard disk capacity is insufficient Remedy Remove unnecessary documents from the mailbox and save th...

Page 177: ...emedy Code Cause Attempted to print Job Template List while updating the job template Remedy Retry printing after waiting for a period Cause Annotation is not possible due to insufficient hard disk sp...

Page 178: ...ified to printing prohibited Remedy Cancel the printing prohibited specification using Adobe Reader and try to print again Cause No permissions to use the service Remedy Check with your System Adminis...

Page 179: ...ion is not possible due to insufficient hard disk space Remedy Remove unnecessary data from the hard disk to increase free disk space Cause Could not send mail because the hard disk on the SMTP server...

Page 180: ...An error occurred during scanned image conversion processing Remedy Retry scanning Cause A hard disk error occurred during scanned image conversion processing Remedy The hard disk might be defective...

Page 181: ...g was interrupted Remedy Reduce resolution or reduce enlarge ratio to decrease the data size or send in several pieces Cause In Scan to FTP SMB or Job Template the forwarding destination or job templa...

Page 182: ...maged Remedy Check the data stored in the media with a computer Cause A media reader is not connected with the machine correctly Remedy Check the connection between the media reader and the machine Ca...

Page 183: ...n application interface Remedy Check whether an application linked CentreWare Flow Service operates correctly When it is operating check the log When it is not operating check the network environments...

Page 184: ...Cause An error occurred with the offset stacking module Remedy Power cycle the machine If the machine is not improved by performing the relevant remedy contact your Xerox Customer Support Center Caus...

Page 185: ...er Cause An error occurred in the document feeder Remedy Power cycle the machine If the machine is not improved by performing the relevant remedy contact your Xerox Customer Support Center Cause The s...

Page 186: ...omer Support Center Trays other than the Tray 2 can be used Cause The Tray 3 malfunctioned Remedy Check paper loaded in the Tray 3 and power cycle the machine If the machine is not improved by perform...

Page 187: ...machine If the machine is not improved by performing the relevant remedy contact your Xerox Customer Support Center Cause A connecting cable is not connected with a media reader correctly Remedy Conn...

Page 188: ...Remedy Power cycle the machine If the machine is not improved by performing the relevant remedy contact your Xerox Customer Support Center Cause The settings for punching are canceled Remedy Confirm...

Page 189: ...and perform the task in the Corrective Action column Is your machine connected on the network as a printer Try printing a test page from your workstation to the machine to verify that the printer is...

Page 190: ...tern prints with squares or small blocks Using a lint free cloth lightly dampened with Xerox Anti Static or General Cleaning Fluid or another suitable non abrasive glass cleaner clean the Document Gla...

Page 191: ...uides are against the edges of the loaded paper Black Lines Streaks Spots Smears or Bands If lines or streaks are present check the IBT Cleaner Assembly for wear or damage and replace as required If s...

Page 192: ...you are copying your original from the Document Handler ensure that your original is loaded face up and the document handler guides are against the edges of the loaded originals If you are copying you...

Page 193: ...sible If you are copying your original from the Document Glass select the paper size required to make the copy DO NOT use the Auto Paper option Ensure that the paper size and type is correctly set for...

Page 194: ...hading If there is a message about low toner on the screen replace the toner cartridge If your original or output is 2 sided check that the paper is not too thin Double Image or Show Through The outpu...

Page 195: ...check that there are no obstacles in the paper path Go to the Jam Clearance topic for information on clearing the paper paths Ensure that your original is loaded face down and to the rear left of the...

Page 196: ...and smears smudges and rubs off Ensure that the paper tray guides are against the edges of the loaded paper Misregistration or Image Shift The output image is not in the correct position some of the...

Page 197: ...nd Tips Fuser 64 to 105 gsm Plain Mode 106 to 176 gsm Heavyweight 1 or Coated 1 Mode 177 to 220 gsm Heavyweight 2 or Coated 2 Mode 221 to 300 gsm Heavyweight 2 or Coated 2 Mode Note Setting the media...

Page 198: ...For example 11 x 17 indicates the grain is in the 17 inch direction This paper is Long Grain 17 x 11 indicates the grain is in the 11 inch direction This paper is Short Grain See sketches below HW 1 o...

Page 199: ...uire the use of two Fusers one when running 8 5x11 stock and the other when running 12x18 or larger stock This is especially true for the Graphic Arts people Image quality defects such as marks or spo...

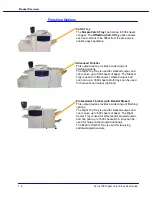
Page 200: ...Problem Solving Xerox 700 Digital Color Press User Guide 8 50...

Page 201: ...y High capacity feeder module 8 5 x 11 A4 Finishing Options Interface module IFM required for the Light Production Finisher Finisher and the High Capacity Stacker High Capacity Stacker Advanced Finish...

Page 202: ...x 400 dpi 600 x 600 dpi 50 ppm color 80 ppm B W with DADF Warm up Time 7 minutes maximum First print out time FPOT 11 2 seconds color 7 5 seconds black Paper Size Print Resolution 2400 x 2400 x 1 A4 8...

Page 203: ...92lb 240Kg With User Interface Catch Tray and High Capacity Feeder Approximately 665lb 302Kg Oversized High Capacity Feeder add approximately 184lb 83 5Kg Advanced Finisher add approximately 170lb 77K...

Page 204: ...x17 SEF Media Type Plain Recycled Transparencies Heavyweight 1 Heavyweight 2 Labels 1 Labels 2 Hole Punched Tab Stock 1 Tab Stock 2 Coated 1 Coated 2 Custom Plain paper size 2 Heavyweight 1 side 2 Hea...

Page 205: ...of 20lb bond Tray Full Detection No Capacity 2000 sheets of 20lb bond Paper Sizes A4 8 5 x 11 LEF to SRA3 13 x 19 SEF Paper Weights 18lb bond 110lb cover Media Type Bond Punched Plain Letterhead Pre p...

Page 206: ...n inside or outside of folded paper Sep Covers Tray Tray 8 Holds 200 sheets of 20 lb 90 gsm paper ranging from 8 5 x11 A4 to 11 x17 A3 in weights from 17 lb Bond 64 gsm to 90 lb Cover 220 gsm This tra...

Page 207: ...User Guide 9 7 Specifications Electrical Specifications DocuColor 700 All Markets Voltage 208 240 VAC minus 10 plus6 Frequency 50 60 Hz plus minus 3 Amperage 12 Amps Power Consumption 2 746 KVA maxim...

Page 208: ...Xerox 700 Digital Color Press User Guide 9 8 Specifications...

Page 209: ...er a 1 drawer or a 2 drawer Feeder Each drawer holds 2000 sheets The High Capacity Stacker HCS an optional finishing device that provides stacking and offsetting capabilities for output to a Stacker T...

Page 210: ...ay Up to 500 sheets are transported to the Top Tray When sheets are purged after a paper jam When the Sample Set button is selected When selected as an Output Location Labels must be sent to the Top T...

Page 211: ...ator lights when the Stacker Tray has reached the down position and the front door can be 4 Sample indicator This indicator blinks until a proof set is delivered to the Top Tray 5 Top Tray jam area Bl...

Page 212: ...tion of the job to the Stacker Cart For Collated output for example if the output is 100 sets of a 50 page original document the user can choose 1 3 output sample sets For Uncollated output for exampl...

Page 213: ...es Position the securing bar on top of the stacked paper Remove the paper from the Stacker Tray Pull the Stacker Cart straight out Remove the 4 Press the Unload button on the HCS Control Panel The Wai...

Page 214: ...6 jam 1 Perform the following steps to clear the HCS Transport jam and resume printing Lift the green handle and or rotate the green knob and remove all paper in the transport area 2 Close the green h...

Page 215: ...ear the E8 jam 1 Perform the following steps to clear the HCS Exit jam and resume printing Lift the green handle and or rotate the green knob and remove all paper in the exit area 2 5 Close the HCS Fr...

Page 216: ...01 049 902 049 903 049 905 049 907 049 908 Paper jam A jam occurred during feeding A jam notification is displayed on the UI Open the front door Carefully remove all sheets and paper scraps from jam c...

Page 217: ...detected as open but the front door is actually closed locked Power off then power on 049 220 049 221 Stacker upper limit failure Stacker lower limit failure Power off then power on 049 222 049 223 04...

Page 218: ...er on 049 300 Upper cover is open Close the upper cover 049 310 HCS download mode failure Power off then power on 049 700 Error in stacking the output paper media Remove the paper from the stacker tra...

Page 219: ...2 049 963 049 964 049 967 049 969 049 970 049 971 049 972 The UI displays the following message Take out the paper stack Press the Unload button The Wait light blinks until the Stacker Tray has reache...

Page 220: ...m rate Transparencies may be run to either the Top Tray or the Stack Tray Stack height should be limited to 100 transparencies Coated paper lighter than 100 g m2 may not run as reliably as coated pape...

Page 221: ...url correction functions Communications between the machine and the various connected finishing devices Interface Module High Capacity Stacker HCS Interface Module Overview Control Panel The Control P...

Page 222: ...d from the decurler to the connected finishing device From the machine Decurler Paper path To the finishing device Paper curl When paper is exposed to heat the paper loses moisture and curls toward th...

Page 223: ...level The amount of curl correction is changed by selecting a related button The current selected amount of curl correction is displayed by the Control Panel LEDs Your system is also designed with sev...

Page 224: ...ose the Interface Module Front Cover 3 If the UI indicates there is a jam in the digital press follow the instructions on the screen to remove any paper in the area indicates Refer to the Jam Clearanc...

Page 225: ...eas Close the front door Verify the paper used is within the approved paper specifications 048 300 The front door is open Close the front door 048 310 048 311 048 312 048 313 048 314 048 315 048 316 D...

Page 226: ...ress User Guide 10 18 100V to 240V Frequency 50 60 Hz Specifications Electrical 10 to 32 C 15 to 85RH 50 to 90 F 15 to 85RH NOTE Above 82 F 28 C reduced humidity is required to maintain the specified...

Page 227: ...a 2000 sheet 8 5X11 or A4 paper source High Capacity Feeder High Capacity Feeder HCF Overview Jam clearance instuctions for the High Capacity Feeder are located in the Problem Solving chapter Chapter...

Page 228: ...to the HCF The Oversized High Capacity Feeder OHCF feeds oversized stock up to 13 x 19 in SRA3 paper Note The OHCF can be either a 1 drawer or a 2 drawer Feeder Each drawer holds 2000 sheets Jam clea...

Page 229: ......

Page 230: ......

Reviews: