

Initial Setup Card
QA 25 Draft: July 31, 1998
9204000
Welcome to the family of productive M Series users!
You will soon have the power of M Series print server at your fingertips. The M Series is
very easy to set up and use. This Setup Card guides you through the initial set up process.
Follow this process each time you set up the M Series print server in a different location,
connect it to a different network, or connect it to a different color copier.
After you complete the initial setup process, refer to the M Series Getting Started Guide for
instructions for configuring and connecting the M Series to you network.
The setup of the M Series Print Server is not complete until you have followed the
instructions on this card and in the Getting Started Guide!
Pre-Installation
Contact your Xerox representative to have a Port Kit installed on your copier.
Step 1:
Prepare the
Copier
Ensure that there is at least 25 sheets of letter size (8.5"x11") paper in one of the copier’s paper
trays. Make a copy off the glass to ensure that the copier is functioning properly. After the copy
is made,
turn off the copier
.
Step 2:
Prepare the M
Series
Unpack the M Series and place it near the copier.
Open the accessory box and remove the cables.
Open the disk set labelled
Setup Disks
.
Step 3:
Connect the
cables
Connect the M Series to the copier using the cable provided.
Connect the power cable to the M Series and plug it into an outlet. This outlet should not be on
the same power circuit as the copier’s outlet.
After you have connected all the cables,
turn on the copier
.
Step 4:
Configure the
M Series for
your Copier
From the Setup Disk package, select the
Copier Configuration Disk
for your copier model.
When the copier is up and be at a ready state,
turn on the M Series print server.
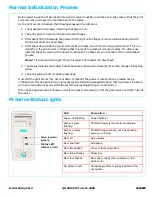
As the print server powers up, the following sequence of events occur:
1.
The green led illuminates, indicating that power is on.
2.
The print server emits one long and two short beeps.
3.
After about 30 to 45 seconds, the green activity light on the floppy drive illuminates briefly
and the print server emits one short beep.
4.
After about 45 seconds, the print server emits six beeps; two short, two long, and two
short. This is a signal from the print server indicating that it is ready to accept the
Copier
Configuration Disk
.
Inserted the
Copier Configuration Disk
in the print server floppy drive
within 5 seconds after you hear the series of two short, two long, and
two short beeps.
The status indicator alternately flashes between yellow and red several times then changes to
flashing yellow. After a short time, the M Series prints a Startup test page.
Step 5:
Configure the
M Series for
your Network
Turn off the M Series print server.
To configure the print server for your network, take the
Copier Configuration Disk
to your
network administrator and have the administrator edit the disk so that it includes the print
server network parameters. Instructions are in the M Series Getting Started Guide.
M Series
Version 1.0
Initial Setup Card


