background image

iD4 Series User Manual

Label Printer

iD4 Series User Manual

iD4P

iD4S

Xiamen Hanin Electronic Technology Co.,Ltd.

ADD:Room 305A,Angye Building,Pioneering Park,Torch High-tech Zone,Xiamen,China.
TEL:+86-(0)592-5935252
FAX:+86-(0)592-5930505
WEB:www.idprt.com

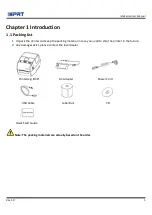
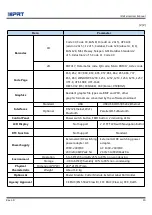
Summary of Contents for iD4P

Page 1: ...bel Printer iD4 Series User Manual iD4P iD4S Xiamen Hanin Electronic Technology Co Ltd ADD Room 305A Angye Building Pioneering Park Torch High tech Zone Xiamen China TEL 86 0 592 5935252 FAX 86 0 592...

Page 2: ...erface 34 4 1 USB Interface 34 4 2 Other Optional Interfaces 35 Chapter 5 Maintenance Adjustment 37 5 1 Cleaning Media Sensor 37 5 2 Cleaning Thermal Print Head 37 5 3 Cleaning Roller and or Paper Pat...

Page 3: ...n of this manual is prohibited to be copied or transferred in any form Copyright This manual is printed in 2017 the copyright belongs to Xiamen Hanin Electronic Technology Co Ltd Printed in China 1 0...

Page 4: ...rmation This user manual contains basic information for product usage as well as for emergency measures that may be required The installation and usage of printer driver utility tool and iDPRT BarTend...

Page 5: ...ions can cause serious injury or death 1 Do not plug several products in one multiperture outlet This can provoke over heating and a fire If the plug is wet or dirty dry or wipe it before usage If the...

Page 6: ...our dealer 5 Do not use the printer when it is out of order This can cause a fire or an electrocution Switch off and unplug the printer before calling your dealer 6 Other considerations Place the prin...

Page 7: ...t by the user and or third party We are not legally liable for any damages and or issues resulting from the use of options and or parts that are not authentic or authorized products 4 WEEE Waste Elect...

Page 8: ...he printer and keep the packing material in case you need to ship the printer in the future 2 Any damages exist please contact the local dealer Printer eg iD4P AC Adapter Power Cord USB Cable Label Ro...

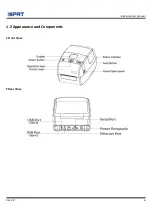
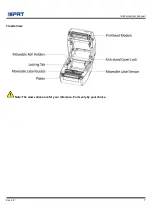
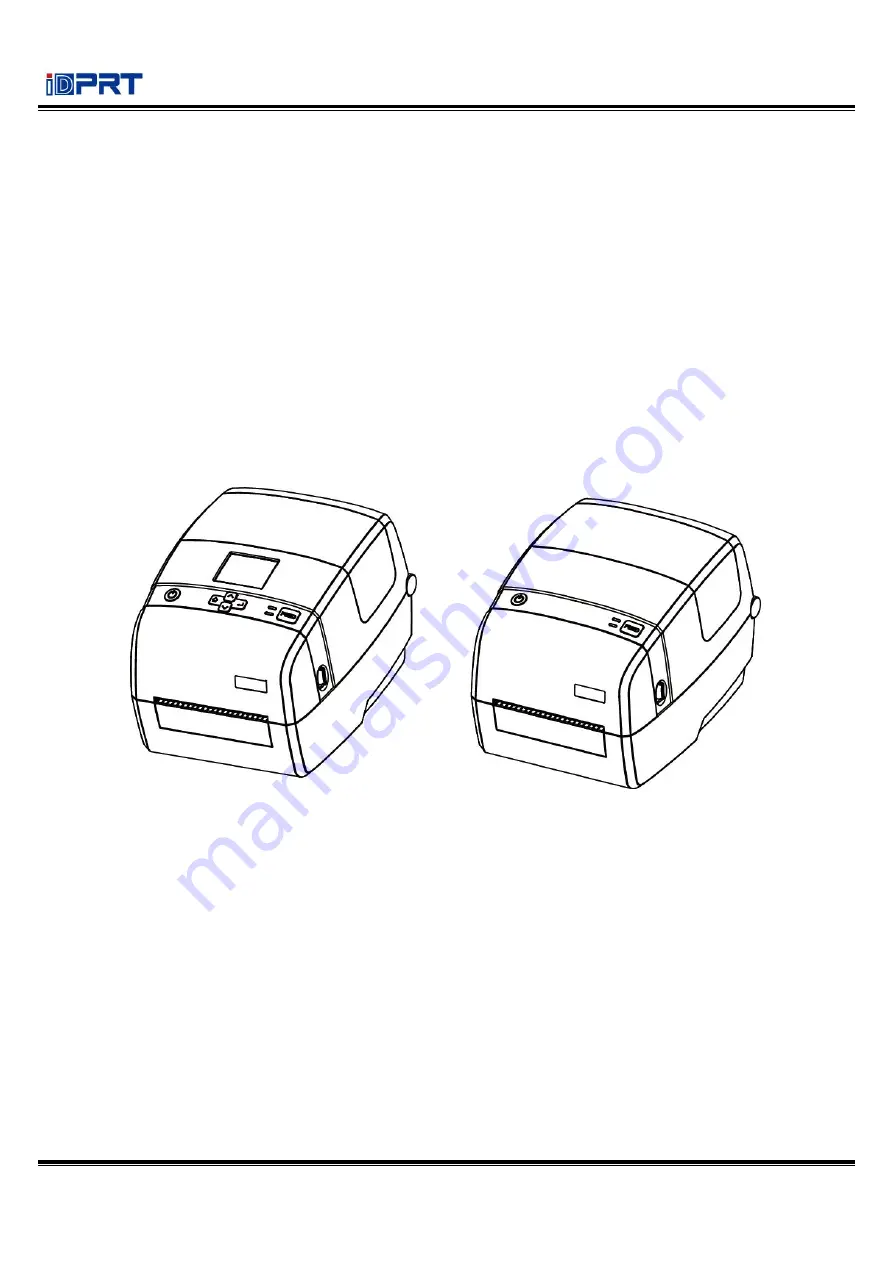
Page 9: ...iD4 Series User Manual Rev 1 0 6 1 2 Appearance and Components Front View Rear View...

Page 10: ...iD4 Series User Manual Rev 1 0 7 Inside View Note The views above are for your reference Ports vary by your choice...

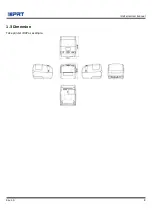
Page 11: ...iD4 Series User Manual Rev 1 0 8 1 3 Dimension Take printer iD4P as example...

Page 12: ...ack Mark Punched Hole Label Width 1 25 4 4 65 118mm include the liner Thickness 0 002 60um 0 01 250um Label Roll Diameter 5 127mm Max Core Diameter 0 5 12 7mm 1 25 4mm 1 5 38mm Software Label Design S...

Page 13: ...d Interfaces Standard USB USB USB HOST RS232 Ethernet Optional RS232 Ethernet Wi Fi Bluetooth Parallel Wi Fi Bluetooth Control Panel Power switch button FEED button 2 indicating LEDs LCD Display Not S...

Page 14: ...iD4 Series User Manual Rev 1 0 11 Chapter 3 Installation Usage 3 1 Media Loading 3 1 1 Loading the Roll 1 Pull and lift the cover eg iD4P 2 Pull the roll holders open and place the roll between them...

Page 15: ...iD4 Series User Manual Rev 1 0 12 3 Press down the locking tab 4 Pass the labels through label guides and adjust label guides to label s width...

Page 16: ...iD4 Series User Manual Rev 1 0 13 5 Press the lock and close the cover slightly 6 Press down the cover until it snaps closed...

Page 17: ...er to power receptacle 2 Connect the power cord to AC adapter 3 Connect the other end of power cord to the outlet Caution Use the original power adapter only Avoid the damage caused by charging improp...

Page 18: ...e serial interface Insert the RJ45 cable into the ethernet interface 3 3 2 Bluetooth Connection PDA with Bluetooth interface laptop and other information terminals can drive the printer Instructions s...

Page 19: ...If user moves the sensor improperly paper may not be detected therefore the printer could not print paper The following instructions tell users how to use label sensor correctly Please read it carefu...

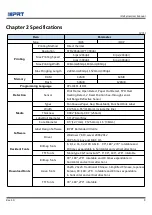
Page 20: ...iD4 Series User Manual Rev 1 0 17 Figure 2 Left...

Page 21: ...es User Manual Rev 1 0 18 3 4 2 Labels When printing labels Figure 3 or double row labels Figure 4 the sensor shall be aimed at the left triangle below Figure 5 which is the original position Figure 3...

Page 22: ...iD4 Series User Manual Rev 1 0 19 Figure 4 Double row Labels...

Page 23: ...iD4 Series User Manual Rev 1 0 20 Figure 5 Left...

Page 24: ...iD4 Series User Manual Rev 1 0 21 3 4 3 Punched Hole Label When printing punched hole labels move the sensor until it s aimed at the right triangle below Figure 6 Figure 6 Right...

Page 25: ...iD4 Series User Manual Rev 1 0 22 3 4 4 Blackmark Paper When printing blackmark paper Figure 7 the sensor shall be aimed at the position of black mark Figure 8 Figure 7 Blackmark Paper...

Page 26: ...iD4 Series User Manual Rev 1 0 23 Figure 8 aimed at blackmark s position...

Page 27: ...3 6 2 FEED Button 3 Directional Pad only for printer iD4P It is included by up arrow button down arrow button menu button and enter button Up Arrow Button Common uses are to scroll through choices na...

Page 28: ...nd operating displays Idle Display When the printer is power on the idle display will appear It contains printer s name version number of the firmware time and menu Home Menu Display When the printer...

Page 29: ...erous sub menu displays and user can switch them by menu button and enter button Operating Display When operating display appears it means that printer is carrying the command that user has sent After...

Page 30: ...e the relevant values could be changed both by display operation and software instructions When the item turns yellow the relevant values have been protected and can only be changed by display operati...

Page 31: ...user has chosen the item needed In the following instructions the example will be taken to show user how to operate the printer Changing the speed of the printer 1 Press the power button to open the...

Page 32: ...iD4 Series User Manual Rev 1 0 29 4 Enter the Printer Setup menu 5 Move the selection highlight to Print Speed item by down arrow button Then change it into the value needed by enter button...

Page 33: ...een changed Finishing the above operation user has changed the speed of the printer successfully Note Much more detailed information of display menu needed please refer to the appendix in the end Pict...

Page 34: ...x x The printer is off standby printing Red On Head up paper out Red Quick flash Paper jam label s separation Orange Slow flash Printing pause Green On Label calibration Green Slow flash Wait on dema...

Page 35: ...en back to the normal printing mode When the indicator status flashes slowly green press the feed button once and printer will print a label 3 6 3 Quick Calibration Users must carry out the calibratio...

Page 36: ...s the indicator flashes green once loosen the button Then the printer starts to print the self test page 2 Printing by Windows Driver Program 1 Install the Windows Driver program 2 Set the Interface a...

Page 37: ...iD4 Series User Manual Rev 1 0 34 Chapter 4 Interface 4 1 USB Interface 1 USB Type A PIN SIGNAL NAME 1 VBUS 2 D 3 D 4 GND 2 USB Type B PIN SIGNAL NAME 1 VBUS 2 D 3 D 4 GND...

Page 38: ...er Manual Rev 1 0 35 4 2 Other Optional Interfaces Serial Port PIN SIGNAL NAME SIGNAL DIRECTION 1 5VDC OUTPUT 2 RXD OUTPUT 3 TXD INPUT 4 DTR INPUT 5 GND GROUNDING 6 DSR OUTPUT 7 RTS INPUT 8 CTS OUTPUT...

Page 39: ...iD4 Series User Manual Rev 1 0 36 Ethernet Port PIN SIGNAL NAME 1 TX 2 TX 3 RX 4 5 6 RX 7 8...

Page 40: ...tic electricity etc So it is strongly recommended to wear hand gloves during cleaning progress Take care not to allow the print head become scratched and or damaged in any way 5 1 Cleaning Media Senso...

Page 41: ...dry cloth or cotton swab 3 Soak the cloth or cotton swab in alcohol for medical use and use it to remove adhesive foreign substances or other pollution materials 4 After cleaning the parts do not use...

Page 42: ...tallation Preparation Download application program in CD eg iDPRTUtility exe 6 2 Usage Note The screen may vary slightly by different operating systems and models Take printer iD4P as example Please r...

Page 43: ...iD4 Series User Manual Rev 1 0 40 2 Click Settings 1 Set up the interface needed range USB COM LPT ETH...

Page 44: ...iD4 Series User Manual Rev 1 0 41 2 Click Get Printer Information and printer information will show in the above...

Page 45: ...iD4 Series User Manual Rev 1 0 42 3 Click Get Status and printer status will show in the above...

Page 46: ...iD4 Series User Manual Rev 1 0 43 4 Click Common In this menu user can set up the protocol media sensor speed density and so on...

Page 47: ...iD4 Series User Manual Rev 1 0 44 5 Click RS 232 then set up the baud rate data bits parity and flow control...

Page 48: ...iD4 Series User Manual Rev 1 0 45 6 Click Bluetooth then set up the Bluetooth name and password Click Get to gain the values of Mac address...

Page 49: ...iD4 Series User Manual Rev 1 0 46 7 Click Ethernet then click Get to gain the relevant values...

Page 50: ...iD4 Series User Manual Rev 1 0 47 8 Click WIFI then set up the name password and so on...

Page 51: ...ting Click Get System DateTime to get the values and click Setup to save them Then click Close and back to the main menu Note 1 Finishing all the settings user can click Set to save the values changed...

Page 52: ...iD4 Series User Manual Rev 1 0 49 3 Click Function Test User can carry the followings such as sensor calibration pattern print testing and so on...

Page 53: ...iD4 Series User Manual Rev 1 0 50 4 Click System 1 Click language and choose the language of printer utility...

Page 54: ...iD4 Series User Manual Rev 1 0 51 2 Click About showing the basic information of this utility...

Page 55: ...Introduction The following operating systems are supported Windows Vista Windows 7 Windows 8 and 8 1 and Windows 10 Windows Server 2008 2008 R2 2012 2012 R2 and 2016 32 bit and 64 bit x64 editions 7 2...

Page 56: ...example Please refer to printer iD4P when using printer iD4S To avoid the prevention recommend to close the security software before installation 1 Select one interface to connect your printer to comp...

Page 57: ...iD4 Series User Manual Rev 1 0 54 5 Choose the installation directory then click Next 6 Click Finish...

Page 58: ...7 Choose Install printer drivers then click Next Note If you have connected the printer to computer it will detect and install the driver automatically eg USB port 8 Choose Install a driver for a Plug...

Page 59: ...iD4 Series User Manual Rev 1 0 56 9 Enter a name for this printer then click Next 10 Click Finish...

Page 60: ...ly 12 After installation the icon will be found in Start Devices and Printers Note If you have already installed the driver No matter what kind of ports it will generate a USB port automatically when...

Page 61: ...iD4 Series User Manual Rev 1 0 58 7 4 Usage 7 4 1 Printing Preferences 1 Click Start Devices and Printers Right click icon and choose Printing preferences...

Page 62: ...iD4 Series User Manual Rev 1 0 59 2 According to different needs set up the page...

Page 63: ...iD4 Series User Manual Rev 1 0 60 Click Stock Name and choose the paper type...

Page 64: ...iD4 Series User Manual Rev 1 0 61 Click New Stock and set up a new stock Click Edit Stock and edit the stock...

Page 65: ...iD4 Series User Manual Rev 1 0 62 Click Delete Stock and delete the stock Choose Orientation or Effects showed in the Preview...

Page 66: ...iD4 Series User Manual Rev 1 0 63...

Page 67: ...iD4 Series User Manual Rev 1 0 64 Click Preset Name and back to the default settings...

Page 68: ...iD4 Series User Manual Rev 1 0 65 Click Manage and change the settings...

Page 69: ...iD4 Series User Manual Rev 1 0 66 3 Click Graphics and edit the pictures...

Page 70: ...iD4 Series User Manual Rev 1 0 67 4 Click Stock...

Page 71: ...iD4 Series User Manual Rev 1 0 68 Set up the print method...

Page 72: ...iD4 Series User Manual Rev 1 0 69 Set up the media type...

Page 73: ...iD4 Series User Manual Rev 1 0 70 Click Feed Mode Mode and choose the method of media handing...

Page 74: ...iD4 Series User Manual Rev 1 0 71 7 4 2 Printer Properties 1 Click Start Devices and Printers Right click the icon and choose Printer properties...

Page 75: ...iD4 Series User Manual Rev 1 0 72 2 Click General Print Test Page and printer will print labels with current settings...

Page 76: ...iD4 Series User Manual Rev 1 0 73 3 Click Ports and choose the port needed...

Page 77: ...iD4 Series User Manual Rev 1 0 74 7 5 Label s Width USER 4 00 in x 4 00 in 2x4 2 00 in x4 00 in 4x4 4 00 in x4 00 in 4x6 4 00 in x 6 00 in...

Page 78: ...ons on BarTender Ultralite program according to PC operating systems OS The followings are supported Windows 10 8 1 8 7 and Vista Windows Server 2016 Server 2012 and 2012 R2 Server 2008 and 2008 R2 In...

Page 79: ...y be slightly different Take Windows 7 as example Take printer iD4P as example Please refer to printer iD4P when using printer iD4S To avoid the prevention recommend to close the security software bef...

Page 80: ...iD4 Series User Manual Rev 1 0 77 4 Click Next 5 Read and accept the license agreement then click Next...

Page 81: ...iD4 Series User Manual Rev 1 0 78 6 Select Features and installation location then click Next 7 Click Install...

Page 82: ...iD4 Series User Manual Rev 1 0 79 8 Click Finish 9 Back to desktop and you will see the icon of BarTender Ultralite Double click it and get down to use...

Page 83: ...es User Manual Rev 1 0 80 8 4 Usage 8 4 1 Page Settings 1 Double click the icon then choose the edition Click OK The edition may be changed according to different needs 2 Click Start a new BarTender d...

Page 84: ...iD4 Series User Manual Rev 1 0 81 3 Choose Blank Template then click Next...

Page 85: ...iD4 Series User Manual Rev 1 0 82 4 If the predefined stocks don t meet your need tick Specify Custom Settings Then click Next...

Page 86: ...iD4 Series User Manual Rev 1 0 83 5 Tick Single item per page then click Next If you print multiple labels tick Multiple columns and or rows of items per page...

Page 87: ...iD4 Series User Manual Rev 1 0 84 6 Edit the side edges then click Next...

Page 88: ...iD4 Series User Manual Rev 1 0 85 7 Choose the item shape then click Next...

Page 89: ...iD4 Series User Manual Rev 1 0 86 8 Edit the template size then click Next...

Page 90: ...iD4 Series User Manual Rev 1 0 87 9 Based on your need edit the template background Then click Next...

Page 91: ...iD4 Series User Manual Rev 1 0 88 10 Finish the settings showed in the Review and Preview Then click Finish...

Page 92: ...iD4 Series User Manual Rev 1 0 89 8 4 2 label Edit 1 Click the icon of code 2 Choose the code then click Select...

Page 93: ...iD4 Series User Manual Rev 1 0 90 3 Click the blank showing the code...

Page 94: ...iD4 Series User Manual Rev 1 0 91 4 Double click the code and edit it User can set up the size font border and so on...

Page 95: ...iD4 Series User Manual Rev 1 0 92 5 Click the icon of character then enter the text...

Page 96: ...iD4 Series User Manual Rev 1 0 93 6 Click the icon of picture then edit the pictures...

Page 97: ...iD4 Series User Manual Rev 1 0 94 7 Compose the text 8 Finish all the settings Click Print and a new label will be printed...

Page 98: ...L DPL N 30 EPL N 20 Rotation 0 Default 90 180 270 After Printed None Tear Off Default Peeling Cutting Stop Position Default Manually 0 30mm Label Setup Label Type Gap Label Default Black Mark Continuo...

Page 99: ...Y Offset 120 Print X Offset 120 LCD Setup LCD Timeout 0 9 LCD Brightness 0 9 LCD Language English Default Spanish Portuguese France German Ukrainian Security Password 0000 Default Standby Display Read...

Page 100: ...P Static Default Port Number Default 9100 IP Address Default 192 168 1 1 Default Gateway Default 255 255 255 0 Subnet Mask Default 192 168 1 0 Wireless Setup Bluetooth Switch OFF Default ON SPP Pairin...

Page 101: ...a Cutting Test Test the cutter Restore Factory Default Enter Cancel Default Firmware Update Touch Screen Calibration Config Info Printer Configuration Print the information of printer s current settin...

Page 102: ...4 Series User Manual Rev 1 0 99 External USB Storage B Label Formats Graphic Bitmap Font True Type Database Firmware Auto Form Auto Label Form Switch OFF Default ON Delete Auto Label Form NO Default Y...

Reviews: