background image

COMPACT DISC PLAYER

MUSE DELUXE 1.0

INSTRUCTIONS

R

Summary of Contents for MUSE DELUXE 1.0

Page 1: ...COMPACT DISC PLAYER MUSE DELUXE 1 0 INSTRUCTIONS R ...

Page 2: ...Discs 3 4 For Using The Remote Controller 3 5 Remote Controller 3 6 Front Panel 3 7 Rear Panel 4 Operation Instruction 4 1 Connection 4 2 Start Play 4 3 Program Play 4 4 Repeat Play 4 5 Preview Play 4 6 Random Play 4 7 Information Window 4 8 Work hour display 5 Specifications 5 1 Specification 5 2 Dimensions Muse Deluxe 1 0 Content 2 2 3 3 4 4 5 6 7 8 9 10 11 11 11 12 12 12 12 13 14 ...

Page 3: ... persons Dangerous Voltage The exclamation point within an equilateral triangle is intended to alert the user to presence of important operating and maintenance servicing instructions in the literature accompanying the appliance Important Instructions Marking by the CE symbol shown left indicates compliance of this device with the EMS Electrornagnetic Compatibility and LVD low voltage directive st...

Page 4: ...g time 11 Always disconnect your entire system from the AC mains before connecting or disconnecting any cable or when cleaning any component 12 This product must be terminated with a three conductor AC mains power cord which includes an earth ground connection to prevent shock hazard all three connections must always be used 13 AC extension cords are not recommended for use with this product 14 Ne...

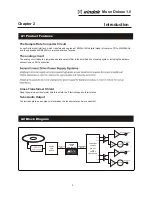
Page 5: ...ng DIGITAL TO ANALOG CONVERTER 16 Bit 44 1kHz DATA PHILIPS CD18 SERVE 24 Bit 96kHz DATA SAMPLE RATE CONVERTER OUTL OUTL OUTR OUTR The analog circuit The analog circuit adopts high grade operational amplifier in the amplification of analog system including the balance connection and RCA connection The Circuit Sample Rate Converter It uses Delta digital interface which transfers and upgrades 16Bit 4...

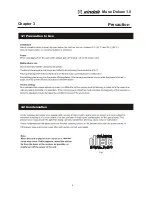
Page 6: ...3 1 Precaution In Use 3 2 Condensation Precaution Chapter 3 Muse Deluxe 1 0 4 Fig 1 receiver ...

Page 7: ...scs as well as ordinary Audio CD and CD R Recordable discs Please do not play the CD which is not round otherwise it may cause fault on this player Precaution Chapter 3 Muse Deluxe 1 0 5 Supported Disc CD CD R CD RW iDO NOT USE the special shape disc or metamorphic disc ...

Page 8: ...1 The remote control range is approximately 5 meters 2 Pointing the remote control on an angle to the receiver will shorten the useful distance of the remote control with correct 3 with correct Using Remote Controller polarity 1 Use the tool remove the rear cover of the remote control unit 2 Take out the old batteries from remote control unit Install the 2 batteries AAA polarity 4 Reinstall the re...

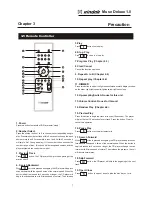
Page 9: ...se the pressure the unit will resume normal play 18 Skip Forward Press button the CD player will skip to the beginning of the next track 19 Open Close Press button to open or close to slide the disc tray out or in 1 Power Press this button to make the CD Player enter sleep 2 Number Select Press the number button 1 to 9 to choose the corresponding song to play Press two number buttons within 2 seco...

Page 10: ...0 8 11 Precaution Chapter 3 3 6 Front Panel Muse Deluxe 1 0 8 IR Sensoer SLEEP HEATING SLEEP PREV NEXT STOP PLAY PAUSE OPEN CLOSE 3 Sleep 2 Sleep Indicator 4 PREV 5 NEXT 6 STOP 7 PLAY 8 PAUSE 9 OPEN CLOSE 10 IR Sensor 11 DISC Tray ...

Page 11: ...dio Output Terminal Output the balanced audio signal analog stereo amplified by transistor to the input port on the amplifer 4 Audio Output Terminal Output the analog stereo audio signal amplified by tube to the input port on the amplifier 5 power ON OFF Press this button turn on or turn off the power 6 Fuse Socket Use to install the fuse There are two fuses one for Neutral line and one for Live l...

Page 12: ...g your audio system 1 BalancedAudio Output Please use balance signal cable to connect the balanced output of this unit and make sure the reliability and correctness of the connection 2 CoaxialAudio Output Please use coaxial signal cable to connect the coaxial output port of this unit and make sure the reliability and correctness of the connection The Connection of Analog Output The Connection of D...

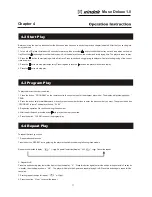
Page 13: ...e control during stop to enter the program play model The display will glisteningly show PROG 2 Press the button skip forward backward or directly press the number buttons to enter the track number you want Then press the button PROGRAM to store The display will show 02 00 3 Repeat the operation 2 to continue editing the track order 4 After the edit finished press the button to play as the order y...

Page 14: ...OM button and the display will show rA XX 00 Then the player will begin to random play the tracks 2 Press the skip forward backward button can skip to the next track 3 Directly press the number buttons to choose the corresponding track but the random will not bu cancel at the same time 4 Press the CLEAR button to cancel the random play 9 Adjust the Lightness of Alphanumeric Display 1 Press the but...

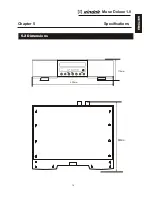
Page 15: ...Level at 0dB 2Vrms THD at 0 dB 1kHz 0 002 Optics Digital Output Optics Digital Jack Coaxial Digital Output RCA Jack Audio Output RCA Jack Balance Output 1 Grounding 2 Signal 3 Signal Power consumption max 25W Power specifications Dimensions WxHxD 430mmx114mmx347mm NOTE Specification and design subject to change without notice for improvements Specified on rear panel decal Specifications Muse Delux...

Page 16: ...Muse Deluxe 1 0 5 2 Dimensions Specifications Chapter 5 IR Sensoer SLEEP HEATING SLEEP PREV NEXT STOP PLAY PAUSE OPEN CLOSE 430mm 115mm 380mm 14 ...

Page 17: ...XD3 834 034 Phone Fax 86 28 84711993 ...

Reviews: