background image

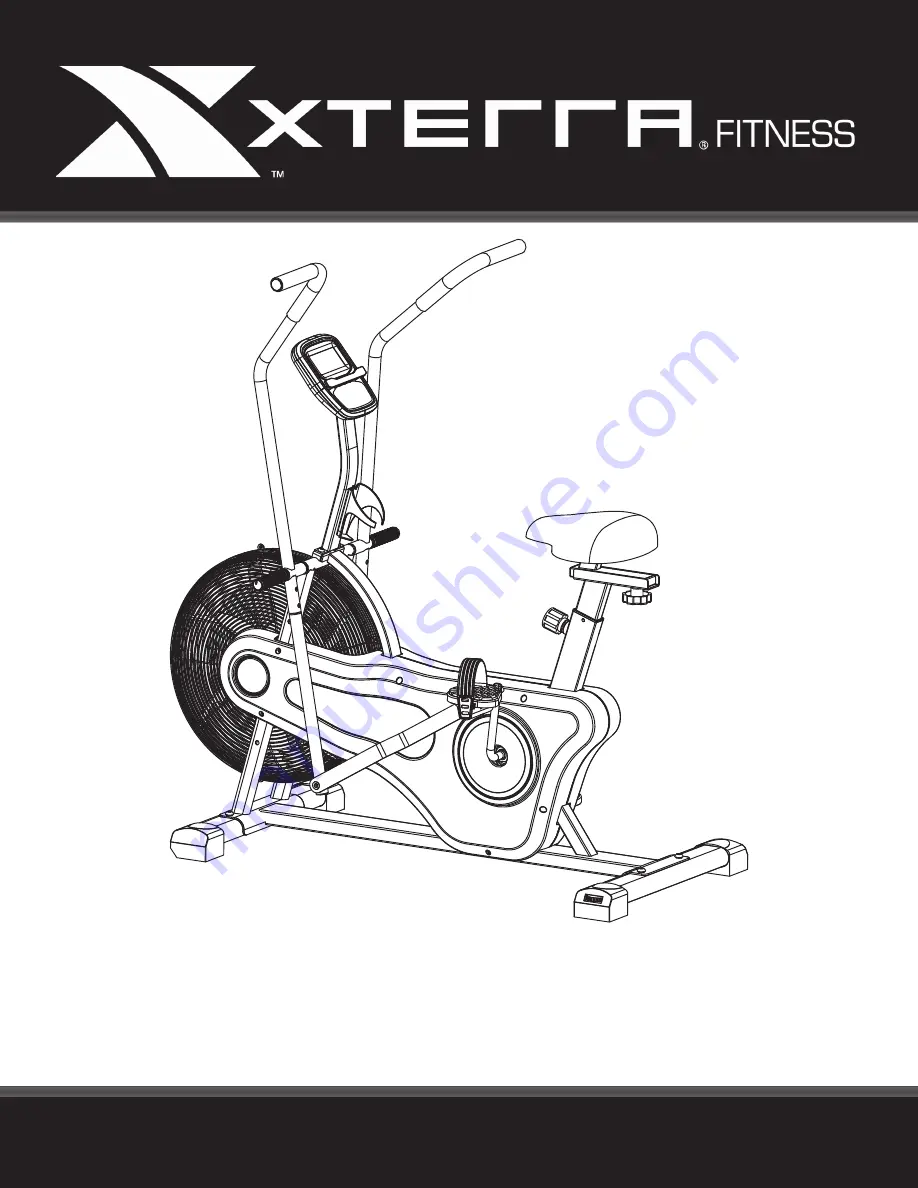
AIR350 Airbike 

OWNER’S MANUAL

PLEASE CAREFULLY READ THIS ENTIRE MANUAL BEFORE OPERATING YOUR NEW Airbike

Summary of Contents for AIR350

Page 1: ...AIR350 Airbike OWNER S MANUAL PLEASE CAREFULLY READ THIS ENTIRE MANUAL BEFORE OPERATING YOUR NEW Airbike ...

Page 2: ......

Page 3: ...SE ONLY AND IS WARRANTED FOR THE APPLICATION ANY OTHER APPLICATION VOIDS THIS WARRANTY IN ITS ENTIRETY Product Registration Important Safety Instructions Important Operation Instructions AIR350 Assembly Instructions Final Preparations Exploring Your New Bike Troubleshooting Manufacturer s Limited Warranty ...

Page 4: ...will do all we can to make your ownership experience as pleasant as possible for many years to come If you have questions or if parts are missing or damaged or you require customer service call 870 333 5500 Please have your model number and serial number handy when you call Please take a moment to record where you purchased your machine as well as the date of purchase for future reference We appre...

Page 5: ...t into any opening of the bike 8 Only use the bike on a stable level floor 9 Follow instructions for safe use of the equipment including proper seat position handlebar position and use of foot positioning system of pedals Do not attempt to pull up handlebar post and seat post over the MAX graduation 10 For safe operation allow for at least 1 foot 30cm of free space to either side of the unit and 2...

Page 6: ... intended for use by persons with reduced physical sensory or mental capabilities or lack of experience and knowledge 5 Overweight or severely de conditioned individuals should be particularly cautious when using the equipment for the first time Even though such individuals may not have histories of serious physical problems they may perceive the exercise to be far less intense than it really is r...

Page 7: ...4 AIR350 AIRBIKE AIR350 Assembly Pack Checklist ...

Page 8: ...1 Main Frame 1 2 3 Handrail Arm 1 1 4 Lower Handrail Arm 2 5 Upright Post 1 6 Seat Post 1 7 Seat Slider 1 9 Front Stabilizer 1 10 Rear Stabilizer 1 11 Computer 1 14 15 Foot Pedal 1 1 19 Seat 1 25 Cup Holder 1 59 Large Screw 2 80 Moving Shaft 1 User Manual 1 Hardware Parts 1 ...

Page 9: ...6 AIR350 AIRBIKE AIR350 Assembly Pack Checklist Grease ...

Page 10: ...r you may damage the cable 3 Using 2 Screws 90 attach the Upright Post to the Main Frame 1 4 Using 2 Screws 55 attach the Cup Holder 25 to the Upright Post 5 5 Connect the Connection Wire 54 at the top of the Upright Post 5 to the wire of the Console 11 Feed any extra length of wire back into the Upright Post 5 then use 4 Screws 58 to mount the Console 11 to the Upright Post 5 ...

Page 11: ... AIRBIKE Attaching the Stabilizers 2 1 Using 2 sets of Screws 57 and M8 Washers 69 attach the Front Stabilizer 9 to the Main Frame 1 2 Repeat the same steps to attach the Rear Stabilizer 10 to the Main Frame 1 ...

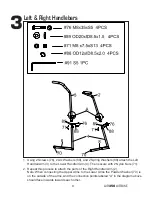
Page 12: ...3 to the Lower Handrail Arm 4 Then secure with 2 Nylon Nuts 71 2 Repeat this process to attach the parts of the Right Handrail Arm 2 Note When connecting the Upper Arms to the Lower Arms the Powder Washer 70 is on the outside of the arms And the connection points labeled A in the diagram above should face inwards towards each other ...

Page 13: ...he Right Handrail Arm 2 and placing 1 Wave Washer 61 and 1 D Washer 35 against the Large Screw Then place the Right Handrail Arm 2 at the connection point on the Main Frame 1 Tighten the screw in the direction as shown in the illustration above with the Allen Wrench 93 3 Tightening the Large Screw 59 Insert the Wrench into the holes on the Large Screws 59 and turn them in opposite directions to th...

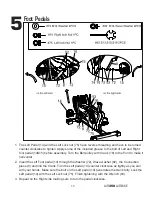
Page 14: ...ulley with Crank 18 to the front to make it horizontal 2 Insert the Left Foot pedal 14 through the Washer 72 Wave washer 92 the Connection piece 8 and into the Crank Turn the Left pedal 14 counter clockwise as tightly as you can with your hands Make sure the bolt on the Left pedal 14 penetrates the crank fully Lock the Left pedal 14 with the Left Lock nut 75 Finish tightening with the Wrench 93 3 ...

Page 15: ...Wrench 93 2 Attach the Seat 19 to the Seat Slider 7 with Washers 69 and Nylon Nut 71 3 Attach the Seat Slider 7 to the Seat Post 6 with Knob 22 and M10 Washer 77 4 Insert the Seat Post 6 into the Main Frame 1 and lock it at desired height with the Adjustment Knob 24 CHECK ALL BOLTS AND NUTS ARE TIGHTENED BEFORE USING THE MACHINE ...

Page 16: ...t the knee about 5 degrees 4 If your leg is too straight or your foot cannot touch the pedal you will need to lower the seat height If your leg is bent too much you will need to raise the seat height 5 Dismount the bike Then loosen the knob on the seat post and adjust up or down as necessary 6 When the seat is in the desired position tighten the quick release to secure the seat post 7 Note the fin...

Page 17: ...ly even if you are not holding the SET button Press any button to stop RESET In the STOP mode press the button to reset the setting values to zero Press the RESET button and hold for two seconds to reset all functions to zero except ODOMETER Getting Familiar with the Control Panel Exploring Your New Bike Functions TIME 0 00 99 59 Minute Second SPEED 0 999 9 K per hour CALORIES 0 0 999 99 9999 Kcal...

Page 18: ...n count down from preset value The Console turns on when you start pedaling or when you press a key The Console turns off automatically after 4 minutes of inactivity Countdown Function You can preset values to countdown TIME CALORIES or DISTANCE Press MODE until the function you want is displayed Make sure meter is not in SCAN Press SET to increase the value If you press SET and hold for a few sec...

Page 19: ... power supply or acts of God 4 Products with original serial numbers that have been removed or altered 5 Products that have been sold transferred bartered or given to a third party 6 Products that are used as store display models 7 Products that do not have a warranty registration on file at XTERRA Fitness Inc XTERRA Fitness reserves the right to request proof of purchase if no warranty record exi...

Page 20: ...AIR350 AIRBIKE 17 3000 Nestle Road Jonesboro AR 72401 Phone 870 336 4286 Fax 870 935 7611 www xterrafitness com 2019 All Rights Reserved AIR350 Owner s Manual ...

Reviews: