background image

Y-cam Shell  

Assembly Instructions


English - Français - Deutsch 

Italiano - Español - Nederlandse

Package Contents

A) x 3 

B) x 3 

C) x 4 

D) x 4 

E)  x 1 

F)  x 1 

Summary of Contents for Camera

Page 1: ...Y cam Shell Assembly Instructions English Fran ais Deutsch Italiano Espa ol Nederlandse Package Contents A x 3 B x 3 C x 4 D x 4 E x 1 F x 1...

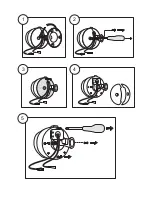
Page 2: ...1 2 3 4 5...

Page 3: ...9 10 6 7 8 For Y cam Knight or Y cam Black...

Page 4: ...For Y cam White A A 8w 7w 11 C x 4...

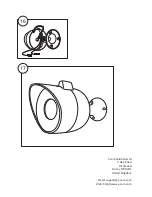
Page 5: ...15 12 13 14 D x 4...

Page 6: ...16 17 Y cam Solutions Ltd 3 Dee Road Richmond Surrey TW9 2JN United Kingdom Email support y cam com Web http www y cam com...

Page 7: ...N INCORRECTLY PLACED SEAL WILL ALLOW WATER OR MOISTURE TO LEAK IN AND DAMAGE THE CAMERA Screw back the 4 screws removed in step 3 Fig 14 and insert the rubber plugs in the screw holes Place the two cu...

Page 8: ...VEMENT LE JOINT CAR UN JOINT MAL AJUSTE PERMETTRA A L EAU OU A L HUMIDITE DE S INFILTRER DANS LA CAMERA ET DE L ENDOMMAGER Revissez les 4 vis que vous avez retir es l tape 3 Fig 14 et ins rez les bouc...

Page 9: ...DAS GEH USE EINDRINGEN L SST UND DIE KAMERA BESCH DIGT Ziehen Sie wieder die 4 Schrauben fest die Sie in Schritt 3 entfernt haben Abb 14 und stecken Sie die Gummistopfen in die Schraubenl cher Setzen...

Page 10: ...UMIDIT DI PENETRARE NELLA STRUTTURA E DANNGGIARE LA VIDEOCAMERA Riavvitare le 4 viti rimosse come indicato al punto 3 Fig 14 ed inserire i cappucci in gomma nei fori delle viti Riposizionare le due pi...

Page 11: ...E EL SELLO YA QUE UN SELLO MAL COLOCADO PERMITIR QUE ENTRE AGUA O HUMEDAD Y DA E LA C MARA Vuelva a atornillar los 4 tornillos retirados en el paso 3 Fig 14 e introduzca los tacos de goma en los hueco...

Page 12: ...ONJUIST GEPLAATSTE VERZEGELING MOGELIJK VOCHT IN DE BEHUIZING BINNEN LAAT DRINGEN WAARDOOR DE CAMERA BESCHADIGD ZAL RAKEN Schroef de 4 schroeven verwijderd in stap 3 weer terug afb 14 en steek de rubb...

Reviews: