background image

Front Surround System

Owner’s Manual

 Read the supplied booklet “Quick Start Guide” before using the unit.

English

EN

Summary of Contents for YAS-706 Series

Page 1: ...Front Surround System Owner s Manual Read the supplied booklet Quick Start Guide before using the unit English EN...

Page 2: ...ning to the sound from a Bluetooth device Receiving 24 Using wireless headphones to listen to audio Transmitting 25 NETWORKS Networks 26 Network functions and the MusicCast CONTROLLER app 26 Connectin...

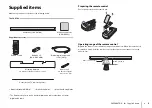
Page 3: ...oint the remote control at the remote control sensor on the top panel p 10 Center unit YAS CU706 Wireless subwoofer NS WSW121 Remote control Batteries x 2 AAA R03 UM4 Optical digital audio cable 1 5 m...

Page 4: ...allows you to listen to music stored on mobile devices such smartphones or on servers or to listen to Internet radio stations and many kinds of major streaming services p 26 This app also allows you t...

Page 5: ...the unit be played on another audio device at the same time or vice versa A5 Yes Sound from one MusicCast enabled audio device can be played on another MusicCast enabled audio device at the same time...

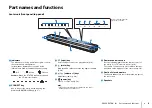
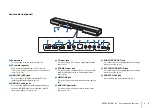
Page 6: ...y Mute the audio output Press the key again to unmute p 20 5 volume keys Adjust the volume p 20 6 power key Turn on or off the unit p 18 HINT The unit may automatically turn off when the auto power st...

Page 7: ...jack For connecting to a TV with an optical digital audio cable p 12 6 COAXIAL input jack For connecting to a playback device such as a Blu ray Disc BD player with a coaxial digital audio cable p 13 7...

Page 8: ...or other pointed object to press this key 3 STATUS indicator Shows subwoofer s connection status p 15 Glows green Power on Glows red Power off 4 SYSTEM CONNECTOR jack For connecting to the center unit...

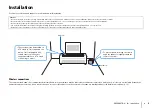
Page 9: ...ch of children Do not stack the center unit and subwoofer directly on top of other playback devices or vice versa Doing so may cause a malfunction due to heat and vibrations Do not hold the speaker po...

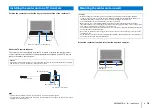
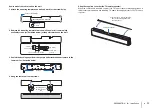
Page 10: ...cm 2 in TV remote control sensor Mounting the center unit on a wall Cautions When mounting the center unit on a wall all installation work must be performed by a qualified contractor or dealer The cu...

Page 11: ...unit as illustrated below 4 Hang the center unit on the screws Using the supplied cover for the TV remote repeater When the center unit is mounted on a wall the TV remote repeater may appear white If...

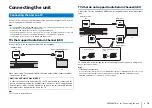
Page 12: ...nel ARC Connect the TV to the unit with an HDMI cable not supplied and an optical digital audio cable TV audio will be output through the unit by switching the unit s input to TV using the TV key on t...

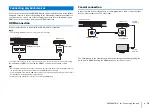
Page 13: ...p 46 video and audio content from playback devices can be output from the TV even when this unit is off HDMI signal pass through Use a 19 pin HDMI cable with the HDMI logo printed on it A cable with a...

Page 14: ...tching the unit s input to ANALOG using the ANALOG key on the remote control Connecting the power cable After all the connections are complete plug in the power cable of the center unit and the subwoo...

Page 15: ...is no sound coming from the subwoofer or if sound is intermittent due to the influence of radio waves from other devices connecting the center unit and subwoofer via cables will solve the problem Con...

Page 16: ...When this unit and the TV are connected as shown below select HDMI 1 using the TV s remote control The menu display The menu is displayed on the TV screen when the SETUP key is pressed When the TV is...

Page 17: ...indicator will not be flashing if the unit is connected to a router via its NETWORK jack wired connection Selecting a language for menu display 1 Turn the unit and TV on 2 Switch the TV s input to dis...

Page 18: ...a device connected to the HDMI IN 1 or HDMI IN 2 jack COAXIAL Sound from a device connected to the COAXIAL input jack ANALOG Sound from a device connected to the ANALOG input jacks BLUETOOTH Sound fro...

Page 19: ...ith a surround program other than MUSIC SURROUND SURROUND 3 BASS EXTENSION key Enable disable the bass extension function When this function is enabled you can enjoy a powerful bass sound with the Yam...

Page 20: ...radio station p 39 to 42 2 Hold down the NET RADIO 1 2 or 3 key for more than 3 seconds Tune in to an assigned Internet radio station 1 Press the NET RADIO 1 2 or 3 key to which the desired Internet r...

Page 21: ...olby Pro Logic II is used when 2 channel stereo signal is played with a surround program other than MUSIC Unit functions and positioning The bass extension function is enabled The clear voice function...

Page 22: ...jack on the unit the unit s input source switches to HDMI when the BD DVD player is selected with the TV s remote control The input source can be switched while the unit is off 1 Turn on off Both the...

Page 23: ...h device Use Bluetooth wireless headphones and the like to listen to audio NOTE Audio cannot be received by the unit from mobile devices and the like and transmitted to speakers or headphones at the s...

Page 24: ...3 Select YAS 706 xxxxxx Bluetooth in the Bluetooth device list on the device If the unit is registered as a MusicCast enabled device p 27 the room name network name is displayed If a passkey PIN is re...

Page 25: ...T keys to select Transmission and then press the ENTER key 6 Use the S T keys to select On and then press the ENTER key 7 Use the S T keys to select Device Search and then press the ENTER key 8 Use t...

Page 26: ...ork connection cannot be established if the MAC address filter on your router is enabled Check your router s settings To configure your router s subnet mask manually apply the same subnet used by this...

Page 27: ...be connected to a wireless router access point Wireless Direct p 37 can be used to connect the unit directly to a mobile device to control the unit using the MusicCast CONTROLLER app installed on that...

Page 28: ...gure network settings When a screen like that at left below is displayed select the network to which the unit will be connected and enter the router s password encryption key The router s password enc...

Page 29: ...n name and the name and photo of the room where the unit is installed can be changed later Network connection with the MusicCast CONTROLLER app is now complete and the unit has been registered as a Mu...

Page 30: ...Before proceeding confirm that your iOS device is connected to a wireless router access point NOTE You need iOS device with iOS 7 or later The connection settings on iOS devices cannot be applied to t...

Page 31: ...pressing WPS button on the wireless router access point 1 Press the z key to turn on this unit 2 Turn on the TV and switch the TV input to display video from the unit HDMI OUT jack p 16 3 Press the S...

Page 32: ...its SSID See Setting up the wireless connection manually p 34 to establish a connection 9 Press the SETUP key to exit the setup menu Searching for a wireless router access point Find and connect to a...

Page 33: ...displayed on the TV screen If Not connected is displayed press the ENTER key to repeat the procedure beginning with step 6 or see the information below to try another connection method NOTE Access Po...

Page 34: ...on and then press the ENTER key 6 Use the S T keys to select Wireless Wi Fi and then press the ENTER key 7 Use the S T keys to select Manual Setting and then press the ENTER key 8 Use the S T keys to...

Page 35: ...character string or 64 hexadecimal base 16 keys HINT Hexadecimal base 16 keys use combinations of the numbers 0 through 9 and the letters a through f Letters are not case sensitive Once the security...

Page 36: ...lable access points appears on the TV screen 8 Use the S T keys to select the desired access point and press the ENTER key The PIN code of the unit appears on the TV screen 9 Enter the unit s PIN code...

Page 37: ...on this unit 2 Turn on the TV and switch the TV input to display video from the unit HDMI OUT jack p 16 3 Press the SETUP key The setup menu is displayed on the TV screen 4 Use the S T keys to select...

Page 38: ...e ENTER key to save the setting This completes the settings and Set the mobile device will be displayed on the TV screen The unit functions as an access point Next configure the Wi Fi settings of a mo...

Page 39: ...s manufacturer or Windows Media Player Help for details 1 Start Windows Media Player 12 on your PC 2 Select Stream then Turn on media streaming 3 Click Turn on media streaming 4 Select Allowed from th...

Page 40: ...T When an Internet radio station is registered with No 1 2 or 3 in Favorites with the MusicCast CONTROLLER app the registered Internet radio station can be played with the NET RADIO 1 2 or 3 key on th...

Page 41: ...layed network settings from your iOS device an iPhone etc can be applied to the unit to connect the unit to a wireless network The indicator does not flash and the screen is not displayed if the unit...

Page 42: ...play music stored on your mobile device over a network Using a mobile device to play songs Use the MusicCast CONTROLLER app p 27 installed on your mobile device to operate playback NOTE Register the u...

Page 43: ...isplaying the setup menu on the TV Setting the setup menu 1 Press the SETUP key NOTE Hold down the SETUP key to display OSD Language directly on the screen p 17 49 If an update for the unit s firmware...

Page 44: ...ers to which audio will be transmitted 46 MAC Address Display the MAC address for the Bluetooth connection 46 Network Information Display the unit s network information 47 Network Connection Select th...

Page 45: ...n method Bass Out Specify how the subwoofer is connected Settings Pairing Manually pair the center unit with the subwoofer After Pairing is selected press the SUBWOOFER PAIRING button on the subwoofer...

Page 46: ...function Settings Transmission Transmit audio from the unit to Bluetooth speakers or headphones Settings Device Search Select the Bluetooth speakers or headphones to which audio will be transmitted an...

Page 47: ...he unit is connected Security The encryption method for your network MAC Address MAC address Ethernet Wi Fi IP Address IP address Subnet Mask Subnet mask Default Gateway The IP address of the default...

Page 48: ...twork devices that will operate the unit when Filter is set to On 1 Use the S T keys to select an MAC address number 1 to 10 2 Use the W X keys to move the edit position and the S T keys to select a v...

Page 49: ...o select the language used for menus displayed on the TV screen Settings HINT Hold down the SETUP key to display OSD Language directly on the TV screen The settings may be changed automatically when u...

Page 50: ...d as the input source The auto power standby function can also be configured without using the setup menu Follow the procedure below 1 Turn off the unit 2 Hold down the key and press the key on the un...

Page 51: ...ode Mode 1 or Mode 2 is enabled and the unit turns on The indicator shows that Mode 1 or Mode 2 has been enabled for several seconds immediately after the unit turns on Configuring 4K video mode Mode...

Page 52: ...and then press the ENTER key 3 Use the S T keys to select Network Update and then press the ENTER key 4 Press the ENTER key The TV screen goes black and firmware update begins Update progress can be c...

Page 53: ...rogress can be confirmed using the indicators on the unit If the update is completed successfully all indicators on the unit will flash 5 Press the key on the unit The firmware update is complete NOTE...

Page 54: ...unit again If the power still turns off frequently unplug the power cable from the AC wall outlet and contact the nearest authorized Yamaha dealer or service center The power cannot be turned on The p...

Page 55: ...l digital audio cable p 12 Sound from an HDMI control enabled TV is set for output from the TV s built in speakers Use the TV s HDMI settings to set audio output to any option other than the TV s buil...

Page 56: ...subwoofer The STATUS indicator on the subwoofer flashes or grows red Move the subwoofer closer to the center unit to improve conditions for wireless communications and pair the two p 62 If the indicat...

Page 57: ...delay control function is not effective even Audio Delay is set to Auto The TV does not support the audio delay auto adjustment feature Adjust timing of sound output manually from Audio Delay in the s...

Page 58: ...t the device to this unit There is a device microwave oven wireless LAN etc outputs signals in the 2 4 GHz frequency band nearby Move this unit away from the device that is emitting radio frequency si...

Page 59: ...o sound is heard or the sound is intermittent via the Bluetooth device The device is not set to receive Bluetooth audio signals from the unit Check that the Bluetooth function of the device is set pro...

Page 60: ...31 36 Not connected is displayed with Wireless Wi Fi configuration using the WPS function WPS Button and PIN Code unable to connect to wireless router access point The wireless router access point use...

Page 61: ...same network Firmware update via the network Network Update fails It may not be possible depending on the condition of the network Update the firmware via the network Network Update again or use a US...

Page 62: ...NTER key 5 Use the S T keys to select Pairing and then press the ENTER key 6 Use an object with a fine point such as a pin to hold down the SUBWOOFER PAIRING button on the subwoofer for more than 3 se...

Page 63: ...nel Input Jacks HDMI 2 HDMI IN 1 2 Digital Optical 1 TV Digital Coaxial 1 COAXIAL Analog RCA stereo 1 pair ANALOG Output Jack HDMI 1 HDMI OUT ARC Analog RCA monaural 1 SUBWOOFER OUT System connection...

Page 64: ...the unit on a wall with spacer Weight 5 4 kg 11 9 lbs Item Specifications Item Specifications Amplifier section Output power 75 W 100 Hz 6 10 T H D Dynamic power 130 W Speaker section Driver 14 cm 5 1...

Page 65: ...ications of the TV connected to this unit Digital audio signal Optical coaxial HDMI ARC The contents of this manual apply to the latest specifications as of the publishing date To obtain the latest ma...

Page 66: ...reduce the speed or distance of communications and in some cases interrupt communications The speed of signal transfer and the distance at which communications is possible differs according to the dis...

Page 67: ...Published 06 2016 KS C0 Manual Development Group 2016 Yamaha Corporation YH958A0 EN Yamaha Global Site http www yamaha com Yamaha Downloads http download yamaha com...

Reviews: