w w w . y o r k v i l l e . c o m
Yorkville Sound
550 Granite Court
Pickering, Ontario
L1W-3Y8 CANADA
Canada
Voice: (905) 837-8481
Fax: (905) 837-8746
Yorkville Sound Inc.
4625 Witmer Industrial Estate
Niagara Falls, New York
14305 USA
U.S.A.
Voice: (716) 297-2920
Fax: (716) 297-3689
P
rin
te
d
in
C
an
ad
a
Yorkville LP-Flykit
LP-FLYKIT
The Yorkville LP302 and LP304 dimmer bars have been designed to accommodate
two methods of mounting; portable mounting on a standard pole mount or a fixed
installation mounting suspended from a secure structure (using certified eyebolts).
If you’re using the dimmer bar as a portable light show, you will most likely use the
built-in stand adapter. If you need to fly the dimmer bar, you would use this eyebolt
kit. This kit enables the dimmer bar to hang safely and securely to a stable overhead
structure. This document will help you set up the dimmer bars for proper mounting
on secure, and stable, structures using certified eyebolts.
Please follow these instructions carefully. It will help ensure safe rigging of the LP302 and/or the
LP304 dimmer bars. If after studying this guide you are still uncertain, please seek qualified techni-
cal assistance. Contact an authorized Yorkville dealer if necessary. These are potentially danger-
ous products and we cannot accept responsibility for injury due to negligence or faulty interpreta-
tion of these instructions.
Important! Rigging of equipment is an extremely serious matter. Overhead rigging requires exten-
sive experience, including (but not limited to) calculating working load limits, hardware installation,
and periodic safety inspection of all hardware. If you lack these qualifications, do not attempt the
installation yourself, but instead use a professional structural rigger. Improper installation can result
in bodily injury or even death. Consult a structural engineer to calculate added loads upon the
building or structure. Structural reinforcement may be necessary to ensure a safe installation.
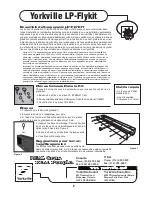
Parts included in kit
Each kit contains enough hardware to fly one Dimmer Bar
- 2 Eyebolts (2x YS Part #EYEBOLT1/4A)
- 2 Lock Nuts with Nylon Inserts (2x YS Part #8683)
- 4 Washers (4x YS Part #8818)
Steps
1. Preparing the dimmer bar
.
a. Remove the stand adapter retaining bolt.
b. Using a standard #2 Philips screwdriver; remove
the rear plate from the Dimmer Bar by unscrewing
the 10 screws.
2.
Locate the mounting holes. Mount the
eyebolts using the supplied locking nuts
and washers in the order as shown in
Figure 2.
3.
Tighten bolts and reinstall the rear plate.
4.
You’re ready to fly.
Rigging/Flying suggestions
The par cans generate a fair amount of radiant heat, please allow
adequate space to allow for air circulation and keep away from
flammable surfaces.
Tools Needed
- A standard #2
Philips screwdriver
- A wrench (7/16-
inch or 11mm)
Figure 1
Figure 2


