YOSUDA
X-BIKE
ASSEMBLY MANUAL
IMPORTANT!
Please read this manual before assembling and using.
Retain owner’s manual for using instructions. Your satisfaction is very
important to us,
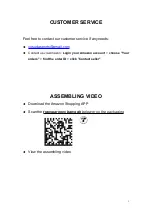
PLEASE CONTACT US
:
yosudasports@gmail.com
X-1-01A
Page 1: ...ASSEMBLY MANUAL IMPORTANT Please read this manual before assembling and using Retain owner s manual for using instructions Your satisfaction is very important to us PLEASE CONTACT US yosudasports gmai...
Page 2: ...IMPORTANT SAFETY INFORMATION 2 PRODUCT PROFILE 5 ASSEMBLY INSTRUCTIONS 7 Step 1 7 Step 2 8 Step 3 9 Step 4 10 Step 5 11 Step 6 12 Step 7 13 Step 8 14 Step 9 15 ADJUST THE RESISTANCE 16 COMPUTER WITH...
Page 3: ...needs yosudasports gmail com Contact us via Amazon Login your Amazon account choose Your orders find the order ID click Contact seller ASSEMBLING VIDEO Download the Amazon Shopping APP Scan the trans...
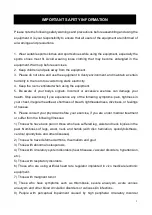
Page 4: ...ymptoms pain tightness in your chest irregular heartbeat shortness of breath lightheadedness dizziness or feelings of nausea 6 Please consult your physician before your exercise if you are under medic...
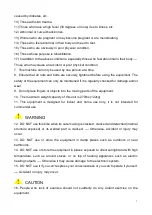
Page 5: ...9 Do not place fingers or objects into the moving parts of the equipment 10 The maximum weight capacity of this unit is 270lbs 122kg 11 This equipment is designed for indoor and home use only it is n...
Page 6: ...sical state is abnormal May cause damage to health 18 DO NOT use it while eating or doing other activities 19 DO NOT use it when your senses blunt after drinking alcohol May cause accident or injury 2...
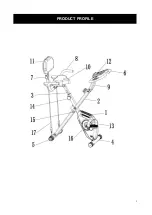
Page 7: ...5 PRODUCT PROFILE...
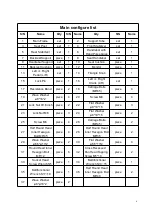
Page 8: ...65 piece 4 19 Wave Washer 8 18 2 piece 4 20 Screw M8 piece 4 21 Lock Nut 9 16 inch piece 2 22 Flat Washer 8 19 1 5 piece 3 23 Lock Nut M8 piece 3 24 Flat Washer 8 19 1 5 piece 2 25 Screw M8 piece 4 2...
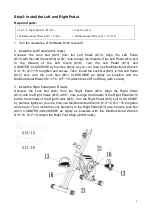
Page 9: ...Main Frame 1 2 Lift the Main Frame 1 up by hand and attach the Front Stabilizer with wheels 4 to the Main Frame 1 the frame holes should align to stabilizer holes for installation tighten with Carria...
Page 10: ...possible with the Multifunctional Wrench S13 15 S17 19 Attach the Left Foot Strap with L mark 3 Install the Right Pedal with R mark Unscrew the Lock Nut 21 from the Right Pedal 13 Align the Right Peda...
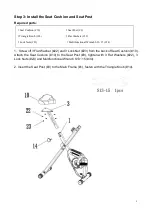
Page 11: ...shion 10 Attach the Seat Cushion 10 to the Seat Post 3 tighten with 3 Flat Washers 22 3 Lock Nuts 23 and Multifunctional Wrench S13 15 34 2 Insert the Seat Post 3 to the Main Frame 1 fasten with the T...
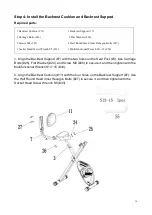
Page 12: ...e Multifunctional Wrench S13 15 34 2 Align the Backrest Cushion 11 with the four holes on the Backrest Support 7 Use the Half Round Head Inner Hexagon Bolts 27 to secure it and then tighten with the S...
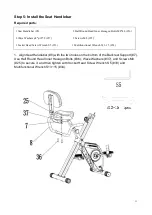
Page 13: ...Round Head Inner Hexagon Bolts 36 Wave Washers 37 and Screws M8 25 to secure it and then tighten with Socket Head Screw Wrench S5 33 and Multifunctional Wrench S13 15 34 1 Seat Handlebar 8 2 Half Rou...
Page 14: ...ort Tube 2 2 Insert the Handlebar Support 9 to the Support Tube 2 secure with 4 Flat Washers 30 at the side 2 Wave Washers 29 at the front and 6 Round Head Inner Hexagon Bolts 31 then tighten with Soc...
Page 15: ...ign Handlebar 6 with the two holes on the Handlebar Support 9 Secure with 2 Half Round Head Inner Hexagon Bolts 28 and tighten with Socket Head Screw Wrench S5 33 1 Handlebar 6 2 Half Round Head Inner...
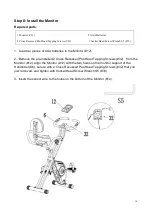
Page 16: ...12 align the Monitor 12 with the two holes on the monitor support of the Handlebar 6 secure with 2 Cross Recessed Pan Head Tapping Screws 32 that you just removed and tighten with Socket Head Screw Wr...
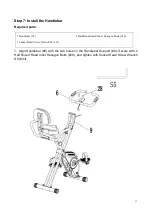
Page 17: ...e Rear Stabilizer 5 to insert the two ends of the stabilizer into the rings of the bands PLEASE NOTE For safety confirm that all the installations are completed according to the above requirements and...
Page 18: ...16 ADJUST THE RESISTANCE Turn the resistance knob clockwise to increase the resistance Turn the resistance knob counterclockwise to reduce the resistance...
Page 19: ...ercise distance When the SET is zero the computer will alarm 10 seconds 5 CALORIES 1 Count the total calories from exercise start to end 2 Press MODE button until CAL appears Press SET button to set e...
Page 20: ...rrent Speed 0 00 999 9 ML KM Trip Distance 0 00 9999 ML KM Total Distance ODO 0 0 9999 ML KM Calories 0 0 9999 Kcal Pulse Rate 40 240BPM Battery Type 2pcs of size AAA or UM 4 Operating Temperature 0 4...
Page 21: ...e sole of your right foot against the inner thigh of your extended leg Try to touch your toes Keep it for 10 15 seconds and then switch leg repeat 3 times 3 Calf and Foot Stretch Place both hands agai...