background image

INTEGRATED
COOKER HOOD
CH 250

INSTRUCTION BOOKLET

Summary of Contents for CH 250

Page 1: ...INTEGRATED COOKER HOOD CH 250 INSTRUCTION BOOKLET ...

Page 2: ...ion Your Appliance Operating Instructions Cooker Hood Controls To Operate Recirculation Extraction Maintenance and Cleaning External Cleaning Charcoal Filters To Remove Replace the Charcoal Filter Synthetic Paper Grease Filter To Replace the Paper Grease Filter Changing the Light Bulb Something Not Working Service and Spare Parts Peace of Mind for Twenty Four Months Standard Guarantee Conditions F...

Page 3: ...he cut out device will reset itself when the fan motor has cooled significantly It is dangerous to alter the specifications or modify this product in any way When installed between adjoining wall cabinets the wall cabinets must not overhang the hob If the room where the hood is to be used contains a fuel burning appliance such as a central heating boiler then its flue must be of the room sealed or...

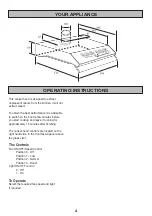
Page 4: ... a few minutes before you start cooking and leave it running for approximately 15 minutes after finishing The cooker hood controls are located on the right hand side in the front fascia panel above the glass visor The Controls Fan ON OFF Speed Control Position 0 Off Position 1 Low Position 2 Normal Position 3 Boost Light ON OFF control 0 Off 1 On To Operate Select the required fan speed and light ...

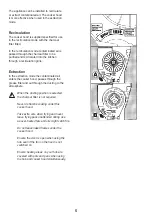
Page 5: ...he extraction mode the contaminated air enters the cooker hood passes through the grease filter and out through the ducting to the atmosphere When the ducting position is selected the charcoal filter is not required Never do flambé cooking under this cooker hood Take extra care when frying and never leave frying pans unattended during use as over heated fats and oils might catch fire Do not leave ...

Page 6: ...pads or abrasive cleaners Never use excessive amounts of water when cleaning particularly around the control panel Charcoal Filter The charcoal filters cannot be cleaned The filter should be replaced at least every three months or more frequently if the hood is used more than three hours per day To Remove Replace the Charcoal Filter 1 Open the visor and remove the metal inlet grille 2 Carefully re...

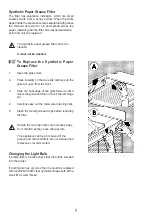
Page 7: ...catches and the grille will open from the front 3 Slide the right edge of the grille forward until it clears the guide and then unhook the left hinge pin 4 Carefully ease out the metal wire retaining clips 5 Clean the metal grille and clips before replacing the filter Handle the wire clips with care and keep away from children as they have sharp points This appliance can be a fire hazard if the gr...

Page 8: ...sh air If set up for recirculation check that the charcoal filter is still effective If set up for extraction check that the ducting and outlets are not blocked The safety cut out device has been tripped Tum off the hob and then wait for the device to reset In guarantee customers should ensure that the above checks have been made as the engineer will make a charge if the fault is not a mechanical ...

Page 9: ... parts of glass or plastic Costs incurred for calls to put right appliances improperly installed or calls to appliances outside the United Kingdom Appliances found to be in use within a commercial environment plus those which are the subject of rental agreements Products of Zanussi manufacture which are not marked by Zanussi Ltd This guarantee is in addition to your statutory and legal rights ZANU...

Page 10: ...t comply with the latest I E E Regulations and local Electricity Board regulations For your own safety this should be undertaken by a qualified electrician e g your local Electricity Board or a contractor who is on the roll of the National Inspection Council for Electrical Installation Contracting NICEIC Electrical Connection Before connecting to the mains supply ensure that the mains voltage corr...

Page 11: ...reinforced to be quite rigid in the area of the cooker hood mounting brackets and the appropriate rawl plugs used for this type of fixing not supplied Ducting The ducting must be fire retardant 100mm 4ins in diameter and the length should be nomore than 3 metres with one 900 bend 2 metres with two 900 bends Bends of more than 900 will reduce the efficiency of the hood and reduce the airflow Cleara...

Page 12: ...must be maintained either side of the hob This cooker hood must not be installed above a cooking appliance with a high level grill Unpacking The fittings supplied to install this cooker hood can be found with the instruction book inside the packaging and consists of the following Ducting spigot Blanking plate Wall fitting template Fitting Kit 2 Wall fixing brackets 4 Plastic rawl plugs 4 Wall brac...

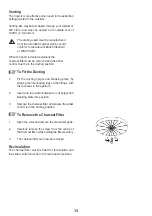
Page 13: ...sition To Fit the Ducting 1 Fit the ducting spigot and blanking plate by aligning the interlocking lugs on the fittings with the recesses in the aperture 2 Insert and turn anti clockwise to lock spigot and blanking plate into position 3 Remove the charcoal filter and ensure the slider control is in the ducting position To Remove the Charcoal Filter 1 Open the visor and remove the metal inlet grill...

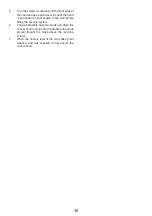
Page 14: ...hole using a pad saw or similar cutter Fitting the Cooker Hood to the Wall 1 Lift the hood squarely to the wall slightly higher than the brackets 2 Lower the cooker hood until the cooker hood locates onto the two brackets 3 Ensure that the cooker hood is correctly located before letting go To Level the Cooker Hood 1 Remove the lower grille by pressing inwardly on the two slide catches located towa...

Page 15: ...d at right angles to the wall before fitting the security system 6 The wall brackets have two studs and when the cooker hood is hung onto the brackets the studs project trought the holes above the levelling screws 7 When the hood is level fit the two shake proof washers and nuts supplied to fully secure the cooker hood ...

Page 16: ...4324165 02 230300 Electrolux Household Appliances Limited 2000 ...

Reviews: