background image

Summary of Contents for FJI 1204/4

Page 1: ...WASHING MACHINE 1204 4 ZANUSSI...

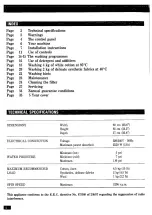
Page 2: ...eaning the filter Page 27 Servicing Page 34 Zanussi guarantee conditions Page 35 5 Year cover TECHNICAL SPECIFICATIONS DIMENSIONS Width 60 em 23 6 Height 85 em 89 57 Depth 57 em 22 47 ELECTRICAL CONNE...

Page 3: ...very hot during the washing cycle Keep children away from the vicinity of the appliance whilst it is in operation A Leave the porthole door slightly ajar between washes to preserve the door seal AOnl...

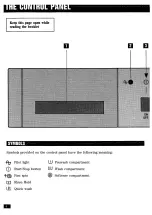
Page 4: ...e reading the booklet SYMBOLS Symbols provided on the control panel have the following meaning Pilot light UJ Prewash compartment Start Stop button Wash compartment Fast spin GO Softener compartment 2...

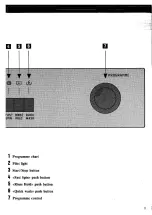
Page 5: ...1 2 j 4 5 6 1 Programme chart Pilot light Start Stop button Fast Spin push button Rinse Hold push button Quick wash push button Programme control...

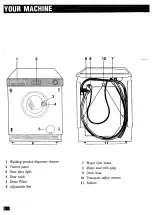
Page 6: ...ashing powder dispenser drawer Control panel Door pilot light Door catch Drain Filter Adjustable feet a oO c rn m mex Ca 7 Water inlet hoses 8 Mains lead with plug 9 Drain hose 10 Transport safety scr...

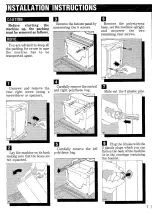
Page 7: ...as follows You are advised to keep all the packing for re use in case the machine has to be transported again Unscrew and remove the rear right screw using a screwdriver or spanner Carefully remove th...

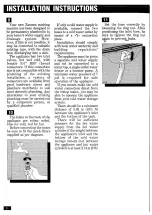
Page 8: ...supply is available connect the two hoses to a cold water outlet by means of a Y connection piece Installation should comply with local water authority and building regulations requirements The applia...

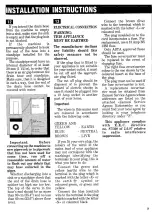
Page 9: ...ard of electric shocks in case it should be plugged into a 18 Amp socket in another part of your home Important The wires in this mains lead are coloured in accordance with the following code GREEN AN...

Page 10: ...place the machine on a solid floor INSTALLATION INSTRUCTIONS Special conditions If the floor is carpeted with a deep pile carpet or covered with erumbly or soft material insert a rigid support base un...

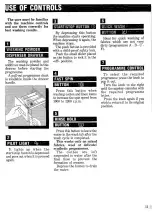
Page 11: ...placed on the button to lock it in the off position FAST SPIN BUTTON 16 Press this button when washing cotton and linen items to increase the spin speed from 1000 to 1200 r p m EH RINSE HOLD BUTTON Pr...

Page 12: ...Open the door only at the end of the programme when the pilot light beside the door catch goes out H necessary stop the machine by pressing the start stop button again At the end of the programme all...

Page 13: ...ing used in the rest of Europe Fabric White Cotton or Linen without Special Finishes Cotton Linen or Viscose without Special Finishes Colourfast at 609 C No longer used White Nylon Polyester Cotton mi...

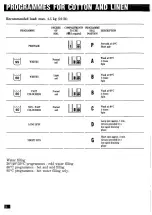
Page 14: ...B Wash at 60 C B Wash at 60 FAST Normal COLOUREDS soil H 4 rinses Spin NON FAST Normal B C Wash at 40 40 COLOUREDS soil H rinses pin Long spin approx 6 min LONG SPIN D Always preceded by a low speed...

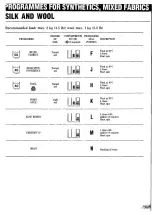
Page 15: ...F soil II wv uk 1 Normal h H soil il dja SILK AND WOOL Recommended load max 2 kg 4 5 Ib wool max 1 kg 2 2 Ib DESCRIPTION Wash at 50 C 3 rinses Short spin Wash at 40 C 3 rinses Short spin Wash at 40 C...

Page 16: ...rogramme The compartment marked with the symbol Ll is for the main wash powder The table here below indicates the amount of the detergent in percent to be used in comparison with the quantities recomm...

Page 17: ...h as Ariel can be used instead of washing powder In this case programme without prewash must be selected Pour the liquid detergent into the compartment lIJin the dispenser drawer immediately before st...

Page 18: ...DER THE ADDITIVES Er washing El LOAD THE Following the table page 15 Pour the softener if re measure the required quanti quired into the compartment ty of washing powder and pour marked do not exceed...

Page 19: ...top button The pilot lamp comes on and the washing machine starts to work D AT THE END OF THE PROGRAMME The machine automatically stops The door is controlled by a safety device which releases 1 2 min...

Page 20: ...e eateh outwards Load the items to be washed one at a time and close the door MEASURE OUT MEASURE OUT THE WASHING POWDERM THE ADDITIVES Following the table page 15 Pour the softener if measure the req...

Page 21: ...The pilot lamp comes on and the washing machine starts to work D AT THE END OF THE PROGRAMME The machine automatically stops The door is controlled by a safety device which releases 1 2 minutes after...

Page 22: ...es requiring different wash temperatures together always select the lowest temperature e White items should be washed separately e Very small items handkerchiefs ribbons socks ete should be washed in...

Page 23: ...NING W sss THE DRAWER From time to time the washing powder and additive dispenser drawer should be cleaned Remove the drawer and flush out under a tap The upper part of the additives compartment can b...

Page 24: ...INLET FILTERS If your water is very hard or contains traces of lime deposit the water inlet filter may become clogged It is therefore a good idea to clean them from time to time Turn off the water tap...

Page 25: ...bsequent fastening of door to the machine use the M5 screws supplied therewith To align the door perfectly it may sometimes be necessary to adjust height of plates 2 To do this loosen temporarily appr...

Page 26: ...to a recess having the dimensions shown in the pieture making sure that the fill and drain hoses are not bent or kinked in such a way as to obstruet the normal water flow As for water electricity conn...

Page 27: ...ose is submerged in the water e Drain pipe without vent hole You have pressed the Rinse Hold button The drain filter is clogged The drain hose is bent The drainage system pipes are blocked The drain h...

Page 28: ...e items e g sheets when loading Run the draining programme N reduce the load and continue E THE DOOR DOES NOT OPEN If after the above checks there is still a fault call your nearest Zanussi Service Fo...

Page 29: ...oss the column to the Service Force Key Number for your area Turn to the last page of this directory for the address and telephone number to contact for service which is listed against your key number...

Page 30: ...Darlington Doncaster Doncaster Post code Number 11 12 1 7 10 12 18 14 8 9 1 9 1 17 1 7 10 12 22 14 8 9 15 21 31 40 SUB POSTCODE DIVISION DN DN DT DT DT DT DY DY EC EH EH EH EN EX EX E FK FK FK FK FY...

Page 31: ...K MK ML NE NE NE NG NG NG NN NN NN NP NR NW OL OL Ox PA PA PA PA PA PA PA PA PA PE PE PE PE PH PH PH PL PL PO PO PR RG RG RG RH RH RH Liverpool Medway Milton Keynes Motherwell Manchester Newcastle on...

Page 32: ...9 10 1 4 41 43 51 2 3 5 21 24 52 20 1 5 9 11 6 7 8 1 7 9 8 0 9 11 17 99 1 18 20 21 19 All SW Codes Except 2 9 16 2 9 16 1 6 9 17 18 22 7 17 19 8 23 25 1 19 30 31 40 45 60 66 74 80 81 70 73 75 1 11 21...

Page 33: ...05 6825 081 859 3939 0782 643814 0382 642828 0382 455862 0382 826809 0337 28807 0246 231790 0387 69694 0573 24411 0776 3277 0325 300606 0482 223335 0472 358760 0522 532330 48 49 50 51 52 53 54 55 56 5...

Page 34: ...by us The appliance is still in the possession of the original purehaser All service work under this guarantee must be undertaken by a Zanussi Service Force Centre Any appliance or defective part repl...

Page 35: ...nullify the exclusions 3 The Engineer will need to check the details of your Cover card and may make a charge for his services if it is not presented to him at the time of his call 4 The date of purc...

Page 36: ...iance of science Zanussi Ltd Zanussi House Newbury The information in this manual is correct at time of going to press Zanussi reserve the right to alter specifications without notice 1112 90 4 531 12...

Reviews: