background image

Summary of Contents for ZHC 955

Page 1: ......

Page 2: ...accessories 8 Technical Specifications 8 Technical assistance service 9 Guarantee Conditions 10 Installation 11 Unpacking 11 Placement 11 Electrical connection 11 Wall unit mounting 12 UK Before installing or using this appliance please read this instruction book carefully paying particular attention to the safety warnings on the following page If you have any queries regarding this appliance plea...

Page 3: ... in the same room Hoods can only be used safely with appliances connected to a chimney if the room and or flat air environment combination is ventilated from outside using a suitable ventilation hole approxi mately 500 600 cm2 large to avoid the possibility of a depression being created during operation of the hood If you have any doubts contact the relevant controlling authority or building inspe...

Page 4: ...d for use by young children or infirm persons without supervision Older children must be supervised if using the appliance Young children should be supervised to ensure that they do not play with the appliance WARNING Ensure that the appliance is switched off before replacing the lamp to avoid the possibility of electric shock This appliance is marked according to the European directive 2002 96 EC...

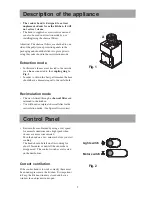
Page 5: ...e should have a diameter equal to the outlet hole Fig 1 Recirculation mode The air is filtered through a charcoal filter and returned to the kitchen You will need an original charcoal filter for the recirculation mode See Special Accessories A Control Panel Best results are obtained by using a low speed for normal conditions and a high speed when odours are more concentrated Turn the hood on a few...

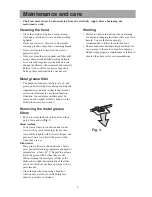
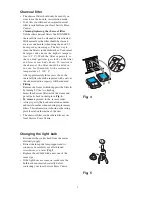
Page 6: ... weeks Removing the metal grease filters Push it towards the back of the unit and then pull it down and out Fig 3 Hand washing Soak grease filters for about one hour in hot water with a grease loosening cleaner then rinse off thoroughly with hot water Repeat the process if necessary Refit the grease filters when they are dry Dishwasher Place grease filters in the dishwasher Select most powerful wa...

Page 7: ...r approximately three years of use the charcoal filter should be replaced with a new as the odour reduction capacity will be reduced Fitting Remove the frame i which supports the filter h by turning 90 the two knobs g Insert the charcoal filter inside the frame and put all parts back in their place Fig 4 To remove proceed in the reverse order Always specify the hood model code number and serial nu...

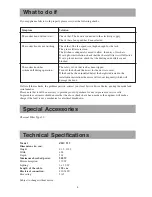
Page 8: ...h air If set up for recirculation check that the charcoal filter is still effective If set up for extraction check that the ducting and outlets are not blocked The cooker hood has The safety cut out device has been tripped switched off during operation Turn off the hob and then wait for the device to reset If the hood has been installed below the heights indicated in the installation instructions ...

Page 9: ...hat to do if as the engineer will make a charge if the fault is not a mechanical or electrical breakdown even the appliance is under warranty Please note that proof of purchase is required for in guarantee service calls Help us to help you Please determine your type of enquiry before writing or telephoning When you contact us we need to know Your name Clear and concise details of the fault Address...

Page 10: ... Costs incurred for calls to put right an appliance which is improperly installed or calls to appliances outside the European Community EC or European Free Trade Area Appliances found to be in use within a commercial environment plus those which are subject to rental agreements Products of Zanussi manufacture which are not marketed by Zanussi European Guarantee If you should move to another countr...

Page 11: ...ould it be necessary to provide a fixed connection the hood must only be installed by an electrician authorised by the local electricity board When installing an omnipolar disconnector with a distance of at least 3 mm between contacts must be provided Fixed connection of the appliance must only be carried out by an authorised electrician Electrical connection for UK only Safety warnings for the el...

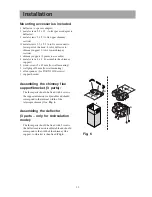
Page 12: ... support 5 wood screws 5 x 45 mm for wall mounting 5 wall plugs Ø 8 mm for wall mounting 1 allen spanner for TORX 10 20 screws 1 support bracket Assembling the chimney flue support bracket 3 parts The three parts should be fixed with 4 screws the support extension is adjustable and should correspond to the internal width of the telescopic chimney flue Fig 6 Assembling the deflector 3 parts only fo...

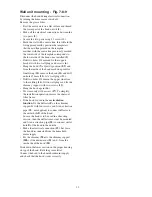
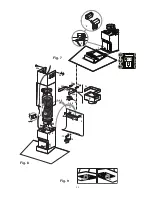
Page 13: ...t a wall plugs 13 Drill two holes Ø 8mm on the upper side close to the ceilling 14 fit two wall plugs and fix the chimney support with two screws 15 Hang the hood again 16 Fix it securely with a screw 17 To simplify the installation operation remove the charcoal filter frame If the hood is used in the recirculation function fix the deflector F on the chimney support G with four screws and fit an e...

Page 14: ...14 20b 20b 7 16 7 16 4 5 6 12 13 8 9 14 14 15 18 20a 20a 9 8 19 B G H 11 11 10 17 21 8 9 F G Fig 7 Fig 8 22 22 Fig 9 2 2 3 x12 1 ...

Page 15: ...15 ...

Page 16: ...LI2LDD Ed 02 06 ...

Reviews: