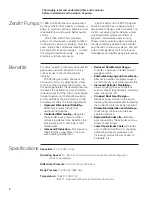
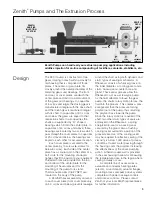
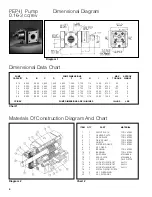
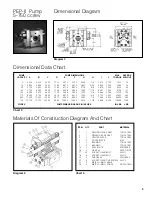
background image

Zenith

®

Pumps

Installation,

Care and

Maintenance

Zenith

Polymer

Extrusion

Gear Pumps

PEP-II Series

Gear Pumps

Summary of Contents for PEP-II Series

Page 1: ...Zenith Pumps Installation Care and Maintenance Zenith Polymer Extrusion Gear Pumps PEP II Series Gear Pumps ...

Page 2: ...e critical issues in the diverse plastics industry The Zenith gear pump optimizes the extrusion process by allowing the screw to melt and homogenize the polymer As the pump generates the needed pressure it relieves the extruder of work therefore reducing heat from the shear lowering the torque required and eliminating surging All this optimizes the performance of the extruder and offers the follow...

Page 3: ... and bottom of the center plate for the mounting of heat plates and for the mounting of the pump to its stand Thermocouple wells 1 8 27 NPT are located on the body of the pump A Zenith Rheoseal assembly secured to each cover plate front cover plate only on 3 0 cc rev and below prevents leakage around the shaft using both dynamic and static types of sealing mechanisms A Rheoseal consists of a helic...

Page 4: ... 1 KEY EXTERNAL PUMP PUMP DIMENSIONS MAX APPROX CAPACITY A B C D E F G H I J TORQUE WEIGHT 0 16 3 000 3 000 2 860 1 400 2 400 1 960 0 750 1 4 1 500 0 125 80 9 0 3 3 000 3 000 2 860 1 400 2 400 1 960 0 750 1 4 1 500 0 125 80 9 0 6 3 000 3 000 2 860 1 400 2 400 1 960 0 750 1 4 1 500 0 250 195 9 1 2 3 000 3 000 3 650 1 400 2 400 1 960 0 750 5 16 2 500 0 750 410 9 1 8 3 000 3 000 3 650 1 400 2 400 1 9...

Page 5: ...H I J TORQUE WEIGHT 5 3 250 3 250 3 250 1 125 2 875 2 125 0 500 1 4 1 875 0 750 1225 10 10 4 000 4 000 4 000 1 188 3 375 2 615 0 625 5 16 2 344 1 000 2085 18 20 4 750 5 000 5 000 1 188 3 750 3 300 0 750 3 8 2 813 1 250 3250 34 40 5 750 6 000 6 250 1 188 4 438 4 000 1 000 7 16 3 531 1 500 6750 61 100 8 000 8 250 8 250 1 750 5 438 5 458 1 250 5 8 4 688 2 188 12100 150 175 9 500 9 750 9 880 1 813 6 3...

Page 6: ...ature thread lubricant such as DAG Dispersion 154 Felpro C 100 or equivalent 2 Place the top heat plate on the pump then place the insulation jacket on top of the heat plate Install and tighten the bolts taking care not to crack the insulation block 3 Repeat for the bottom plate noting that bottom heat plate mounting bolts are typically used to mount the pump to its mounting block 4 Place the supp...

Page 7: ...ances As with any other Zenith pumps PEP II pumps may be returned to Zenith for complete rehabilitation as necessary This procedure may be desirable if only a few pumps are involved If a large number of pumps are to be maintained at the user s plant it may be worthwhile to have key maintenance personnel attend a mainte nance seminar at the Zenith factory to view the manufacturing gauging and assem...

Page 8: ...ete assembly Again soaking the parts in lubricating penetrating oil or other non damaging solution will help ease the disassembly Do not force the parts out one side with a hammer or arbor press 7 Slide the gear shafts and bearings out of the center plate They will not come out separately as the gear teeth will not clear the bearings Take extreme care not to nick or ding the gear teeth or the edge...

Page 9: ...the driven shaft taking care to select a bearing with the proper groove configuration Set the flats on the circum ference of the bearings against each other and gently slide the bearings and shafts into the center plate Slide them far enough through the center plate to allow the drive shaft to protrude out on the front side and allow the front bearings to be installed See D bearing orientation sch...

Page 10: ...l gently press the lip seal into the Rheoseal housing Do not attempt to press on the lip seal with screwdriver or other pointed object as this will damage the seal Do not press the lip seal all the way into its cavity Instead allow it to protrude slightly so that it will be correctly seated by the seal cover Carefully remove the special Zenith tools 14 Slide the seal cover over the shaft until it ...

Page 11: ...urrent and speed settings Check all drive couplings 3 Process conditions changed Check process conditions for proper melt temperature pres sures viscosities and materials 4 Entrained particle Disassemble and clean pump replace any damaged parts 5 Possible internal damages Disassemble and clean pump replace damaged parts Consult factory Excessive seal assembly leakage 1 Worn lip seal Replace lip se...

Page 12: ...ty of operating conditions and applications for these products or systems the user through its own analysis and testing is solely responsible for making the final selection of the products and systems and assuring that all performance safety and warning requirements of the application are met The products described herein including without limitation product features specifications designs availab...

Reviews: