background image

Summary of Contents for Z42P3 and

Page 1: ...ENERGY STAR is a set of power saving guidelines issued by the U S Environmental Protection Agency EPA E As an ENERGY STAR Partner LGE U S A Inc has determined that this product meets the ENER GY STAR...

Page 2: ...erference in a residential installation This equipment generates uses and can radiate radio frequency energy and if not installed and used in accordance with the instructions may cause harmful interfe...

Page 3: ...apparatus near water 9 Do not defeat the safety purpose of the polarized or grounding type plug A polarized plug has two blades with one wider than the other Agrounding type plug has two blades and a...

Page 4: ...able f CAUTION concerning the Power Cord Most appliances recommend they be placed upon a dedicated circuit that is a single outlet circuit which powers only that appliance and has no additional outlet...

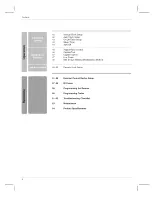
Page 5: ...Audio Output 24 26 PC Setup 27 Turning on the TV 27 Volume Adjustment 27 Channel Selection 27 On Screen Menus Language Selection 28 On Screen Menus Selection and Adjustment 29 EZ Scan Channel Search 2...

Page 6: ...pect Ratio Control 46 Caption Text 47 Caption Option 47 Low Power 48 ISM Image Sticking Minimization Method 49 50 Parental Lock Setup 51 56 57 58 59 60 61 62 63 64 External Control Device Setup IR Cod...

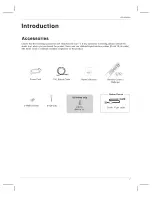
Page 7: ...ontact the dealer from where you purchased the product User must use shielded signal interface cables D sub 15 pin cable with ferrite cores to maintain standard compliance for the product 75_ Round Ca...

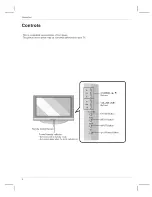
Page 8: ...cture shown below may be somewhat different from your TV Remote Control Sensor Power Standby Indicator illuminates red in standby mode illuminates green when the set is switche CHANNEL A T Buttons VOL...

Page 9: ...S VIDEO device ANTENNA CABLE IN Connect over the air signals to this jack Connect cable signals to this jack DIGITAL AUDIO OUT Connect digital audio from various types of equip ment Note In standby m...

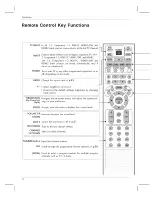
Page 10: ...Change the aspect ratio _ _p 45 _ _ Adjust brightness on screen _ It turns to the default settings brightness by changing mode source THUMBSTICK Navigate the on screen menus and adjust the system set...

Page 11: ...ent red _ p 33 Select the appropriate type of sound for type of program green _ p 39 Adjust the screen position size and phase in PC mode yellow _ p 26 Display information at the top of the screen blu...

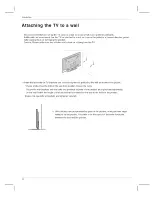
Page 12: ...or TV brackets and bolts to tighten the product to the wall as shown in the picture If your product has the bolts in the eye bolts position loosen the bolts Secure the wall brackets with the bolts not...

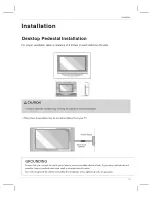
Page 13: ...ewhat different from your TV Power Supply Short circuit Breaker GROUNDING Ensure that you connect the earth ground wire to prevent possible electric shock If grounding methods are not possible have a...

Page 14: ...ct in the holes B on the bottom of the stand a Image shown here may be slightly different from your set When closing the stand for storage First remove the screws inthe holes B on the bottom of the st...

Page 15: ...ABLE MANAGEMENT with both hands and push it as shown 2 Connect the cables as necessary To connect an additional equipment see the External equipment Connections section Reinstall the CABLE MANAGEMENT...

Page 16: ...ntenna _ UHF Antenna _ _ Turn clockwise to tighten Outdoor Antenna _ Single family Dwellings Houses 9 Connect to wall jack for outdoor antenna IL__ Bronze Wire Be careful not to bend the bronze wire w...

Page 17: ...een VCR AUDI L I C Lj _ Connect the AUDIO VIDEO jacks between TV and VCR Match the jack colors Video yellow Audio Left white and Audio Right red Insert a video tape into the VCR and press PLAY on the...

Page 18: ...AUDIO VIDEO jacks between TV and external equipment Match the jack colors Video yellow Audio Left white and Audio Right red O Select AV2 input source with using the INPUT button on the _emote control...

Page 19: ...or HDMI2 input source with using the INPUT button on the remote control Refer to the DVD player s manual for operating instructions TV can receive the video and audio signal simultaneously with using...

Page 20: ...er insert a DVD Select Component I input source with using the iNPUT button on the remote control If connected to COMPONENT IN 2 select Component 2 input source Refer to the DVD player s manual for op...

Page 21: ...r s manual for the digital set top box TV can receive the video and audio signal simultaneously using a HDMI cable If the digital set top box supports Auto HDMI function output resolution of the digit...

Page 22: ...MII DVI input source with using the INPUT button on the remote control If the digital set top box has a DVl output and no HDMI output a separated audio connection is nec essary If the digital set top...

Page 23: ...of the second TV or monitor for further details regarding that device s input settings oComponent 1 2 RGB PC HDMI1 DVl HDMI2 DTV input sources canqot be used for Monitor out We recommend to use the v...

Page 24: ...tputs of the PC to the AUDIO IN RGB DVl jack on the set O Turn on the PC and the set Select HDMI1 DVl input source with using the INPUT button on the remote control _ l if the PC has a DVI output and...

Page 25: ...may be noise associated with the resolution vertical pattern contrast or brightness in PC HDMI DVl mode If noise is present change the PC or HDMI DVl mode to another resolution change the refresh rat...

Page 26: ...or sharpen the image of characters Resolution This function allows you select Resolution of XGA WXGA 1 Press the ADJUST button and then use L _ button to selecl Resolution POSITION SIZE or PHASE 2 Pre...

Page 27: ...reverts to standby mode 1 Press the VOL button to adjust the volume 2 If you want to switch the sound off press the MUTE button 3 You can cancel this function by pressing the MUTE or VOL button Press...

Page 28: ...Operation t On Screen Menus Se ec ion and Adjustment 1 Press the MENU button and then J T button to select each menu 2 Press the _ button and then use J T _1 _ button to display the available menus 28...

Page 29: ...n the channel search Allow EZ Scan to complete the channel search cycle for ANTENNA and CABLE b A password is required to gain access to Manual Scan menu if the Lock System is turned on 1 Press the ME...

Page 30: ...p left corner of the screen You can create your own Favorite List Use the FAV button on the remote control when a channel is highlighted and then you can add or delete the channel to from the Favorite...

Page 31: ...the on screen signal strength monitor to see the quality of the signal being received 4 Press EXIT button to return to TV viewing or press MENU button to return to the previous menu Changes the pictur...

Page 32: ...se J T button to select the SETUP menu 2 Press the _ button and then use J T button to select Input T abel 3 Press the _ button and then use A T button to select the source AV1 2 Component1 2 RGB PC H...

Page 33: ...hown below Daylight Normal Night Time User 1and User 2 your own set tings You can also use the VIDEO menu to adjust E zPicture 2 Press the EXIT button to save and return to TV viewing b Choose one of...

Page 34: ...ton and then use J T button to select Color 2 Ternper_ure 3 Press the _ button and then use J T button to select User 4 Press the _ button and then use J T button to select Red Green or Blue 5 Press t...

Page 35: ...ss the _ button and then use J T button to select DB Press the _ button and then use J T button to select Auto or Manual Selecting the Manual 1 Press the D button and then use _ _ button to select DB...

Page 36: ...n HDMI1 DVl HDMI2 or AVl AV2 mode 1 Press the MEN U button and then use J T button to select the VXD_ O menu 2 Press the _ button and then use J T button to select Advanced 3 4 Press the _ button and...

Page 37: ...ns to their original fac tory preset values 1 Press the MENU button and then useJ T button to selectthe VIDEO menu 2 Press the _ button and then use J T button to select Video Reset 3 Press the _ butt...

Page 38: ...ress the MENU button and then use A T button to select the AUDIO menu 2 Press the I_ button and then use J T button to select Audio Language 3 Press the _ button and then use J T button to select Engl...

Page 39: ...u select the Stadium or Theater the AUDIO menu Balance option is disable and the Balance option is set to 0 automatically When SRS is On the Balance option is set to 0 automatically And when you chang...

Page 40: ...to the previous menu SRS TruSurround XT Takes advantage of any multi channel format without needing to add extra speakers or equipment Dialog clarity bass enrichment and the addition of stereo audio...

Page 41: ...EXIT button to return to TV viewing or press MENU button to return to the previous menu b Tum TV speakers off ff using external audio equipment Feature turns the TV Speakers option On or Off 1 Press t...

Page 42: ...the cur rent time is set incorrectly by the auto clock function The factory default value of the Auto Clock is Off because a clock information sent each broadcasting station is different 1 2 3 4 5 Pre...

Page 43: ...On Timer function Press the _ button and then use J T button to select the channel at turn on Press the _ button and then use J T button to set the sound level at turn on 7 Press EXIT button to retur...

Page 44: ...lly after 10 minutes 1 2 3 4 Press the MENU button and then use J T button to select the TIME menu Press the _ button and then use J T button to select Auto Off Press the _ button and then use J T but...

Page 45: ...lly preferred aspect ratio needs to be specified RGB PC DVI PC input source use 4 3 or 16 9 aspect ratio Horizon The screen size is more enlarged at both sides to create a spectacular view Zoom 1 Choo...

Page 46: ...tton to select Caption Text Press the _ button and then use A T button to select caption CCI CC2 CC3 CC4 Texfl Text2 Text or Text4 CAPTION The term for the words that scroll across the bottom of the T...

Page 47: ...xt Color Choose a color for the text Text Opacity Specify the opacity for the text color Bg Background Color Select a background color Bg Background Opacity Select the opacity for the background color...

Page 48: ...ing is never a problem ISM is not necessary set to Normal White Wash White Wash removes permanent images from the screen Note An excessive permanent image may be impossible to clear entirely with Whit...

Page 49: ...trongly cautioned Restricted No one 17 and under admitted Adult only If you set PG 13 G and PG movies will be avail able PG 13 R NC 17 and X will be blocked Ratings for Television programs made for TV...

Page 50: ...ed Region5 Rating data Input block Enables you to select a source to block from the exter nal source devices you have hooked up For USA Movie Rating MPPA Blocks movies according to the movie rat ings...

Page 51: ...C connection cables are not supplied with the TV IS PC No Pin Name 1 No connection 2 RXD Receive data 435 TXD _ Transmit data _GNDDTR _ k_ _ 6 DSR DCE side ready_ 7 RTS Ready to send 8 CTS Clear to se...

Page 52: ...r x Command 2 Second command to control the set Set ID You can adjust the set ID to choose desired monitor ID number in Setup menu Adjustment range is 1 99 When selecting Set ID 0 every connected the...

Page 53: ...n mute on off Transmission i k d Set ID Data Cr i Data O Screen mute off Picture on 1 Screen mute on Picture off Acknowledgement I d Set IU OK Uata x 1 05 Volume Mute Command2 e To control volume mute...

Page 54: ...13 Remote Control Lock Mode Command2 m To lock the remote control and the front panel controls on the set Transmission I k m Set IU Uata Cr I Data O Lock off 1 Lock on Acknowledgement I m Set ID OK Da...

Page 55: ...0 1 0 0 Cat_ 0 1 0 1 ATSC Ca_ei 0 1 1 0 ATSC auto 0 1 1 1 Reserved X X X X 1 1 1 1 Reserved All data are transmitted by Hexadecimal code Two One part Channel 6th bit This bit is used in a cable ready...

Page 56: ...ote key code Transmission m c Set IU Uata Cr I Data Key code Refer to page 58 Acknowledqement c Set ID OK Data x 23 input select Command x b Main Picture input To select input source for TV Transmissi...

Page 57: ...uty ratio T1 Tc 1 3 Configuration of frame 1st frame I Lead Low custom code _ e c lc11c21c31c4c51c61c7 Repeat frame __J _ Repeat code Lead code __J _ _ 9 ms High custom code colc11c21c31c4c51c61c7 Dat...

Page 58: ...R C Button FLASH BACK R C Button MUTE R C Button VOL R C Button VOL R C Button CH R C Button CH R C Button FAV R C Button INFO R C Button CC R C Button A R C Button T R C Button R C Button I_ R C But...

Page 59: ...ice 2 Turn on the component to be programmed then press the correspond ing MODE button on the remote control 3 4 Press the MENU and MUTE buttons simultaneously for 2 seconds the button selected compon...

Page 60: ...033 067 014 031 053 072 134 139 059 045 046 059 061 039 043 074 083 145 031 033 067 034 054 101 O48 Brand PORTLAND PULSAR QUARTZ QUASAR RCA REALISTIC RICO RUNCO SALORA SAMSUNG SANSUI SANYO SCOTT SEAR...

Page 61: ...em may be with the broadcast Is the power cord inserted into wall power outlet Check your antenna direction and or location Test the wall power outlet plug another product s power cord into the outlet...

Page 62: ...y result in an unusual noise when the product is turned on or off and does not indicate a fault with the product There is a problem in PC mode Only PC mode applied The signal is out of range Vertical...

Page 63: ...lukewarm water and a little fabric softener or dish washing detergent Wring the cloth until it s almost dry and then use it to wipe the screen 2 Make sure the excess water is off the screen and then...

Page 64: ...and 44 4 x 27 4 x 4 1 inches 1129 0 x 695 x 103 7 mm with stand 64 4 pounds 29 2 kg without stand 55 8 pounds 25 3 kg with stand 51 3 x 34 3 x 14 0 inches 1302 6 x 872 0 x 355 8 mm Z50P3 50PC3DB UE We...

Page 65: ...asts so the above exclusion or limitation may not apply to you This warranty gives you specific legal rights and you may also have other rights that vary from stat to state THIS LIMITED WARRANTY DOES...

Page 66: ...ut charge Other service requirements will be at the owner s expense tf you have problems in obtaining satisfac tory warranty service write or call the Zenith Customer Interactive Center Service may be...

Reviews: