Temperature and Humidity
data logger Manual
3-Simple start:
①
Check the battery indicator is normal.
②
Connect the USB data logger to the Windows PC. The first time using, according to the computer
instructions, install the system’s own driver. Similar to A new U disk.
③
Setting the data logger. Please check the software CD, use the PC software setting the data
logger. For more information, please refer to the PC software help document.
④
Recording and download data.
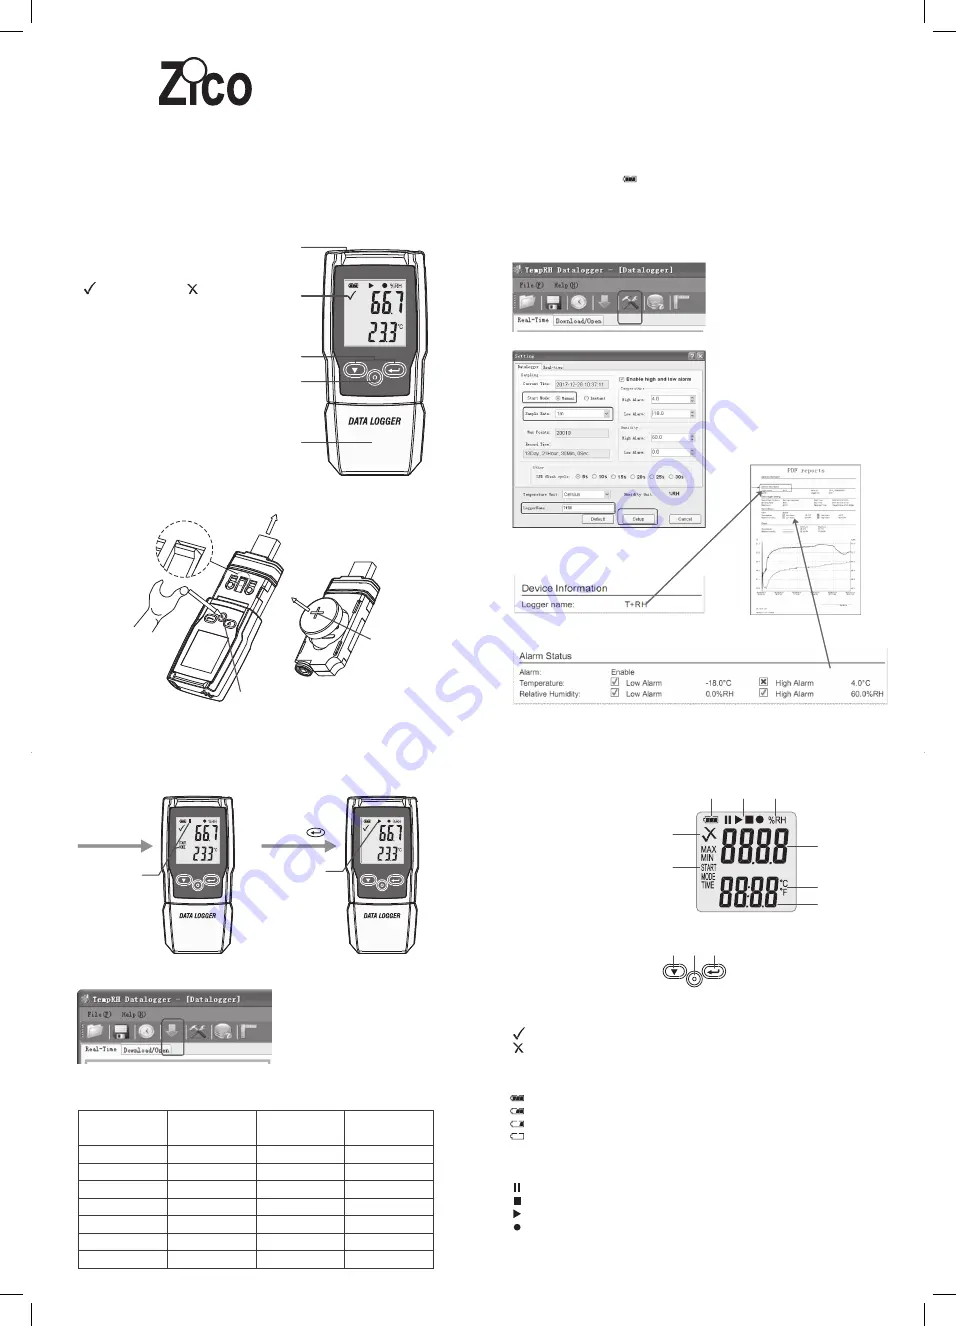
First step: Open the software. Then open the setting window.
Second step: refer to the picture.
*
Logger Name will synchronize to the PDF reports.
*Enable high and low alarm parameter will synchronize to the PDF reports.
Third step:
Fourth step: After recording some data, you can use the PC software download data.
Sample rate is 1minute, 10 minutes is ten data.
4-Sample rate & Record time
2
3
4
5
1
1-Product overview:
1. Sensor
2. Alarm indicator, red/green LED inside.
: green LED flashing, :Red LED flashing.
3. Electronic function key
4. Mechanical switch, hold down the switch,
then pull out the shell.
5. USB protecting hood. Connect PC software
,
then you can setting up the data logger.
2-Replace battery
Hold down the switch,
then pull out the shell.
CR2450 Battery
After Setting
“Manual” mode
Waiting start
Long Press
Recording
Sample rate
/min
1
2
3
4
5
6
7
Record time
/day
13.9
27.8
41.7
55.6
69.5
83.4
97.3
Sample rate
/min
8
9
10
15
20
25
27
Record time
/day
111.2
125.1
139.0
208.4
277.9
347.4
375.2
5-LCD display and button
Display:
①...
Alarm indicator
②...
Battery indicator
③...
Record indicator
④...
Humidity unit
⑤...
Humidity reading
⑥...
Temperature unit
⑦...
Temperature reading
⑧...
Function indicator
Buttons:
①
Down key
②
Replace battery
③
Enter key
• Alarm indicator
Measurement values are within programmed limits. Green LED is flashing.
Measurement exceeded the programmed limits. If activated during programming a red LED
is flashing.
• Battery indicator
Full battery
Battery OK
Low battery
Empty battery, replace
• Recording indicators
The current state of the recording is indicated by the following symbols:
Waiting start
Recording stopped
Recording started
Appear after setting
2
3
4
5
6
7
1
8
2
3
1
www.zicotech.com
Zi-9530


