


1
Assembly Instructions
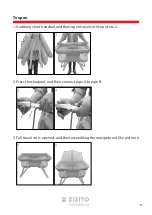
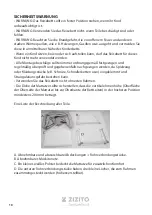
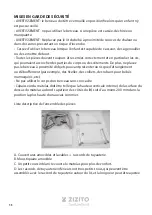
Unfold the Baby Stroller
• Take the stroller out of the package as shown in Fig. 1a
• Unfold the folding hook, pull the handlebar and gradually push to
open the stroller until a „click“ sound is heard as shown in
Fig. Ib and 1c
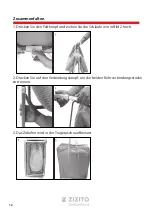
Install the Front Wheels
As shown in Fig. 2, attach each wheel to
the front wheel axle till a “click”
sound is heard.
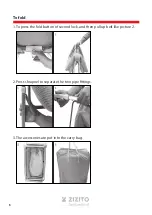
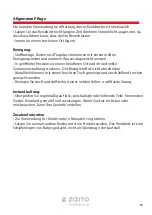
Install the Rear wheel
As shown in Fig. 3, insert the rear wheels
into the rear wheel axle till a „click“ sound
is heard and ensure the rear wheels are
locked and cannot be pulled out.
1а
1b
1c
3
2
Folding Hook
13
1
BARRON
DE
KINDERWAGEN ...............................................2
EN
BABY STROLLER .......................................... 11
FR
POUSSETTE DE BÉBÉ ................................ 19
ES
CARRITO DE BEBÉ .......................................28
IT
PASSEGGINO ................................................ 37
NL
KINDERWAGEN .............................................46
RO
CARUCIOR .....................................................55
GR
ΚΑΡΟΤΣΑΚΙ ΜΩΡΟΎ ....................................64
BG
БЕБЕШКА КОЛИЧКА ....................................73
BENUTZERHANDBUCH.....................................9
ELIAS
USER GUIDE.......................................................3
MODE D’EMPLOI...............................................15
GUÍA DEL USUARIO..........................................21
GUIDA UTENTE..................................................27
GEBRUIKERSHANDLEIDING...........................33
MANUALUL UTILIZATORULUI..........................39
ΟΔΗΓΙΕΣ ΧΡΗΣΗΣ..............................................45
РЪКОВОДСТВО ЗА УПОТРЕБА......................51
1
BARRON
DE
KINDERWAGEN ...............................................2
EN
BABY STROLLER .......................................... 11
FR
POUSSETTE DE BÉBÉ ................................ 19
ES
CARRITO DE BEBÉ .......................................28
IT
PASSEGGINO ................................................ 37
NL
KINDERWAGEN .............................................46
RO
CARUCIOR .....................................................55
GR
ΚΑΡΟΤΣΑΚΙ ΜΩΡΟΎ ....................................64
BG
БЕБЕШКА КОЛИЧКА ....................................73


