background image


OP200 Quick Start Guide   


QUICK START GUIDE 

Applicable Model: OP-200   


Version: 1.2 
Date: May 2019 


Summary of Contents for OP-200

Page 1: ...OP200 Quick Start Guide 1 QUICK START GUIDE Applicable Model OP 200 Version 1 2 Date May 2019 ...

Page 2: ...or Settings 13 4 1 Enroll an administrator 13 4 1 1 Enroll FP 13 4 1 2 Enroll Card 13 4 2 Delete an administrator 14 4 2 1 Delete FP 14 4 2 2 Delete Card 14 5 Amag Symmetry Configuration 15 5 1 Overview 15 5 2 ZK Opera Service Installation 15 5 3 Basic Amag Symmetry Configuration 16 5 3 1 Data Connect License 16 5 3 2 Amag SQL Server configuration 16 5 3 3 Symmetry Unique Employee Reference 17 5 3...

Page 3: ... 3 2 Name the Readers 36 6 3 3 Set Card formats 36 6 3 4 Configure Door Settings 37 6 3 5 Reader Input and Output settings 39 6 3 6 Backup Database 41 6 3 7 Personnel management fingerprint registration 43 7 Proper Fingerprint Enrollment 47 8 Enroll Verification 50 9 Trouble Shootings 52 ...

Page 4: ...cts near the device Do not place the device next to heating equipment Prevent water drinks or chemicals leaking into the device This product is not intended for use by children unless they are supervised Do not drop or damage the device Do not disassemble repair or modify the device Do not use the device for any purpose other than those specified Remove dust or dirt regularly While cleaning wipe d...

Page 5: ...on wiring 1 1 Features USB port Reset button Left side view 2 4 inch color screen Touch keypad LED indicator Fingerprint sensor Card reader Front view Speaker Right side view Security screw holes for securing the device onto its back plate Bottom view ...

Page 6: ...OP200 Quick Start Guide 3 1 2 Pin Layout 4 Pin cable connectors _Ethernet 2 Pin cable connectors _Power in 11 Pin cable connectors Tamper switch Back view ...

Page 7: ...1mm Fix the back plate on the wall using wall mounting screws Note We recommend drilling the mounting plate screws into solid wood i e stud beam If a stud beam cannot be found use supplied drywall plastic anchors Attach the device to the back plate Fasten the device to the back plate with security screws 0 51 in 13 mm Front view Back view Left side view ...

Page 8: ...OP200 Quick Start Guide 5 1 4 Power Connection Without PoE With PoE Optional Recommended power supply 12V DC at least 750mA per OP 200 GND 12V 12V DC Adaptor supplied with OP 200 Power Data ...

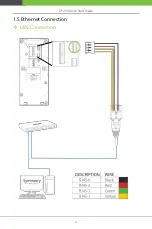
Page 9: ...OP200 Quick Start Guide 6 1 5 Ethernet Connection LAN Connection ...

Page 10: ...rence with RS485 communication it s recommended using a bus topology instead of star topology 3 Adjust the communication speed as needed The signal strength varies depending on wiring conditions and it may be necessary to lower the baud rates 4 The GND Signal may be omitted if and only if the GND potential difference is less than 5V Controller panel GND 485A 485B D0 D1 GND ...

Page 11: ...OP200 Quick Start Guide 8 1 7 Wiegand Output Connection WD1 WD0 GND Controller panel GLED LED D0 D1 GND ...

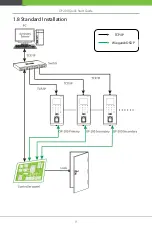
Page 12: ...OP200 Quick Start Guide 9 1 8 Standard Installation TCP IP Wiegand OSDP ...

Page 13: ...parameters for the actual network IP Address 192 168 1 201 Subnet Mask 255 255 255 0 Gateway 192 168 1 1 DNS 8 8 8 8 2 2 Webserver Settings Click Main Menu Comm Settings Webserver Settings Port The default Port is 80 normally you don t need modify it but if it is necessary you can change it SSL The network connection is encrypted in the transport layer which is used to ensure the security of netwo...

Page 14: ...it doesn t need change 2 4 Backup to USB Flash drive Insert the USB disk to the reader click Main Menu Device Settings Backup Data Backup to USB Disk Backup start the data user data and network settings in the device will be copied to the disk And you can restore the data with the USB disk too The menu path is Main Menu Device Settings Restore Data Restore from USB Disk Restore start Secondary rea...

Page 15: ...ck Main Menu Comm Settings Primary Secondary Settings Turn off Primary Device the device will be used as secondary reader And please set the Primary IP the IP of the primary reader Primary Port is default it doesn t need change Panel Ack If you open this function the reader will get feedback verify successfully or unsuccessfully from controller panel When you use Wiegand communication please turn ...

Page 16: ...ministrator verification to enter the main menu An administrator can enroll ten fingerprints and one card 4 1 1 Enroll FP Press Main Menu Device Settings Admin Settings Enroll FP to enroll administrator s fingerprints 4 1 2 Enroll Card Press Main Menu Device Settings Admin Settings Enroll Card to enroll a card for the administrator ...

Page 17: ...n click Main Menu Device Settings Admin Settings Enroll FP select the finger you want to delete then click Yes to delete administrator s fingerprint 4 2 2 Delete Card After administrator verification click Main Menu Device Settings Admin Settings Enroll Card then click Yes to delete administrator s card ...

Page 18: ...municate with Amag Symmetry It communicates using Amag s Data Connect feature in order to synchronize personnel records between Symmetry and Opera There is also a ZK Opera Service configuration tool which is used to specify the Host and Port of the primary OP 200 to communicate with This is also used to configure the host and credentials to communicate with Symmetry via Data Connect The ZK Opera S...

Page 19: ...h Amag via its SQL Server database The Amag Data Connect Manual 9600 0458 should be reviewed 5 3 1 Data Connect License A separate Data Connect Module license from Amag is required for Data Connect support This license must be acquired and installed on the Amag server 5 3 2 Amag SQL Server configuration Access to multiMaxExport database Data Connect for Cardholders in Amag works by exporting cardh...

Page 20: ...nbounded Thus the ZK Opera Service does this Note however that this implies that only a single 3rd Party Data Connect application can integrate with a given Amag system for cardholder export 5 3 3 Symmetry Unique Employee Reference 3rd Party applications such as Opera need a unique identifier for a cardholder record within Amag Symmetry so that when a record is modified or deleted it can be mapped...

Page 21: ...Amag to enforce that every cardholder must given a unique Employee Reference value Note Amag Symmetry will not allow a unique employee reference to be configured if any cardholders already exist in the system Contact Amag support for assistance ...

Page 22: ... the specifics of cardholder data export Opera requires that the following fields be exported Last Name First Name Middle Name Card Number Card Issue Level Employee Reference PIN and Customer Code Make sure that these fields are checked on the Data Export screen and hit the OK button Other fields can be unchecked for efficiency ...

Page 23: ...sting Cardholder so that the ZK Opera Service may synchronize the initial set of cardholders in the system Export All Records can also be done at any time to ensure that Opera has all of the latest credentials from the Symmetry system Since the Data Connect export database acts as a persistent queue with records existing until Opera processes them this should generally only be needed in cases of l...

Page 24: ...tool is also used to configure the connection to the Symmetry database for Data Connect This includes the host name or address of the Symmetry server as well as the credentials to use to connect to the database For Host enter the hostname or IP address of the Symmetry server If the ZK Opera Service is running on the same machine as the Symmetry server localhost can be entered If Windows Authentica...

Page 25: ... SSI if the windows account running the Configuration tool has been given access to the DataExportTable within the Amag multiMAXExport database Alternatively if a SQL account has been created for access in the Amag Symmetry database uncheck UseSSI and enter the proper Username and Password to match the Symmetry SQL Server configuration ...

Page 26: ...OP200 Quick Start Guide 23 The Test button in the Configuration tool can be used to test the connection ...

Page 27: ...up but currently the ZK Opera Service must be manually configured for the account that it will run under If SSI is to be used to connect to the Amag Symmetry database see the above section on Symmetry Configuration configure the ZK Opera Service to run under appropriate Windows Account Otherwise the Local System account default is fine ...

Page 28: ... Guide 25 Future versions of the installer may also automatically set this up but please ensure that the service is configured to be restarted on all failures and restarts after 1 minute The service may then be started ...

Page 29: ...ne Things are working properly if Active Badges from Symmetry show up as Credentials on the OP200 Make sure that the ZK Opera Service is running according to the previous instructions in this document Note the Service should be Started and Service Connection should be Online status in the Configuration tool Make sure that the ZK Opera Service is able to connect to the Symmetry database Note the Sy...

Page 30: ...ked There is also a log file relating to the connection between the ZK Opera Service and the primary OP200 that can be viewed for troubleshooting purposes It is the daemon log in C Program Files x86 ZKTeco Opera z9 1 0 SNAPSHOT dist zkoperaserver log Make sure it is really trying to connect to the OP 200 at the address and port that you think it should be as in this example setup where a primary O...

Page 31: ...OP200 Quick Start Guide 28 6 OP 200 Primary Settings on Webserver 6 1 Install the SilkID driver Find Setup ZKBIOOnline SDK application program to install ...

Page 32: ...SL Optional 6 2 1 Certificate Installation Installing the Client xmzkteco local cer is bound with the domain name 127 0 0 1 Therefore use 127 0 0 1 when calling the HTTPS interface Installing the Certificate 1 Double click xmzkteco local cer and install the certificate ...

Page 33: ...OP200 Quick Start Guide 30 2 Install the certificate for all the users 3 Install the certificate to Trusted Root Certification Authorities ...

Page 34: ...OP200 Quick Start Guide 31 4 Complete the installation ...

Page 35: ...OP200 Quick Start Guide 32 6 2 2 Configuring the Firefox Browser Firefox of a higher version requires extra configuration of the certificate 1 Access the Firefox options ...

Page 36: ...OP200 Quick Start Guide 33 2 Display the certificate settings 3 Add the server exception ...

Page 37: ...OP200 Quick Start Guide 34 4 Add the server address to the exception ZKBIOOnline exception settings ISSOnline exception settings ...

Page 38: ...troller to the network or PC start the browser enter the IP address of the reader Then you can visit the Web Server b When Web Server is used User Name and Password should be set firstly The default username is admin and password is pass We can set the relevant parameters by clicking on 1 or 2 1 2 ...

Page 39: ... you can Configure the Reader s name Save 6 3 3 Set Card formats Choose Configuration Card Formats Create Card Format enter Card Format date save to Create a new Card Formats If your card is not 26 bit or your card has different card format you can create a new card format under this menu For example the default 26 bit Wiegand format ...

Page 40: ...OP200 Quick Start Guide 37 6 3 4 Configure Door Settings Choose Configuration Doors Door Edit to set verification mode ...

Page 41: ...OP200 Quick Start Guide 38 ...

Page 42: ...tart Guide 39 6 3 5 Reader Input and Output settings Reader Input Choose Configuration Doors Door Door Door Reader Input Edit to choose Card Formats You can set card format which you want the reader to support here ...

Page 43: ...OP200 Quick Start Guide 40 Reader Output Choose Configuration Doors Door Door Reader Output Edit to choose Card Formats You can set the format of Wiegand output here ...

Page 44: ...t Guide 41 6 3 6 Backup Database Back up the server data or configuration data of the device to the device Choose Administration Backups Backup Now the device backup the data user data and network settings immediately ...

Page 45: ...primary reader Restore and restart Select the backup data you can restore it If the backup data has been downloaded to your pc then you first upload the backup data as following Upload Backup Choose Administration Backups Upload Backup you can insert the data on your computer backed up past times ...

Page 46: ...OP200 Quick Start Guide 43 6 3 7 Personnel management fingerprint registration User Management Choose Access Control Personnel edit that person and enroll fingerprint ...

Page 47: ...OP200 Quick Start Guide 44 We need to register fingerprints three times on the SilkID fingerprint sensor ...

Page 48: ...OP200 Quick Start Guide 45 ...

Page 49: ...OP200 Quick Start Guide 46 The following figure shows enroll fingerprint successfully ...

Page 50: ...s for fingerprint matching if the following recommendations and suggestions are followed We recommend enrolling two index fingers images 3 and 6 or two middle fingers images 2 and 7 Avoid using the thumb ring or little finger for enrollment These fingers are often too difficult to correctly position on the fingerprint sensor and often result in poorer quality fingerprint reads 2 Proper Finger Plac...

Page 51: ...yness or wetness excessive or insufficient pressure or scarring of the skin at the fingertip Figure A 2 DRY WET SCARRED 4 Correcting wet or dry fingerprint images When the temperature is very cold or just after washing hands fingerprints often become very dry In this case the user should moisturize their fingerprint simply by breathing on the fleshy pad of their fingertip prior to placing their fi...

Page 52: ...age will be similar to the dry fingerprint Similar again to a stamp if not enough ink is used the image will be barely recognizable Issues related to moisture and pressure can be easily resolved With a little practice users will get the feel of it When enrolling and authenticating be sure to maintain contact with the fingerprint sensor for a 2 full seconds until the fingerprint reader responds Mos...

Page 53: ...formation and edit the user s fingerprint Enroll the fingerprints on OP 200 Press Select an employee Fingerprint to enroll the fingerprints on OP 200 When shown as Figure 4 the enrollment is successful Verification on OP 200 Notes 1 The OP 200 has to connect to panel and only if the panel has authorization ...

Page 54: ... if the Panel Ack is set to ON but without connection to the panel then you will get Fingerprint Verified but Access Denied message on screen 2 If you do not connect OP 200 to panel then set panel ack to OFF in primary secondary settings interface on the OP 200 ...

Page 55: ... any fingerprints then try the following Make sure finger s are clean and free from cuts or scratches Rub the finger you wish to enroll against your forehead or cheek to obtain more oil from your skin and try again This helps when in dry cold environments Lower the threshold setting on the reader which desensitizes the fingerprint scanner Change from 1 N matching to 1 1 matching 1 1 matching requi...

Page 56: ...ered alarm mode carefully check whether the OP 200 and back plate are securely connected to each other 4 Network Offline If the network is offline you can see icon at the upper right corner Please check the network connection 5 Door does not open Check Wiegand output format settings Check Access Rights in Symmetry software Reader Power Off Check the power supply Reader not connecting Check Network...

Reviews: