background image

MICROWAVE DRAWER

www.zlinekitchen.com

Installation Manual

Summary of Contents for MWD-1

Page 1: ...MICROWAVE DRAWER www zlinekitchen com Installation Manual ...

Page 2: ...nd finishes our inspiration is your reality ZLINE is fueled by a passion for innovation A relentless pursuit of bringing the highest end luxury designs and professional features into everyone s homes Because we continually strive to improve our products we may change specifications and designs without prior notice WARNING This product can expose you to chemicals including nickel which is known to ...

Page 3: ......

Page 4: ...t be extended based on the date of installation The warranty applies only to products installed in the contiguous United States and the District of Columbia Warranty shall not apply and ZLINE Kitchen and Bath is not responsible for damage resulting from negligence improper maintenance misuse abuse alteration of or tampering with the appliance accident natural disaster improper electric supply unau...

Page 5: ...TABLE OF CONTENTS SAFETY INSTRUCTIONS 1 BEFORE INSTALLATION 5 INSTALLATION 10 TRIM KIT INSTALLATION 13 24 OPERATION 20 30 OPERATION 26 TROUBLESHOOTING 32 ...

Page 6: ... soil or cleaner residue to accumulate on sealing surfaces Do not operate the oven if it is damaged It is particularly important that the oven door closes properly and that there is no damage to the Door bent Hinges and latches broken or loosened Door seals and sealing surfaces When using electrical appliances basic safety precautions should be followed To reduce the risk of burns electric shock f...

Page 7: ...ppliance Do not immerse cord or plug in water Keep cord away from heated surface Do not let cord hang over edge of table or counter Do not use paper products when appliance is operated in the toaster mode Do not store this appliance outdoors Do not use this product near water for example near a kitchen sink in a wet basement near a swimming pool or similar locations When cleaning surfaces of door ...

Page 8: ... or circuit breaker panel Do not use the cavity for storage purposes Do not leave paper products cooking utensils or food in the cavity when not in use Do not store any materials other than manufacturer s recommended accessories in this oven when not in use Liquids such as water coffee or tea are able to be overheated beyond the boiling point without appearing to be boiling Visible bubbling or boi...

Page 9: ... short time before removing the container Use extreme care when inserting a spoon or other utensils into the container Oversized food or oversized metal utensils should not be inserted in a microwave oven as they may create a fire or risk of electric shock Do not cover racks or any other part of the oven with metal foil This will cause over heating of the oven Do not use the microwave if the cavit...

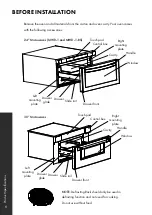
Page 10: ...e oven and all materials from the carton and oven cavity Your oven comes with the following accessories NOTE Defrosting Rack should only be used in defrosting function and not used for cooking Do not use without food BEFORE INSTALLATION Product Specifications 5 A B C D E F G H I J K BEFROE AFTER Control box Control box Right mounting plate Right mounting plate Handle Handle Window Window Drawer fr...

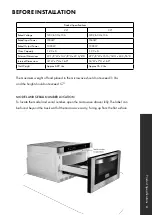
Page 11: ...5 16 H x 24 3 16 D Internal Dimensions 16 W x 7 H x 16 D 16 W x 7 H x 16 D Net Weight Approx 69 9 Lbs Approx 76 2 Lbs The maximum weight of food placed in the microwave should not exceed 1 1 lbs and the height should not exceed 5 7 MODEL AND SERIAL NUMBER LOCATION To locate the model and serial number open the microwave drawer fully The label can be found beyond the back wall of the microwave cavi...

Page 12: ...n cord shall be equal to or greater than the electrical rating of the appliance Touching some of the internal components can cause serious personal injury or death Do not disassemble this appliance Improper use of the grounding can result in electric shock Do not plug into an outlet until appliance is properly installed and grounded A short power supply cord is provided to reduce the risks resulti...

Page 13: ... instructions with the consumer IMPORTANT NOTES TO THE CONSUMER Keep this manual for the future reference With use of any heat generating microwave oven there are certain safety precautions you should follow These are listed in the operation portion of the manual Read all and follow carefully Be sure your microwave drawer is installed and grounded properly by a qualified installer or service techn...

Page 14: ... for proper electrical supply Your oven can be built into a cabinet or wall by itself or under a gas or electric wall oven Be sure that the clearance of the floor between the wall oven and the microwave drawer is a minimum of 2 This microwave drawer can be installed below any electric or gas wall oven It can be installed using an electrical outlet in an adjacent cabinet within the area where the p...

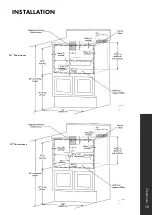
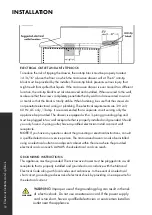
Page 15: ...10 INSTALLATION Clearances 24 Microwaves 30 Microwaves 10 ...

Page 16: ...hat is properly installed and grounded Should you only have a 2 prong outlet have a qualified electrician install a correct wall receptacle NOTE If you have any questions about the grounding or electrical instructions consult a qualified electrician or service person The microwave drawer can also be installed using an electrical outlet in an adjacent cabinet within the area where the provided elec...

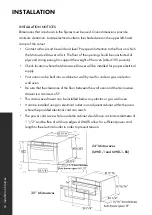
Page 17: ...te the model and serial number open the microwave drawer fully The label can be found beyond the back wall of the microwave cavity facing up from the flat surface Refer to the Operation Manual for cleaning and care instructions DRAWER INSTALLATION MODEL SERIAL NUMBER LOCATION CARE CLEANING MAINTENANCE Figure 4 Figure 5 1 Place the drawer adjacent to the wall or cabinet opening Plug the power suppl...

Page 18: ...ess only TK MWD The trim kit is only available for the MWD 1 The trim kit is included with MWD TK 30 Not available in black stainless TOOLS NEEDED Air screwdriver Marker TOOLS INCLUDED Support beam Buckle seat 1 Screw Front bracket Buckle 2 Screw Rear bracket Trim kit 3 Screw Trim Kit Tools INSTALLATION Trim Kit ...

Page 19: ...screws holding the microwave in place in order to install the front bracket and rear bracket 1 三 Install step 安装步骤 according to front bracket fixing hole marker the support beam position 用记号笔根据前支架安装孔比对出支撑 横梁安装位置 Use 1 Screw fixing support beam 使用长螺丝垂直安装 Remove the screw of microwave oven Install the front bracket and rear bracket 将微波炉原有螺丝 拆卸 将前支架 后支架安装上去 Complete chart 完成图 横梁安装位置 Use 1 Screw fixin...

Page 20: ...框放在橱柜上作出比对 用记号笔画上安 装位置 用 1 螺丝将卡座安装在对应安装位置上 Place the trim kit which install buckle on the cabinet for contrast then use marker strokes to draw the mounting position 好卡扣的外观框放在橱柜上作出比对 用记号笔画上安 螺丝将卡座安装在对应安装位置上 Place the trim kit which install buckle on the cabinet for contrast then use marker strokes to draw the mounting position 将安装好卡扣的外观框放在橱柜上作出比对 用记号笔画上安 装位置 用 1 螺丝将卡座安装在对应安装位置上 Use 2 screws to inst...

Page 21: ... beam Figure 2 Trim Kit Installation Push the microwave which had install bracket into the slot in the rear bracket by extending the support beam picture 1 将预装好的微波炉顺延着支撑横梁推到后支架卡槽内为止 如图一 Use 3 screw to fix the front bracket and support beam picture 2 再用 3 螺丝安装前支架与支撑横 梁对应孔位 如图二 complete Picture 1 Picture 2 Figure 1 Figure 2 2 1 INSTALLATION Trim Kit ...

Page 22: ...17 7 Insert the trim kit into the corresponding buckle seat Insert the trim kit into the corresponding buckle seat 将 预装好外观框卡进对应卡扣座里 Finish Trim Kit Installation INSTALLATION Trim Kit ...

Page 23: ...t branch circuits CAUTION UTENSILS Tightly closed utensils could explode Closed containers should be opened and plastic pouches should be pierced before cooking See the instructions on materials you can use in microwave oven or to be avoided in microwave oven There may be certain non metallic utensils that are not safe to use for microwaving If in doubt you can test the utensil in question by foll...

Page 24: ...bing fat Use with supervision for a short term cooking only Parchment and wax paper Use as a cover to prevent splattering or a wrap for steaming Plastic Microwave safe only Follow the manufacturer instructions Should be labeled Microwave Safe Some plastic containers soften as the food inside gets hot Boiling bags and tightly closed plastic bags should be slit pierced or vented as directed by packa...

Page 25: ...r is fully opened Press CLOSE button to close the drawer and the screen displays CLOSE The screen will display the current time or 00 00 when the drawer is fully closed If there are mistakes to open or close the drawer buzzer will sound five times and the screen will display OPEN OR CLOSE CLOCK SETTING Press CLOCK KITCHEN TIMER button once The first hour figure will flash and other 0 will light Pr...

Page 26: ...n Timer MICROWAVE COOKING FUNCTION 1 1 power levels are available Press TIME COOK button Screen will display 00 00 FUNCTION will light Press number buttons to input the cooking time The maximum cooking time is 99 minutes 99 seconds Press POWER button to set the power The default power level is PL100 Press number buttons to select different power levels Press START 30SEC to start cooking Buzzer sou...

Page 27: ...to start defrosting Buzzer sounds once The defrosting time begins to count down When cooking finished buzzer sounds five times and FINISH displays TIME DEFROST FUNCTION Press DEFROST TIME button Screen displays TIME DEFROST And FUNCTION will light Press number buttons to enter the defrosting time between 00 01 99 99 Press START 30SEC to start defrosting Buzzer sounds once The defrosting time begin...

Page 28: ... Screen displays BUTTER AUTO MENU indicator will light Continue to press MELT button BUTTER CHOCOLA CHEESE or MARSHMA will display in order Press START 30SEC to confirm the selection Press MELT button to select the weight OZ will light except butter menu Press START 30SEC to start cooking Buzzer sounds once OZ will go out The cooking time begins to count down When cooking finished buzzer sounds fi...

Page 29: ...ut The cooking time begins to count down When cooking finished buzzer sounds five times and FINISH displays BUZZER ON OFF MUTE Press SETUP button Screen displays BUZ OFF Press START 30SEC button The oven will turn to waiting state Buzzer is turned off No beep will sound Press SETUP button Screen displays BUZ ON Press START 30SEC button The oven will turn to waiting state Buzzer is turned on Buzzer...

Page 30: ...tton to inquire the microwave power The current microwave power will display for 3 seconds OTHER SPECIFICATIONS The buzzer sounds once by efficient press inefficient press will be no response In cooking state OPEN cannot be pressed to open the drawer unless STOP CANCEL button is pressed to pause the cooking Press CLOSE button to close the drawer Then START 30SEC button must be pressed to continue ...

Page 31: ...lay PLEASE CLOSE when the drawer is fully opened Press CLOSE button to close the drawer The screen will display the current time or 00 00 when the drawer is fully closed If there are mistakes to open or close the drawer buzzer will sound five times and the screen will display OPEN OR CLOSE CLOCK SETTING Press TIMER CLOCK button twice 12 00 will flash Press number keys to set the clock it should be...

Page 32: ...9 99 COOK POWER Press POWER LEVEL once and then to confirm and then press POWER LEVEL repeatedly or press number key to set the power level Press START 30SEC to start cooking If no power level is set the default power level is PL10 Level 10 9 8 7 6 5 4 3 2 1 Power 100 90 80 70 60 50 40 30 20 10 Display PL10 PL09 PL08 PL07 PL06 PL05 PL04 PL03 PL02 PL01 ADD 30 SEC In waiting state instant cooking at...

Page 33: ...IME DEFROST FUNCTION Press DEFROST TIME button Screen displays defrost icon and 00 00 will light Press number buttons to enter the defrosting time between 00 01 99 99 Press START 30SEC to start defrosting NOTE The defrosting power level is PL03 It cannot be changed The buzzer will sound twice to remind you of turning over the food during defrosting POPCORN Press POPCORN to start cooking directly S...

Page 34: ...SEC to start cooking MELT In waiting state press MELT once 1 buTT will display Press MELT repeatedly to choose the menu Press 1 or 2 to choose the correspond weight Press START 30SEC to start cooking Potato Sc 1 Chicken Sc 2 Fish Sc 3 Ground meat Sc 4 Fresh veggies Sc 5 Frozen veggies Sc 6 Canned veggies Sc 7 Menu Display Weight Butter Margarine 1 buTT 1 stick 2 buTT 2 stick 3 buTT 3 stick Chocola...

Page 35: ... 00 01 99 99 Press POWER LEVEL once and then to confirm and then press POWER LEVEL repeatedly or press number key to set the power level Press START 30SEC to start cooking NOTE The defrost function only could be one stage of the multiple cook Two stage cook can be set at most BUZZER ON OFF To enter silent mode Press MUTE button Screen displays silent icon To cancel silent mode In silent mode press...

Page 36: ...reen will display UnLo ECO MODE To enter eco mode When the oven door is closed in waiting state if there is not any operations in 1 minute When in eco mode the stand by power will be 0 9W To cancel eco mode In eco mode open the door or press any key to cancel it INQUIRING FUNCTION In cooking state press TIMER CLOCK button to check the clock The current time will display for 3 seconds at most OPERA...

Page 37: ... operated when empty Do not operate with oven empty Spilled food is in the cavity Clean cavity with wet towel Certain foods high in iron can cause a spark Example Broccoli potatoes butter etc Improper defrosting Materials to be avoided in microwave oven were used Use microwave safe cookware only Cooking time power level is not suitable Use correct cooking time power level Food is not turned or sti...

Page 38: ...food Overcooked food Cooking time and or power level is not suitable Use correct cooking time and or power level Undercooked food Materials to be avoided in microwave were used Use microwave safe cookware only Oven ventilation ports are restricted Check to see that oven ventilation ports are not restricted Cooking time and or power level is not suitable Use correct cooking time and or power level ...

Page 39: ...zlinekitchen com 1 614 777 5004 contact zlinekitchen com 2 5 0 ...

Reviews: