
Wi-Fi installs only
• MS Windows only: close any popup windows
that open after connecting the iAquaLink
device to the computer (step 1.1-C)
• A security warning may pop up. Ignore it and
proceed.
• After step 1.1-D (above), the setup tool should
indicate successful programming of the
iAquaLink. If not, repeat steps 1.1-C and 1.1-D.
Wi-Fi installe uniquement
• MS Windows only: close any popup windows
that open after connecting the iAquaLink
device to the computer (step 1.1-C)
• A security warning may pop up. Ignore it and
proceed.
• After step 1.1-D (above), the tool should
indicate successful programming of the
iAquaLink. If not, repeat steps 1.1-C and 1.1-D.
Wi-Fi se instala únicamente
• MS Windows only: close any popup windows
that open after connecting the iAquaLink
device to the computer (step 1.1-C)
• A security warning may pop up. Ignore it and
proceed.
• After step D (above), the tool should indicate
successful programming of the iAquaLink. If
not, repeat steps 1.1-C and 1.1-D.
Wi-Fi installs only
The iAquaLink device uses Wi-Fi standard
802.11b for maximum range and broadest
compatibility with most residential Wi-Fi
routers and wireless access points. Some
Wi-Fi routers or access points may require “b”
mode be enabled in order to communicate with
the iAquaLink Device. Every router is different
– please see router instructions for help.
Wi-Fi installe uniquement
The iAquaLink device uses Wi-Fi standard
802.11b for maximum range and broadest
compatibility with most residential Wi-Fi
routers and wireless access points. Some
Wi-Fi routers or access points may require “b”
mode be enabled in order to communicate with
the iAquaLink Device. Every router is different
– please see router instructions for help.
Wi-Fi se instala únicamente
The iAquaLink device uses Wi-Fi standard
802.11b for maximum range and broadest
compatibility with most residential Wi-Fi
routers and wireless access points. Some
Wi-Fi routers or access points may require “b”
mode be enabled in order to communicate with
the iAquaLink Device. Every router is different
– please see router instructions for help.
iAquaLink.com/SSID
Wi-Fi
setup tool
i
Helpful hints
| Conseils pratiques |
Consejos útiles
How It Works
Comment cela fonctionne-t-il? | Cómo funciona
WARNING ⁄ AVERTISSEMENT ⁄ ADVERTENCIA
FOR YOUR SAFETY - This product must be installed and serviced by a contractor who is
licensed and qualified in pool equipment by the jurisdiction in which the product will be
installed where such state or local requirements exist, the maintainer must be a professional
with sufficient experience in pool equipment installation and maintenance so that all of the
instructions in this manual can be followed exactly. Before installing this product, read and
follow all warning notices and instructions that accompany this product. Failure to follow
warning notices and instructions may result in property damage, personal injury, or death.
Improper installation and/or operation will void the warranty. Improper installation and/or
operation can create unwanted electrical hazard which can cause serious injury, property
damage, or death. Turn off power at the main circuit feeding the AquaLink power center to
disconnect the power center from the system.
POUR VOTRE SÉCURITÉ - ce produit doit être pris en charge par une entreprise qui est autorisée et qualifiée pour
la réparation des équipements de piscine par la juridiction où le dit produit est installé lorsque de telles exigences
locales ou provinciales sont édictées, la personne responsable de l’entretien doit être un professionnel avec
une expérience suffisante dans l’installation et l’entretien d’équipement de piscine pour suivre exactement les
instructions contenues dans ce guide. Avant d’installer ce produit, lisez et respectez toutes les consignes de
mise en garde et les instructions incluses avec ce produit. Le non-respect des avertissements et des instructions
pourrait résulter en des dommages matériels, des blessures graves ou même la mort. L’installation ou l’utilisation
inappropriée annulera la garantie. L’installation ou l’utilisation inappropriée peuvent créer un danger électrique
indésirable qui peut provoquer des blessures graves, des dommages à la propriété ou la mort. Coupez l’électricité
au niveau de l’alimentation principale de l’AquaLink pour débrancher le tableau d’alimentation du système.
PARA SU SEGURIDAD - Este producto se debe ser instalado y mantenido por un contratista que sea autorizado
y calificado en el equipo de la piscina por la jurisdicción en la cual el producto será instalado donde existen
requisitos estatales o locales. En el caso que ningun requisito del estado o local exista, el instalador o el personal
de mantenimiento debe ser un profesional con suficiente experiencia en la instalación y el mantenimiento de
equipo de piscina para poder seguir todas las instrucciones de este manual exactamente. Antes de instalar este
producto, lea y siga todos los avisos e instrucciones que acompañen este producto. La falta de seguir avisos e
instrucciones puede dar lugar a daños materiales, a daños corporales, o a muerte. La incorrecta instalación y/o
la operación anularán la garantía. La incorrecta instalación y/o la operación pueden crear el peligro eléctrico
indeseado que puede causar lesión, daños materiales, o muerte. Apague la energía electrica en el circuito
principal que alimenta el centro de control AquaLink para desconectar el centro de control del sistema.
CAuTIoN ⁄ MISE EN GARDE ⁄ PRECAuCIÓN
If replacing the CPU board go to Clear Memory in the System Setup menu and clear the memory.
To avoid damages caused by static electricity, handle the PCB by its edges only. Avoid touching
any electronics components with your fingertips. Do not replace the PCB in the rain.
Pour éviter des dommages causés par l’électricité statique, manipuler uniquement la carte de circuit imprimé par
les extrémités. Éviter de toucher les composants électroniques avec vos doigts. Ne pas remplacer la carte de circuit
imprimé sous la pluie.
Para evitar los daños causados por la electricidad estática, manipule el PCB sosteniéndolo únicamente por sus
bordes. Evite tocar cualquier componente electrónico con las puntas de los dedos. No cambie el PCB bajo la lluvia.
1. Network the iAquaLink device
Se connecter Brancher l’iAqualink à son bloc
d’alimentation
Conexión Conecte iAqualink al tablero de
alimentación eléctrica de iAqualink
2. Install the iAquaLink device to the power center
Configurer Intégration de l’appareil dans le
réseau du client
e
ConfiguraciónIncorporación del dispositivo en la
red del consumidor
3. Create a user account at iAquaLink.com , log in
and begin enjoying iAquaLink
Configurer votre nom d’utilisateur et mot de passe
au www.iAquaLink.com
Configure el nombre de usuario y la contraseña
en www.iAquaLink.com
With a web browser, download & run the
WiFi setup tool from iAquaLink.com/SSID
With a web browser download & run the
WiFi setup tool from iAquaLink.com /SSID
With a web browser download & run the
WiFi setup tool from iAquaLink.com/SSID
iAquaLink.com/SSID
Interface
Votre routeur Internet
Su enrutador de Internet
Internet user Account
FR Internet User
Account
SP Internet User
Account
Your Internet Router
Votre routeur Internet
Su enrutador de Internet
iAquaLink Web
Connect Device
Appareil de connexion
Web iAquaLink
Dispositivo de conexión
a Internet iAquaLink
Aqualink
®
Power Center
Bloc d’alimentation
Aqualink
Alimentación
eléctrica Aqualink
Pools System
Système pour piscine
Sistema para piscinas
1
•
2
•
3 Installation
Installation 1
•
2
•
3 | Instalación 1
•
2
•
3
1
Network the iAquaLink Device Go to step 1.1 or 1.2
FR Network the iAquaLink Device
Go to step 1.1 or 1.2
|
SP Network the iAquaLink Device
Go to step 1.1 or 1.2
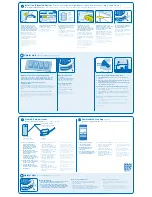
1.1
WiFi Network Connection option | Sans fil — configuration à l’aide d’un ordinateur |
Inalámbrica, configuración mediante computadora
Remove the device lid by removing the
two screws.
Retirer le couvercle de l’appareil en
enlevant les deux vis.
Retire la tapa del dispositivo al quitar los
dos tornillos.
Locate the WiFi/WIRED switch and ensure
it is in the WiFi position.
Localiser l’interrupteur WI-FI/WIRED et
s’assurer qu’il est à la position WI-FI.
Ubique el interruptor WI-FI/WIRED
(inalámbrico/por cable) y asegúrese de que
esté en la posición WI-FI (inalámbrico).
Attach the iAquaLink device to an internet
connected PC or Mac® with a uSB cable.
Attach the iAquaLink device to an internet
connected PC or Mac® with a USB cable.
Attach the iAquaLink device to an internet
connected PC or Mac® with a USB cable.
After programming the device with the
network SSID & Key, replace the rubber
gasket & cover.
After programming the device with the
network SSID & Key, replace the rubber
gasket & cover.
After programming the device with the
network SSID & Key, replace the rubber
gasket & cover.
A
B
C
D
E
Wi-Fi
setup tool
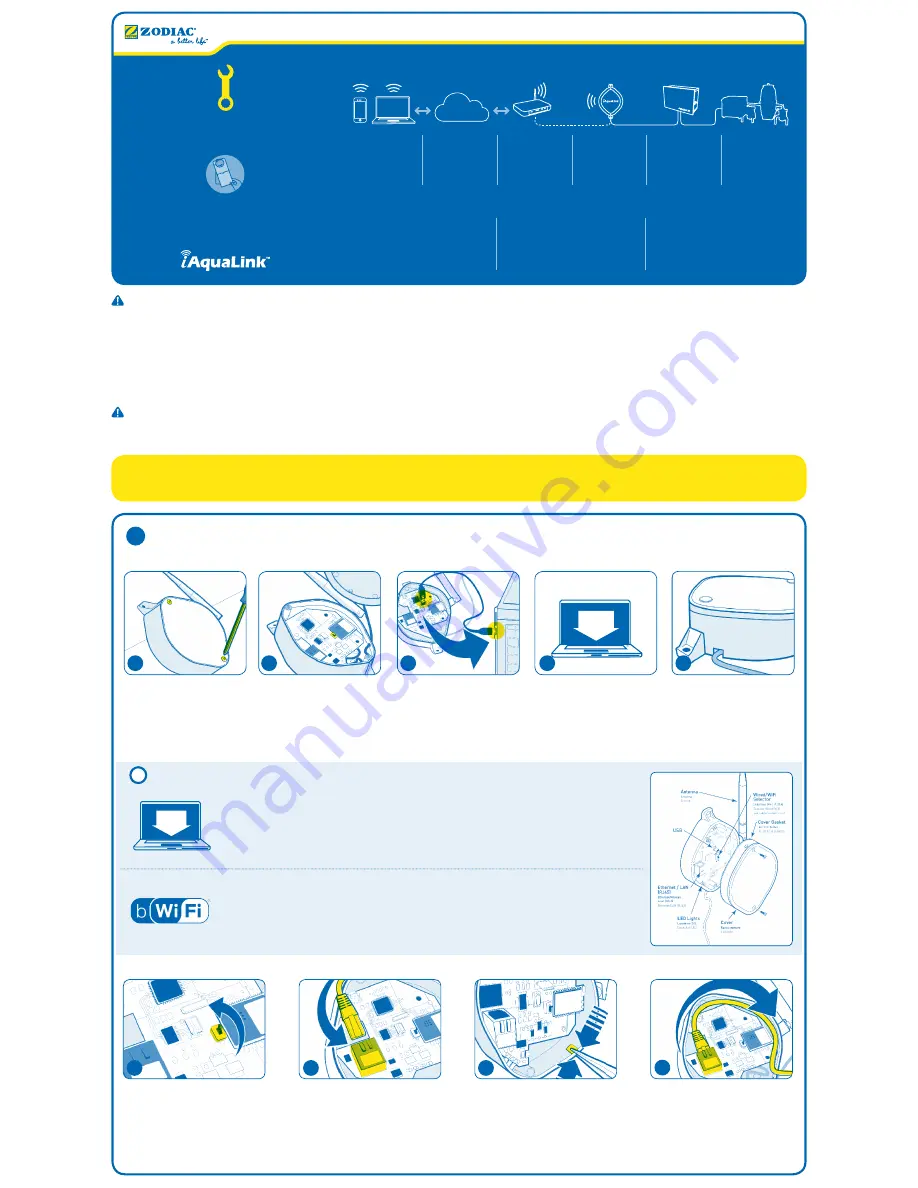
1.2
Wired (Ethernet) Network Connection option | FR Wired (Ethernet) Network Connection |
SP Wired (Ethernet) Network Connection
Remove the device lid by removing the two
screws. Locate the WiFi/WIRED switch and
ensure it is in the WIRED position.
Retirer le couvercle de l’appareil en enlevant les
deux vis. Localiser l’interrupteur WI-FI/WIRED et
s’assurer qu’il est à la position WIRED.
Retire la tapa del dispositivo al quitar los dos
tornillos. Ubique el interruptor WI-FI/WIRED
(inalámbrico/por cable) y asegúrese de que esté
en la posición WIRED (por cable).
using an Ethernet cable, connect the device to
the home network’s router.
À l’aide d’un câble Ethernet standard, brancher
l’une des extrémités du câble au raccord sur
le panneau de l’appareil. Connecter l’autre
extrémité au routeur de réseau domestique.
Con el cable de Ethernet estándar, conecte un
extremo del cable al conector del
tablero del dispositivo.
Conecte el otro extremo al enrutador de red local.
Remove device lid and gasket by removing
the two screws.
Pour permettre au câble de sortir de l’appareil,
empoigner la partie détachable et effectuer un
mouvement de va-et-vient jusqu’à ce qu’elle cède.
Para permitir que el cable salga del dispositivo,
sujete la pieza separable y muévala hacia
adelante y atrás hasta que se quiebre.
Wrap the cable as shown inside the device and
use the break-away as an exit hole. Replace the
rubber gasket & cover.
Enrouler le câble comme illustré à l’intérieur
de l’appareil, puis utiliser la partie détachée
comme trou de sortie. Repositionner le boîtier
d’étanchéité et les deux vis.
Enrolle el cable como se muestra dentro del
dispositivo y utilice la separación como orificio de
salida.
Vuelva a colocar la cubierta de la junta y
los dos tornillos.
A
B
C
D
INTERNET
Quick Start Guide
Guide de démarrage rapide | Guía de inicio rápido
IMPoRTANT | IMPoRTANT | IMPoRTANTE
Give doorhanger directly to pool owner or hang on door
Donner l’affichette de porte directement au propriétaire de
la piscine ou l’accrocher sur la porte
E
ntregue el gancho para la puerta directamente al propietario
de la piscina o cuélguelo en la puerta
!
Installation manual (H0364100) and owners manual
(H0364200), available online at www.iAquaLink.com or by
calling: uSA: 1-800-822-7933 | Canada: 1-888-647-4004 |
Australia 1800.688.552
Manuel d’installation complet (H0364100) et Manuel du propriétaire
(H0364200), disponible en ligne au www.iAquaLink.com ou en appelant
au: USA: 1-800-822-7933 | Canada: 1-888-647-4004 |
Australia 1800.688.552
El Manual de Instalación (H0364100) y el Manual del Usuario
(H0364100), están disponibles en la pagina web www.iAquaLink.com
o llamando: USA: 1-800-822-79
33 | Canada: 1-888-647-4004 |
Australia 1800.688.552


