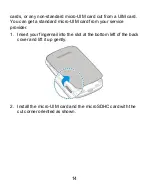
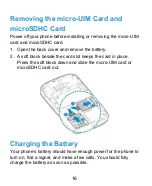
background image


Z233VL 

User Manual 


Summary of Contents for Z233VL

Page 1: ...1 Z233VL User Manual ...

Page 2: ...e modifications on print errors or update specifications in this guide without prior notice This manual has been designed with the utmost care to ensure the accuracy of its content However all statements information and recommendations contained therein do not constitute a warranty of any kind either expressed or implied Please refer to For Your Safety to be sure to use your phone properly and saf...

Page 3: ...rks of Google Inc The Bluetooth trademark and logos are owned by the Bluetooth SIG Inc and any use of such trademarks by ZTE Corporation is under license microSDHC Logo is a trademark of SD 3C LLC Qualcomm Snapdragon processors are products of Qualcomm Technologies Inc Qualcomm and Snapdragon are trademarks of Qualcomm Incorporated registered in the United States and other countries Used with perm...

Page 4: ...4 Version No R1 0 Edition Time September 22 2016 Manual No WARNING This product contains a chemical known to the State of California to cause cancer birth defects or other reproductive harm ...

Page 5: ...Off 18 Setting Up for the First Time 18 Getting to Know the Home Screen 19 Personalizing 20 Changing the System Language 20 Setting the Date and Time 20 Changing Ringtone and Notification Sound 21 Turning On Off System Sounds 21 Adjusting Volume 22 Switching to Silent or Vibration Mode 22 Applying New Wallpapers 23 Changing Screen Brightness 23 Protecting Your Phone With Screen Lock 23 Protecting ...

Page 6: ...Connecting to Your Computer via USB 36 Phone Calls 38 Placing and Ending Calls 38 Answering or Rejecting Calls 39 Working With the Call History 40 Calling Your Contacts 41 Checking Voicemail 41 Using Options During a Call 42 Managing Multi party Calls 43 Adjusting Your Call Settings 44 Contacts 49 Checking Contact Details 49 Searching for a Contact 49 Adding a New Contact 49 Setting Up Your Own Pr...

Page 7: ...ettings 59 Calendar 60 Viewing Your Calendars and Events 60 Creating an Event 61 Editing Deleting or Sharing an Event 61 Changing Calendar Settings 61 Web Browser 62 Opening the Browser 62 Setting the Homepage 62 Adding a Website to Bookmarks 63 Viewing the Browsing History 63 Changing Browser Settings 64 Camera 65 Capturing a Photo 65 Recording a Video 66 Customizing Camera Camcorder Settings 67 ...

Page 8: ...ying Music 71 Managing Playlists 73 Video Player 74 Opening the Video Library 74 Playing and Controlling Videos 74 Managing Video Files 75 FM Radio 76 Scanning and Saving Channels 76 Listening to FM Radio 76 Deleting a Saved Channel 77 Other Options 77 Sound Recorder 78 Recording a Voice Memo 78 Playing a Voice Memo 78 More Apps 79 Clock 79 ...

Page 9: ...roubleshooting 90 For Your Safety 95 General Safety 95 Radio Frequency RF Energy 96 FCC Regulations 98 Hearing Aid Compatibility HAC Regulations for Mobile Phones 99 CTIA Requirements 101 Distraction 103 Product Handling 103 Electrical Safety 107 Radio Frequency Interference 108 Explosive Environments 110 Specifications 111 ...

Page 10: ...Your Phone Earpiece Internal screen Navigation keys Up Down Left Right key Right soft key Center key Left soft key Send key Power end key Recent apps key Clear key Camera key Vibration mode key Main microphone Charging micro USB jack key ...

Page 11: ...11 Volume key Camera External screen Auxiliary microphone Speaker Headset jack Back cover ...

Page 12: ...bottom line of the display The options change depending on the application function being used Navigation keys Up Down Left Right key Press in the home screen to access designated functions Press to navigate options on the display or move the cursor in a text field Center key Press to make selections or perform the command displayed at the bottom center of the display Send key Press in the home sc...

Page 13: ...ion mode In a text editing screen press or hold to change input mode key Press and hold in the home screen to enter In a text editing screen press and hold to change the input language Volume key Press or hold either end of the key to turn the volume up or down Installing the micro UIM Card and microSDHC Card Not Included Power off your phone before installing or removing the micro UIM card and mi...

Page 14: ...M card You can get a standard micro UIM card from your service provider 1 Insert your fingernail into the slot at the bottom left of the back cover and lift it up gently 2 Install the micro UIM card and the microSDHC card with the cut corner oriented as shown ...

Page 15: ...5 3 Insert the battery by aligning the metal contacts on the battery with the metal contacts in the battery compartment Gently push down on the battery until it clicks into place 4 Replace the back cover ...

Page 16: ...ack cover and remove the battery 2 A soft block beside the card slot keeps the card in place Press the soft block down and slide the micro UIM card or microSDHC card out Charging the Battery Your phone s battery should have enough power for the phone to turn on find a signal and make a few calls You should fully charge the battery as soon as possible ...

Page 17: ...the adapter to the charging jack 2 Connect the charger to a standard AC power outlet If the phone is on you ll see a charging icon such as or appear on the status bar 3 Disconnect the charger when the battery is fully charged NOTE If the battery is extremely low you may be unable to power on the phone even when it is being charged In this case try again ...

Page 18: ...t time Lower the screen brightness Turn Bluetooth off when not in use Disable the GPS function when not in use Most applications using this function will periodically query the GPS satellites for your current location and each query drains your battery Powering On Off Press and hold the Power end key to turn on your phone To turn it off press and hold the Power end key to open the options menu and...

Page 19: ...ect the language and then follow the prompts to set up your phone Getting to Know the Home Screen The home screen is the starting point for your phone s applications functions and menus Status bar Contacts Open the app list Messages ...

Page 20: ...ime time zone and time format To adjust the date and time automatically turn on Automatic date time To adjust the date and time manually turn off Automatic date time and select Set date Set time to change the date and time To adjust the time zone automatically turn on Automatic time zone To adjust the time zone manually turn off Automatic time zone and select Select time zone to set the correct ti...

Page 21: ...ication ringtone and press the Center key 4 Select the ringtone you want to use and press the Center key 5 Press the Left soft key to save the setting NOTE See Adding a New Contact for how to assign a special ringtone to an individual contact Turning On Off System Sounds 1 From the home screen select Settings Profiles 2 Select General and press the Left soft key 3 Select Silent power on off Vibrat...

Page 22: ... volume or the earpiece volume during a call Switching to Silent or Vibration Mode You can set the phone to silent or vibration mode by using one of the following methods Press the Volume key when no media application is active to show the volume management window Keep pressing the Volume down key to switch the phone to vibration mode Press the key again in vibration mode to switch the phone to si...

Page 23: ... Brightness 1 From the home screen select Settings General settings Display Brightness level 2 Press the Left Right key to adjust the screen brightness Protecting Your Phone With Screen Lock You can protect your phone by creating a screen lock When it is enabled you need to enter a numeric PIN to unlock the phone s screen and keys 1 From the home screen select Settings Personal Security Screen loc...

Page 24: ...IM card should be installed in your phone and you should remember the Anti Theft password and the trusted email address you set To turn on the Anti Theft feature 1 From the home screen select Settings Personal Security Anti Theft 2 Select the on off switch and press the Center key 3 Enter your screen lock PIN and press the Center key If the PIN has not been set you must set one 4 Enter the Anti Th...

Page 25: ...ture is enabled Press the Left soft key and select Configuration from the Anti Theft screen input the Anti Theft password and then change the options To control your lost phone remotely You can use your trusted email address to send the following commands to phonenumber vtext com to control your lost phone remotely NOTE phonenumber is your lost phone number or the new number The new number will be...

Page 26: ...ject To turn off the Anti Theft feature 1 From the home screen select Settings Personal Security Anti Theft 2 Select the on off switch and press the Center key 3 Select OK and press the Center key 4 Input the Anti Theft password and press the Center key ...

Page 27: ... icons on the right side Below are some of the icons you may see 3G connected No signal LTE connected Signal strength Vibration mode Mobile data in use Silent mode Airplane mode Battery extremely low Bluetooth on Battery low Speaker on Battery partially drained Phone microphone off Battery full GPS on Battery charging Alarm set ...

Page 28: ...SMS New MMS USB connected Missed call Wired headset connected Call in progress Song playing Checking External Screen Icons You can also check the phone status and notification alerts with different icons on the external screen Below are some of the icons and their meanings New message No signal Missed call Signal strength Battery level Airplane mode Alarm set ...

Page 29: ...ictive Text Mode T12 abc T12 Abc T12 ABC The predictive text mode T12 abc T12 Abc T12 ABC is based on a built in dictionary and generates words from the combination of letters pressed Press each key once that corresponds to the letter you want to enter The letters are shown on the display as they are entered The list of candidate words changes as each key is pressed When the candidate words are di...

Page 30: ...uickly to enter the second letter and so on Press the 0 key to insert a space or press the key to select symbols NOTE When using Abc mode only the first letter will be capitalized After entering the first capital letter Abc mode will be changed to abc mode automatically Enter Numbers In numeric mode 123 you can enter numbers directly using the number keys Enter Symbols 1 Press the key 2 Use the Na...

Page 31: ...the Navigation keys and the Center key to select and open an app Switch Between Recently Opened Apps 1 Press the Recent apps key The apps you ve used recently are displayed in a series of tabs Use the Navigation keys to scroll up and down to see all the tabs 2 Select a tab and press the Center key to open that app NOTE Select Clear all to remove all tabs ...

Page 32: ... the switch To get data services when roaming 1 From the home screen select Settings General settings Mobile networks 2 Select Data roaming and press the Center key to turn on the switch if it is turned off NOTE Data roaming may incur significant roaming charges Set Access Point Names To connect to the Internet you can use the default Access Point Names APN And if you want to add a new APN please ...

Page 33: ...Bluetooth Devices Bluetooth is a short range wireless communication technology Phones or other devices with Bluetooth capabilities can exchange information wirelessly within a distance of about 30 feet The Bluetooth devices must be paired before the communication is performed Turn Bluetooth On Off 1 From the home screen select Settings General settings Bluetooth 2 Select the Bluetooth switch and p...

Page 34: ...f all available Bluetooth devices in range You could select Refresh if you want to scan again 3 Select the device you want to pair with and press the Center key 4 Confirm that the Bluetooth passkeys are the same between the two devices and press the Center key Alternately enter a Bluetooth passkey and press the Center key Pairing is successfully completed when the other device accepts the connecti...

Page 35: ...e Center key 3 Press the Right soft key Send Data via Bluetooth 1 Open the appropriate application and select the file or item you want to share 2 Select the option for sharing via Bluetooth The method may vary by application and data type 3 Select a Bluetooth device the phone has paired with or wait for it to search for new devices and select one of them 4 Press the Center key to send the data Re...

Page 36: ...card Connect Your Phone to a Computer via USB 1 Connect your phone to the PC with a USB cable 2 Choose one of the following options Charge only Charge your phone via USB Install driver Install the driver needed for some USB connection modes such as MTP You only need to install the driver on the same PC once NOTE You can also install the driver on PC by running the executable file in the new CD ROM...

Page 37: ...ck it Disconnect Your Phone From the Computer To disconnect the phone from the computer simply unplug the USB cable when you re finished Erase the microSDHC Card 1 From the home screen select Settings Device Storage 2 Select Erase SD card OK CAUTION The formatting procedure erases all the data on the microSDHC card after which the files CANNOT be retrieved ...

Page 38: ...story Press the Clear key to delete any incorrect digits 3 Press the Send key to call the number you entered Or select the matching record and press the Send key to call the contact or history number NOTES To make an international call press and hold the key to enter the plus symbol Next enter the country code followed by the city area code and then the phone number To call an extension enter the ...

Page 39: ...et Phone Flip Action NOTE To silence the ringer before answering the call you can press either end of the Volume key Reject a Call When you receive a phone call press the Power end key or the Right soft key to reject the call Select Message reject to reject the call and send a text message to the caller NOTE You can also reject a call by closing the phone flip See Set Phone Flip Action NOTE To edi...

Page 40: ... history 2 Select a listing and press the Send key to call back NOTE You can use the Navigation keys to select missed outgoing or incoming to filter the records by call type Add a Number From Call History as a Contact 1 Open the call history 2 Select a phone number and press the Center key 3 To add the number to an existing contact select Update existing contact and choose a contact in the list To...

Page 41: ...ete all history records Calling Your Contacts 1 From the home screen select Contacts 2 Select the tab to view all your contacts 3 Select a contact and press the Center key 4 Select the contact number and press the Send key to make a call Checking Voicemail If you have set the phone to divert calls to voicemail callers can leave voicemail messages when they cannot reach you Here s how to check the ...

Page 42: ... off the speaker Press the Right soft key to mute or unmute your microphone Select Add call to make another call separately from the first call which is put on hold Select Swap to put the caller you are speaking to on hold and switch to the other call that has been put on hold Select Merge calls to merge the separate calls into a single conference call Select End Call or press the Power end key to...

Page 43: ...and another call comes in your phone screen informs you and displays the caller ID To respond to an incoming call while you re on a call Press the Send key or the Center key to answer the call This puts the first caller on hold and answers the second call Press the Power end key or the Right soft key to reject the second call Select Message reject to reject the second call and send a text message ...

Page 44: ...all and are the first to hang up all callers are disconnected To end the conference call press the Power end key Adjusting Your Call Settings Set Speed Dials You can press and hold the 1 9 keys in the home screen to call the corresponding speed dial number The number key 1 is reserved to speed dial your voicemail To assign a speed dial key 1 From the home screen select Settings Device Call setting...

Page 45: ...ication Forward Incoming Calls Call forwarding feature allows you to forward your incoming calls to another phone number 1 From the home screen select Settings Device Call settings Carrier Setting Call forwarding 2 Select an available option to enable it Other Options 1 From the home screen select Settings Device Call settings Carrier Setting Additional settings 2 The following options are availab...

Page 46: ... compatible device A TTY device can allow people who have hearing or speech disabilities to communicate by telephone Simply connect the TTY device to the phone s headset jack Select a TTY mode for your phone to work with a TTY device or turn TTY off 1 From the home screen select Settings Device Call settings TTY mode 2 Select one of the following options Consult your teletypewriter manufacturer s ...

Page 47: ...il to answer the phone it will help you hear more clearly during the phone call 1 From the home screen select Settings Device Call settings 2 Check Hearing aids to turn on hearing aid compatibility CAUTION Do not turn on the Hearing aids option unless you use a hearing aid with a telecoil Using this setting without a hearing aid or with a hearing aid without a telecoil may be harmful to your heari...

Page 48: ...omatically Select Auto answer conditions and press the Center key to set the auto answer condition for your wired or Bluetooth headset Edit Quick Response to Rejected Callers 1 From the home screen select Settings Device Call settings Quick responses 2 Select a text message and press the Center key to edit it ...

Page 49: ...croll through the list to view all your contacts 3 Select a contact and press the Center key to view its details Searching for a Contact 1 From the home screen select Contacts and select the tab to access your contact list 2 In the search field below input the contact name phone number or any information the contact has to search for it The contacts matched will be listed Adding a New Contact 1 Fr...

Page 50: ...ial ringtone or notification ringtone to the contact 4 Select ADD ANOTHER FIELD at the bottom and press the Center key to enter more information 5 Select Done to save the contact Setting Up Your Own Profile You can create your own name card in your phone 1 From the home screen select Contacts and select the tab to access your contact list 2 Select Set up my profile and press the Center key 3 Edit ...

Page 51: ... 1 From the home screen select Contacts 2 Select Import Export Import from storage 3 If prompted choose to import one multiple or all vCard files in the microSDHC card or the phone storage 4 If prompted press the Center key to import the contacts Export Contacts to the Phone Storage or the microSDHC Card 1 From the home screen select Contacts 2 Select Import Export Export to storage 3 The phone wi...

Page 52: ...n prompts to send the vCard file Editing Contacts Edit Contact Details 1 From the home screen select Contacts 2 Select a contact you need to edit and press the Center key 3 Press the Center key 4 Edit the contact and select Done Delete Contacts 1 From the home screen select Contacts and select the tab to access your contact list 2 Select Multi Select 3 Check the contact you want to remove and then...

Page 53: ...key 6 Select Done The information from the second contact is added to the first contact and the second contact is no longer displayed in the contacts list You can repeat these steps to join another contact to the main contact Separate Contact Information If contact information from different sources was joined in error you can separate the information back into individual contacts on your phone 1 ...

Page 54: ... you have created 3 Select a group and press the Center key to view its members NOTE To send a message to all or some of the group members you can select Send Group message after you open the group Set Up a New Group 1 From the home screen select Contacts and select the tab 2 Select Create group to create a new group 3 Select the Group s name field and enter the group name 4 Select below MEMBER an...

Page 55: ...p Delete a Group 1 From the home screen select Contacts and select the tab 2 Select a group and press the Center key 3 Select Delete Group 4 Press the Center key to disband the group The contacts in the group will not be deleted Edit a Group 1 From the home screen select Contacts and select the tab 2 Select a group and press the Center key 3 Select Edit group 4 Select the group name to edit it or ...

Page 56: ...56 the ringtone 5 Select Save NOTE To remove group members open a group in the tab and select Multi Select to choose members Then select Delete member OK ...

Page 57: ...r multimedia message Open an existing message thread to view the conversation you ve had with a certain number Sending a Message 1 On the Messages screen select New message 2 Add recipients by one of the following ways Select the To field and manually enter the recipient s number or the contact name If the phone presents a few suggestions select the one you want to add Select the To field and pres...

Page 58: ... add any attachment if you want to send a text message Otherwise you may be charged for a multimedia message Replying to a Message Messages you receive are appended to existing threads of the same number If the new message comes from a new number a new thread is created 1 On the Messages screen open the thread that has the message you want to reply to 2 Type your reply in the text box at the botto...

Page 59: ... for the message and edit the content if you want 5 Press the Center key or select SEND and then press the Center key Copying a Message You can copy text messages from the micro UIM card to the phone storage 1 On the Messages screen select Settings Text message SMS Manage SIM card messages 2 Select a message and select Copy to phone memory Changing Message Settings Select Settings in the Messages ...

Page 60: ...ect the view you prefer You can also select a day block in Month view and press the Center key to switch to Agenda view In Month view scroll up and down to see previous and future months In Week or Agenda view scroll left and right to see previous and future weeks days When you are viewing past or future days weeks or months select Today to quickly switch to today View Event Details In Agenda or W...

Page 61: ... delete or share 2 Open its details screen see View Event Details in this chapter 3 Do one of the following as you need To edit the event select Edit Press the Left soft key to save your changes To delete the event select Delete and press the Center key To share the event select Share and choose how to share Changing Calendar Settings To change the calendar settings open a calendar view Week Month...

Page 62: ...pp 2 Select Type URL to highlight the address box 3 Enter the address URL of a web page or enter terms you want to search for 4 Press the Center key to open the web page or search results NOTE Press the Right soft key if you want to stop opening the page You can also press the Right soft key to go back to the previous opened web page Setting the Homepage Your home page opens when you start Browser...

Page 63: ...the Browser app 2 Open the website you want to add to bookmarks 3 Select Add to bookmarks 4 Edit the title and URL if needed 5 Select Ok and press the Center key NOTE To view the bookmarks select Bookmarks in the Browser screen Viewing the Browsing History 1 Open the Browser app 2 Select History to view all the websites you have visited You can select one and press the Center key to open it ...

Page 64: ...64 Changing Browser Settings You can configure a number of settings to customize the way you browse the web To open the Browser settings screen select Settings in the browser screen ...

Page 65: ...e stored on the microSDHC card you have installed or in the phone storage You can copy them to your computer or access them in the Gallery app Capturing a Photo 1 From the home screen press the Camera key or select Camera 2 Aim the camera at the subject and make any necessary adjustment ...

Page 66: ...t key To switch between the camera and camcorder press the Left key NOTE You can press the Volume key to zoom in or out before taking pictures 3 Press the Center key or the Camera key to take a picture Recording a Video 1 From the home screen press the Camera key or select Camera 2 Press the Left key to switch to the camcorder The shutter button at the bottom of the display turns red 3 Aim the cam...

Page 67: ...ey again to stop recording Customizing Camera Camcorder Settings Before capturing a photo or a video you can select Settings to set the following camera and camcorder options Picture size Set the image size for your photo Video quality Set the quality for your video Shutter tone Turn on or off the shutter sound Photo auto review Select whether to review the picture after you shot it ...

Page 68: ...oll up and down to see them all To view album contents Select an album and press the Center key to view the pictures and videos it contains To share pictures or videos 1 Open an album 2 Select Multi select 3 Select the pictures or videos you want to share and press the Center key to highlight them 4 Select Share and select how you want to share them To delete albums pictures or videos 1 Open the G...

Page 69: ...lect 3 Select the items you want to delete and press the Center key to highlight them 4 Select Delete 5 Press the Center key to confirm Working With Pictures Select a picture in an album and press the Center key to view it ...

Page 70: ...key to see more pictures or videos Select Delete to delete the picture Select Share to share the picture Select Details to check file details Select Slideshow to browse the album contents in a slideshow Playing Videos 1 Open an album in the Gallery 2 Select the thumbnail of a video and press the Center key 3 Press the Center key again to start playing ...

Page 71: ...taloged according to the information stored in the files Now Playing If an audio file is being played select this option to open the playback screen All Songs View all music files on your phone Playlists View all music playlists you have created Albums Browse music files on your phone organized by the album name Playing Music Select a song in the music library and press the Center key to open the ...

Page 72: ...resume the playback press the Center key To skip songs press the Left key or the Right key To rewind or fast forward press and hold the Left key or the Right key To toggle repeat mode select Repeat and choose one mode To turn on or off shuffle select Shuffle and select On or Off To see the current playlist select Now Playing List ...

Page 73: ...that you can play the songs you like in the order you prefer Select a song and then select Add to playlist to add the song to a playlist or create a new playlist Select a playlist and then select Delete to delete it Select a playlist and then select Rename to rename it Open a playlist to view its content You can select Add Songs to add more songs to the playlist or select a song and select Remove ...

Page 74: ...in the video library and press the Center key to play it You can control the video or carry out other operations To pause or resume the playback press the Center key To skip to the previous or the next video press the Left key or the Right key To rewind or fast forward press and hold the Left key or the Right key To adjust the screen brightness select Brightness and then press the Up key or the Do...

Page 75: ... 1 Select Multi Select in the video library 2 Check the videos you want to delete 3 Select Delete and press the Center key to confirm Share Video Clips 1 Select Multi Select in the video library 2 Check the videos you want to share 3 Select Share and choose how you want to share them ...

Page 76: ...g to the radio the radio will be turned off Scanning and Saving Channels 1 Plug in a wired headset and select Multimedia FM Radio from the home screen 2 Select Scan Your phone scans for all available channels and saves them to the All channels list NOTE When you open the FM Radio app for the first time it will automatically scan for channels and show the All channels list You can also select All c...

Page 77: ...nnel 1 Open the FM Radio app and select All channels 2 Select a channel and select Delete 3 Press the Center key to delete it from the list Other Options To set your radio region FM radio frequency ranges differ in different regions Select FM frequency range to select the range you need NOTE If you change the frequency range previously saved channels are not shown until you switch back to the orig...

Page 78: ...rding During recording press the Center key to pause or continue the recording 3 Press the Left soft key to stop recording The memo is automatically saved Playing a Voice Memo 1 Select All Recordings from the Sound Recorder screen to see all recordings 2 Select a memo and press the Center key to play it NOTE Choose a memo and select Share Delete Rename Details to share delete or rename it or check...

Page 79: ...figure it or select New alarm to create a new alarm 3 Set up the alarm options such as time alarm days repeat snooze and alarm ringtone 4 Press the Left soft key to save and exit NOTE To enable or disable an existing alarm directly select the alarm and press the Center key to turn on or off the switch on the right side Check World Time Select the tab in the Clock app to check local time around the...

Page 80: ...calculation by pressing the Navigation keys and view the result by pressing the Center key NOTES Press the Clear key to clear inputs and results Press the Left soft key to reset all inputs and results Press the key to enter a decimal point Press the Vibration mode key to toggle the number between positive and negative Weather From the home screen select Tools Weather to check the weather of your c...

Page 81: ...the weather of your city and all added cities Press the Center key to refresh the weather Downloads The Downloads app keeps a record of the files you have downloaded From the home screen select Tools Downloads to check the record File Manager Quickly access all of your images videos audio clips and other types of files on your phone storage and the microSDHC card From the home screen select File M...

Page 82: ...82 Select folders and files and press the Center key to access stored items Select an item and select to access more options Select New folder to create a new folder in the current directory ...

Page 83: ... it If you select the General profile you can edit it by pressing the Left soft key You can adjust different types of volume see Adjusting Volume set up ringtone and notification sound see Changing Ringtone and Notification Sound or set system sounds see Turning On Off System Sounds General Settings Airplane Mode From the home screen select Settings General settings Airplane mode and press the Cen...

Page 84: ...ave location services enabled on your phone 1 Select the switch and press the Center key to turn location services on or off 2 When location is enabled select Mode and press the Center key to select location sources you want to use To get your accurate location choose High accuracy To save battery power and get approximate location choose Battery saving To use only GPS to pinpoint your location ch...

Page 85: ...gth of time of inactivity before the screen turns off automatically Keypad light Adjust how long the backlight for the keypad remains on Font size Set the font size of the text on the screen Date and Time From the home screen select Settings General settings Date time to set date time time zone and the time format You can also use network provided data Navigation Key Shortcuts From the home screen...

Page 86: ...t the speech synthesis engine you want to use or change its settings Speech rate Select how quickly you want the synthesizer to speak Listen to an example Play a brief sample of the speech synthesizer using your current settings Default language status Check whether the text to speech output feature supports the current system language Device Data Usage From the home screen select Settings Device ...

Page 87: ...ew the memory information of the internal phone storage and the microSDHC card Save location You can choose the default location for new data such as photos captured and voice recorded Select Phone or SD card to store items in the phone storage or the installed microSDHC card Erase SD card Format the installed microSDHC card Connect to PC From the home screen select Settings Device Connect to PC t...

Page 88: ...tion or select Software Update to check for the phone software updates Personal Security From the home screen select Settings Personal Security to configure options that help keep your phone and data safe Screen lock Disable the screen lock or enable it with PIN See Protecting Your Phone With Screen Lock Automatically lock Set the time needed for the lock protection to be activated after the scree...

Page 89: ...ot access the mobile phone network Contact your operator for a PIN Unlock Key PUK to restore the micro UIM card Anti Theft If your phone is lost or stolen you can use this feature to lock your phone erase all data in your phone or make the phone sound the alarm remotely See Protecting Your Phone With the Anti Theft Feature Reset From the home screen select Settings Personal Reset Factory data rese...

Page 90: ...ak at your current location for example in a basement or near a tall building because wireless transmissions cannot effectively reach it Move to a location where the network signal can be properly received The network is busy at the current time for example during peak times there may be too much network traffic to handle additional calls Avoid using the phone at such times or try again after wait...

Page 91: ...etwork link or phone line Unable to select certain features Your service provider does not support these features or you have not applied for services that provide these features Contact your service provider Cannot charge the battery The battery or battery charger is damaged Contact the dealer The phone s temperature is below 0 C or higher than 45 C Adjust the battery charging environment to avoi...

Page 92: ...ea where signaling is weak temporarily power off the phone The battery is depleted In high temperature environments battery life will be shortened Contact the dealer to change a new battery If you are not able to connect to the network the phone will continue to send out signals as it attempts to locate a base station Doing so consumes battery power and will consequently shorten standby time Chang...

Page 93: ... micro UIM card is inserted improperly Insert the micro UIM card properly There is debris on the micro UIM card contacts Use a soft dry cloth to clean the micro UIM card contacts Unable to connect to the network The micro UIM card is invalid Contact your service provider You are not within the network s service area Check the service area with your service provider The signal is poor Move to an op...

Page 94: ...ible solution PIN Code blocked You have entered an incorrect PIN code three consecutive times Contact your service provider If the service provider provides the micro UIM card s PUK code use the PUK code to unlock the micro UIM card ...

Page 95: ... least 15 mm away from your body while making calls Your phone may produce a bright or flashing light Small parts may cause choking Don t dispose of your phone in fire Your phone can produce a loud sound To prevent possible hearing damage do not listen at high volume levels for long periods Avoid contact with anything magnetic Avoid extreme temperatures ...

Page 96: ...uids Don t rely on your phone as a primary device for emergency communications Radio Frequency RF Energy This phone is designed and manufactured not to exceed the emission limits for exposure to radio frequency RF energy set by the Federal Communications Commission of the United States During SAR testing this device was set to transmit at its highest certified power level in all tested frequency b...

Page 97: ...th SAR for general population uncontrolled exposure limits in ANSI IEEE C95 1 1992 and had been tested in accordance with the measurement methods and procedures specified in IEEE1528 The FCC has granted an Equipment Authorization for this model phone with all reported SAR levels evaluated as in compliance with the FCC RF exposure guidelines SAR information on this model phone is on file with the F...

Page 98: ...was not tested and certified and using such body worn accessory should be avoided FCC Regulations This device complies with part 15 of the FCC Rules Operation is subject to the following two conditions 1 This device may not cause harmful interference and 2 this device must accept any interference received including interference that may cause undesired operation CAUTION Changes or modifications no...

Page 99: ...ful interference to radio or television reception which can be determined by turning the equipment off and on the user is encouraged to try to correct the interference by one or more of the following measures Reorient or relocate the receiving antenna Increase the separation between the equipment and receiver Connect the equipment into an outlet on a circuit different from that to which the receiv...

Page 100: ...es that are rated have the rating on their box or a label located on the box The ratings are not guarantees Results will vary depending on the user s hearing device and hearing loss If your hearing device happens to be vulnerable to interference you may not be able to use a rated phone successfully Trying out the phone with your hearing device is the best way to evaluate it for your personal needs...

Page 101: ... that not all hearing devices have telecoils in them Your phone meets the M4 T4 level rating Hearing devices may also be rated Your hearing device manufacturer or hearing health professional may help you find this rating For more information about FCC Hearing Aid Compatibility please go to http www fcc gov cgb dro CTIA Requirements Do not disassemble or open crush bend or deform puncture or shred ...

Page 102: ...EE Std 1725 Use of an unqualified battery may present a risk of fire explosion leakage or other hazard Promptly dispose of used batteries in accordance with local regulations Battery usage by children should be supervised Avoid dropping the phone or battery If the phone or battery is dropped especially on a hard surface and the user suspects damage take it to a service center for inspection Improp...

Page 103: ...perating the machinery in order to reduce the risk of an accident Product Handling General Statement on Handling and Use You alone are responsible for how you use your phone and any consequences of the use You must always switch off your phone wherever the use of a phone is prohibited Use of your phone is subject to safety measures designed to protect users and their environment Always treat your ...

Page 104: ...o bend your phone or its accessories Do not use harsh chemicals cleaning solvents or aerosols to clean the device or its accessories Do not paint your phone or its accessories Do not attempt to disassemble your phone or its accessories only authorized personnel can do so Do not expose or use your phone or its accessories in an environment with or that can reach extreme temperatures minimum 23 and ...

Page 105: ...t They could hurt themselves or others or could accidentally damage the phone Your phone contains small parts with sharp edges that may cause an injury or may become detached and create a choking hazard Demagnetization To avoid the risk of demagnetization do not allow electronic devices or magnetic media close to your phone for a long time Electrostatic Discharge ESD Do not touch the metallic conn...

Page 106: ...ll percentage of people may be susceptible to blackouts or seizures even if they have never had one before when exposed to flashing lights or light patterns such as when playing games or watching videos If you have experienced seizures or blackouts or have a family history of such occurrences please consult a physician To reduce the risk of blackouts or seizures you can use your phone in a well li...

Page 107: ...ns Therefore you should not rely solely on any wireless phone for emergency communications Loud Noise This phone is capable of producing loud noises which may damage your hearing Turn down the volume before using headphones Bluetooth headsets or other audio devices Phone Heating Your phone may become warm during charging and normal use Electrical Safety Accessories Use only approved accessories Do...

Page 108: ...vice or repair the phone or its accessories If your phone or its accessories has been submerged in water punctured or subjected to a severe fall do not use it until you have taken it to be checked at an authorized service center Radio Frequency Interference General Statement on Interference Care must be taken when using your phone in close proximity to personal medical devices such as pacemakers a...

Page 109: ... devices or when one is nearby The level of interference will depend on the type of hearing device and the distance from the interference source increasing the separation between them may reduce the interference You may also consult your hearing aid manufacturer to discuss alternatives Medical Equipment Switch off your wireless device when you are requested to do so in hospitals clinics or health ...

Page 110: ...s Stations and Explosive Atmospheres In locations with potentially explosive atmospheres obey all posted signs to turn off wireless devices such as your phone or other radio equipment Areas with potentially explosive atmospheres include fuelling areas below decks on boats fuel or chemical transfer or storage facilities areas where the air contains chemicals or particles such as grain dust or metal...

Page 111: ...sions 4 26 H x2 18 W x 0 73 D Weight 4 59 oz with battery Display 2 8 inch 240 320 Camera 2 MP Internal memory ROM 4 GB RAM 512 MB Removable memory card Supports microSDHC card up to 32GB Battery 1500 mAh Continuous idle time Up to 20 days Continuous talk time Up to 8 hours WAP browser version 2 0 HAC M4 T4 ...

Page 112: ...2 Bluetooth 4 0 NOTE The phone s talk time and idle time are based on ideal working environments The use of extended backlighting browser and network conditions can reduce battery life and talk idle time ...

Reviews: