

Zurn Industries, LLC | Specification Drainage Operation
1801 Pittsburgh Avenue, Erie, PA 16502, Ph. 855.663.9876
In Canada | Zurn Industries Limited
7900 Goreway Drive, Unit 10, Brampton, Ontario L6T 5W6, Ph. 877.892.5216
www.zurn.com
WARNING:
Cancer and Reproductive Harm - www.P65Warnings.ca.gov
ADVERTENCIA:
Cáncer y daño reproductivo - www.P65Warnings.ca.gov
AVERTISSEMENT:
Cancer et effets néfastes sur la reproduction -
www.P65Warnings.ca.gov
Rev. -
Date: 4/03/2020
C.N. No. 142533
Prod. | Dwg. No. C66 Page 1 OF 3
Z1231EZ
WALL-HUNG LAVATORY ADJUSTABLE CARRIER INSTALLATION INSTRUCTIONS
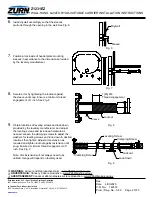
1
.
Drill holes in concrete and place anchors.
a. Two diagonally spaced anchors per foot
are required for correct installation.
b. Anchor holes for either 3/8 (A) or 1/2 (B)
(Furnished by others) See Fig.1
Note: Ensure using anchors with a minimum pullout
force of 980 lbs
2
.
Place carrier over anchors and secure with nuts
and washers
a. Torque to 25-35 ft-lbs
3.
Adjust the height of one header plate to desired
rough-in location per lavatory to be installed.
a. Hold header bracket in place
b. Loosen 4 (C) nuts on header plate
c. Loosen height adjustment bolt (D)
(on side of header)
d. Slide along upright to desired location
e. Hand tighten height adjustment bolt (D) ensuring
the header bracket does not deflect. See Fig. 3
4.
Adjust height of second header plate
a. Hold header bracket in place
b. Loosen 4 nuts (C in Fig 3) on header plate
c. Loosen height adjustment bolt (D in Fig 3)
(on side of header)
d. Place level on top of both header sleeves
and adjust height until level. See Fig 4
e. Hand tighten height adjustment bolt (D in Fig 3)
ensuring the header bracket does not deflect.
Optional - Use integrated pipe support bracket to
secure supply and drainage lines.
5.
Adjust width of the header brackets (E) per the
lavatory manufacturer’s recommendation for spacing
and tighten the 4 nuts (C) on the header bracket in a
star pattern to 30-35 ft-lbs.
Fig. 1
Fig. 3
Fig. 4
Fig. 5
B
B
A
A
Rough-in
Height
C
C
D
1
2
3
4
5
6
7
C
E
1
2
3
4
5
6
7
11
12
13
14
15
16
17
0
C
D
C
C
Rough-in
Height


