7)
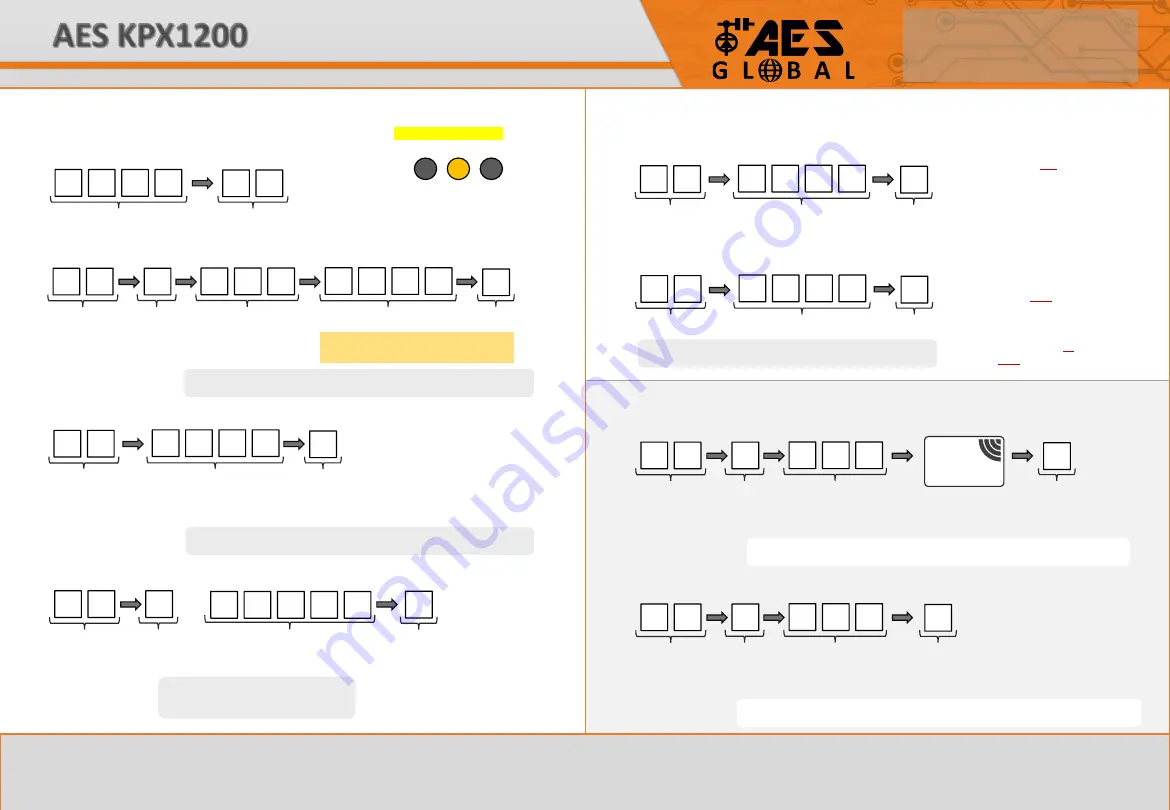
Adding a new PROX card or tag:
1 0
1
0 0 1
#
10
=
Relay 1
(1000 limit)
20
=
Relay 2
(100 limit)
30
=
Relay 3
(100 limit)
1
=
add
MEMORY LOCATION
000
to
999
= Relay 1
001
to
100
= Relay 2
001
to
100
= Relay 3
SWIPE PROX
CARD or TAG
VALIDATE
* This example will add a PROX card/tag to location
001
on
Relay
1
*
PROX CARD
6)
Change the programming code:
0 1
? ? ? ?
#
4-8 DIGIT CODE
VALIDATE
*
ALWAYS MAKE NOTE OF NEW CODE ONCE CHANGED
*
LOCATION
Note: If you set a 4-8 digit code then
user codes must also be the same
amount of digits.
Example: If you set a 6 digit
programming code all access codes
must also be 6 digits long.
4)
Change relay output times & modes:
5 1
0
#
0
=
LATCHING MODE
1
-
99999
=
MOMENTARY TRIGGER TIME
(
SECONDS
)
VALIDATE
Note: Setting the relay time to
0
will
change all codes for this output to
latching codes, re-enter same code
again to unlatch.
51
=
Relay 1
52
=
Relay 2
53
=
Relay 3
OR
9 9 9 9 9
5)
Adding a SUPER user code: (
1 MAX
)
0 2
? ? ? ?
#
‘SUPER’ CODE
VALIDATE
LOCATION
Note: You can add one SUPER code as an
optional feature which allows a single code
to operate all 3 outputs. To use input
SUPER code
followed by
#
then
1
,
2
or
3
to
select.
Example -
5555
#
2
KEYPAD PROGRAMMING CONTINUED
AES KPX1200
- Analog Keypad
* WARNING : DO NOT TURN OFF POWER WHILE THE KEYPAD IS IN PROGRAMMING MODE AS THIS MAY CORRUPT DATA *
KEYPAD PROGRAMMING
1)
Enter programming mode:
0 0 0 0
* *
DEFAULT PROGRAMMING CODE
ENTER
/
EXIT
PROGRAMMING
Note: Programming can only begin 60 seconds after powering the device on.
* UNLESS OVERRIDDEN *
3)
Delete
ALL
of the codes & cards saved in a relay group:
1 0
0 9 9 9
#
SUPER DELETE CODE
VALIDATE
* This example will delete
ALL
of the codes stored for
Relay
1
*
10
=
Relay 1
(1000 limit)
20
=
Relay 2
(100 limit)
30
=
Relay 3
(100 limit)
Note: Take care when deleting full
relay groups because once deleted
there is no way to restore these
previously stored codes to the
keypad.
The amber LED will remain
SOLID
once
you enter programming mode
successfully. Press ** again to leave
programming mode.
Note:
In the event that the programming code has been forgotten or changed by accident, a
DAP Reset
of the keypad can be performed
during the
60 second bootup phase
. Pressing the PTE during this time or replicating this by shorting
terminals
9
&
15
together with a jumper link the keypad will emit 2 short beeps if this step has been performed successfully. Then enter the
DAP
Code
(
D
irectly
A
ccess
P
rogramming Code)
(8080**)
on the front of the keypad as a
backdoor into programming mode which will allow you to now set a new programming code, as per
Step 6
above.
PROGRAMMING CODE NOT WORKING?
* For example:
‘
51
5
#
’
will set
Relay
1
to trigger for
5
seconds
*
2)
Adding and deleting a new keypad entry code:
1 0
2
0 0 0
? ? ? ?
#
10
=
Relay 1
(1000 limit)
20
=
Relay 2
(100 limit)
30
=
Relay 3
(100 limit)
2
=
add
5
=
delete
MEMORY LOCATION
000
to
999
= Relay 1
001
to
100
= Relay 2
001
to
100
= Relay 3
4-8 DIGIT CODE
VALIDATE
* This example will add code ‘
????
’ to location
000
on
Relay
1
*
Note:
After using ‘5’ to delete a code just type
the memory location followed by #
8)
Deleting a new PROX card or tag:
1 0
5
0 0 1
#
10
=
Relay 1
(1000 limit)
20
=
Relay 2
(100 limit)
30
=
Relay 3
(100 limit)
5
=
delete
MEMORY LOCATION
000
to
999
= Relay 1
001
to
100
= Relay 2
001
to
100
= Relay 3
VALIDATE
* This example will delete a PROX card/tag from location
001
on
Relay
1
*
Note: Keep in mind that keypad codes
and PROX card/tags must be saved in
their own separate memory locations.
If a keypad code is stored on location
035 this means a card cannot be added
to location 035.
(OPTIONAL PROGRAMMING FOR PROX MODELS ONLY)
STILL HAVING TROUBLE?
Find all of our support options such as Web Chat,
Full Manuals, Customer Helpline and more on
our website:
WWW
.
AESGLOBALONLINE
.
COM


