SGX-120L User Manual, rev2.0
Page 4 of 21
http://www.seetron.com/sgxmnl.htm
2002-11-13
Connecting Serial Input
The G12032 accepts serial data from RS-232 (±10-volt) or logic-level (+5-volt) sources. Although most
serial ports implement additional pins for handshaking purposes, the G12032 requires only the transmit
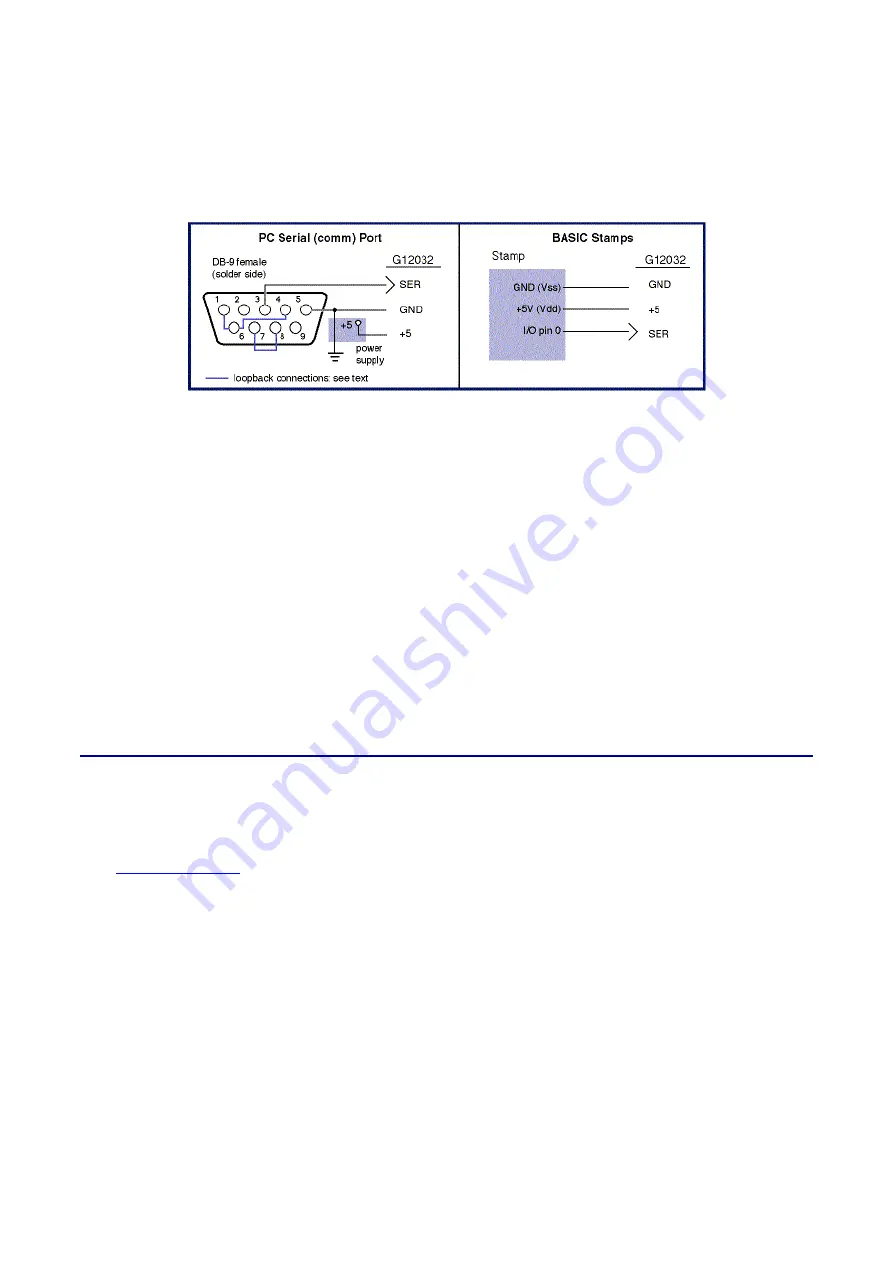
data (TxD) and signal ground (SG) lines. Connect these to SER and GND respectively. The figure below
shows typical hookups for standard PC-style serial ports and BASIC Stamp computers.
Figure 2. Connecting serial input.
The "loopback" connections shown in the PC comm port hookup serve to disable hardware handshaking.
Our BASIC example programs do not require these connections, but many terminal programs do. If the
software sending data returns a message to the effect of "timed out waiting for port" or "no serial device
detected," the loopback connections will probably cure the problem.
If you are using this display with a single-board computer, see the manufacturer's documentation for
information on connecting serial devices. If the serial output is logic-level (5V), make sure that it is
inverted. In terms of serial communication, this means that the stop-bit condition should be low (0V or
negative) and the start-bit condition should be high (3.5V or higher).
Display Contrast Control
The control marked contrast on the G12032 board sets the initial contrast of the LCD display. Contrast is
factory set, and should not require adjustment. The G12032's temperature-compensation circuit maintains
contrast throughout the operating range of 0° to 50°C (32° to 122°F). You may tweak the contrast setting
by turning this control
very slightly
while viewing an image on the display.
Getting Acquainted
The best way to get acquainted with the G12032 is to connect power and serial data as outlined in the
previous sections, boot up a terminal program (like the Windows Terminal accessory or Serial Sender
from
www.seetron.com
), and type some text and instructions. The text you type in your terminal software
will appear on the display. When you set up your terminal program, remember to
l
Set the program and the display for the same baud rate.
l
Configure the program for no parity, 8 data bits, 1 stop bit.
l
Turn off hardware handshaking.
l
Set the program for the com port to which the display is connected.
l
To see your typing on the PC monitor, set the program for "half duplex."
With the display powered and connected, anything you type in the terminal program will appear on the
LCD. If it does not, check the settings and connection. If text is garbled, chances are that the baud rate is
incorrect. As you send text to the display, characters print from left to right. When they reach the end of a
line, the next character appears at the beginning of the next line. When text reaches the end of the display
the next character appears at the top left position of the display.
The layout of the display depends on the font setting. The default font (as set from the factory) uses 6-by-
8-pixel characters that display in a 4-line-by-20-character format. Bear in mind that all instructions that
position the cursor (printing position) work in terms of the current font--even if a mixture of font sizes is
displayed on the screen. See the font instruction ESC-F for more information.


